Zugriff auf Nextcloud-Dateien über WebDAV
Nextcloud unterstützt das WebDAV-Protokoll vollständig. Das ermöglicht es Ihnen auf Ihre Daten zuzugreifen und diese zu synchronisieren. In diesem Kapitel erfahren Sie, wie Sie Linux, MacOS, Windows und mobile Geräte über WebDAV mit Ihrem Nextcloud-Server verbinden können. Bevor wir mit der Konfiguration von WebDAV beginnen, schauen wir uns die empfohlene Art und Weise an, wie Sie Client-Geräte mit Ihren Nextcloud-Servern verbinden können.
Bemerkung
In the following examples, you should replace example.com/nextcloud with the URL of your Nextcloud server (omit the directory part if the installation is in the root of your domain), and „USERNAME“ with the username of the connecting user.
Siehe WebDAV URL (unten links, Einstellungen) auf Ihrer Nextcloud.
Bemerkung
In the following examples, you must use an app-password for login, which you can generate in your security settings.
Nextcloud Desktop und mobile Clients
Der empfohlene Weg, einen Desktop-PC mit einem Nextcloud-Server zu synchronisieren, ist die Verwendung von Nextcloud/ownCloud-Synchronisationsclients. Sie können den Client so konfigurieren, dass er Dateien in einem beliebigen lokalen Verzeichnis speichert und Sie können wählen, mit welchen Verzeichnissen auf dem Nextcloud-Server synchronisiert werden soll. Der Client zeigt den aktuellen Verbindungsstatus an und protokolliert alle Aktivitäten, sodass Sie immer wissen, welche Remote-Dateien auf Ihren PC heruntergeladen wurden und ob die auf Ihrem lokalen PC erstellten und aktualisierten Dateien ordnungsgemäß mit dem Server synchronisiert sind.
Die empfohlene Methode zur Synchronisierung des Nextcloud Servers mit Android- und Apple iOS-Geräten ist die Verwendung der mobilen Apps.
Um Ihre mobile Anwendung mit einem Nextcloud-Server zu verbinden, verwenden Sie nur die Basis-URL und den Ordner:
example.com/nextcloud
Zusätzlich zu den von Nextcloud oder ownCloud bereitgestellten mobilen Apps können Sie andere Apps verwenden, um sich von Ihrem mobilen Gerät aus über WebDAV mit Nextcloud zu verbinden. WebDAV Navigator ist eine gute (proprietäre) Anwendung für Android-Geräte. `_ und `iPhones. Die zu verwendende URL lautet:
example.com/nextcloud/remote.php/dav/files/USERNAME/
WebDAV-Konfiguration
Wenn Sie es wünschen, können Sie Ihren Desktop-PC auch über das WebDAV-Protokoll mit Ihrem Nextcloud-Server verbinden, anstatt eine spezielle Client-Anwendung zu verwenden. Web Distributed Authoring and Versioning (WebDAV) ist eine Hypertext Transfer Protocol (HTTP)-Erweiterung, die das Erstellen, Lesen und Bearbeiten von Dateien auf Web-Servern erleichtert. Mit WebDAV können Sie auf Ihre Nextcloud-Freigaben unter Linux, MacOS und Windows auf die gleiche Weise wie auf jede andere Remote-Netzwerkfreigabe zugreifen und synchron bleiben.
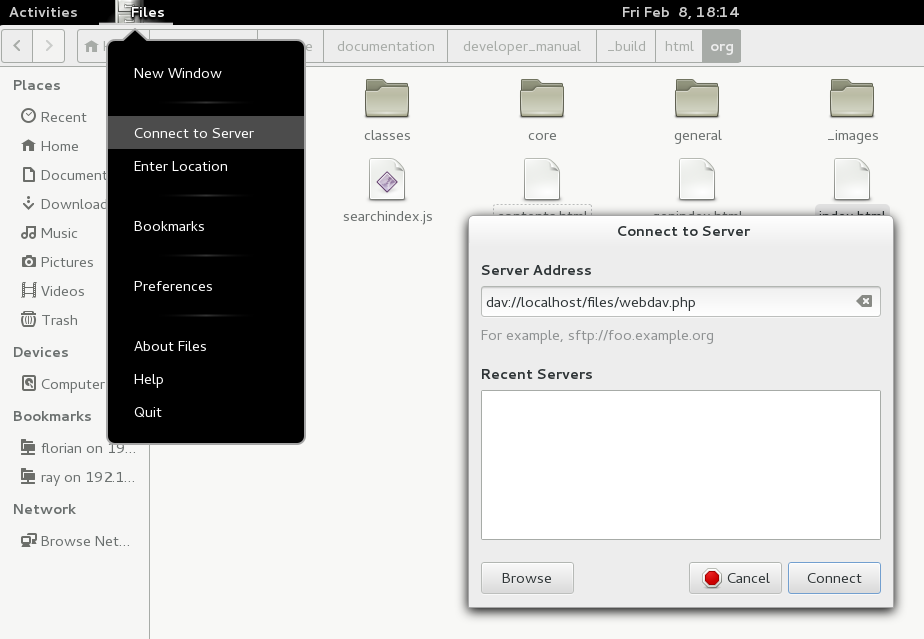
Zugriff auf Dateien unter Linux
Sie können auf Dateien in Linux-Betriebssystemen mit den folgenden Methoden zugreifen.
Nautilus-Dateimanager
When you configure your Nextcloud account in the GNOME Control Center, your files will automatically be mounted by Nautilus as a WebDAV share, unless you deselect file access.
You can also mount your Nextcloud files manually. Use the davs://
protocol to connect the Nautilus file manager to your Nextcloud
share:
davs://example.com/nextcloud/remote.php/dav/files/USERNAME/
Bemerkung
Wenn Ihre Serververbindung nicht HTTPS-gesichert ist, verwenden Sie dav:// anstelle von davs://.
Bemerkung
The same method works for other file managers that use GVfs, such as MATE’s Caja and Cinnamon’s Nepomuk.
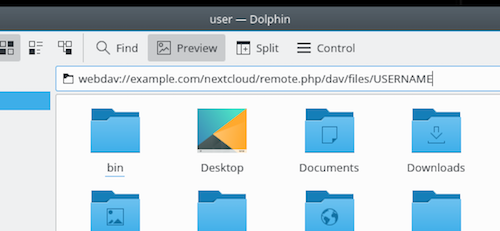
Zugriff auf Dateien mit KDE und Dolphin-Dateimanager
Um auf Ihre Nextcloud-Dateien mit dem Dolphin-Dateimanager in KDE zuzugreifen, verwenden Sie das webdav:// Protokoll:
webdav://example.com/nextcloud/remote.php/dav/files/USERNAME/
Sie können einen permanenten Link zu Ihrem Nextcloud-Server anlegen:
Öffnen Sie Dolphin und klicken Sie in der linken Spalte „Orte“ auf „Netzwerk“.
Klicken Sie auf das Symbol mit der Aufschrift Netzwerkordner hinzufügen. Der daraus resultierende Dialog sollte erscheinen, wobei WebDAV bereits ausgewählt ist.
Wenn WebDAV nicht ausgewählt ist, wählen Sie es aus.
Klicken Sie auf Weiter.
Geben Sie die folgenden Einstellungen ein:
Name: Der Name, den Sie im Lesezeichen Orte sehen möchten, z.B. Nextcloud.
User: The Nextcloud username you used to log in, for example admin.
Server: The Nextcloud domain name, for example example.com (without http:// before or directories afterwards).
Folder – Enter the path
nextcloud/remote.php/dav/files/USERNAME/.
(Optional) Check the „Create icon“ checkbox for a bookmark to appear in the Places column.
(Optional) Provide any special settings or an SSL certificate in the „Port & Encrypted“ checkbox.
Creating WebDAV mounts on the Linux command line
You can create WebDAV mounts from the Linux command line. This is useful if you prefer to access Nextcloud the same way as any other remote filesystem mount. The following example shows how to create a personal mount and have it mounted automatically every time you log in to your Linux computer.
Install the
davfs2WebDAV filesystem driver, which allows you to mount WebDAV shares just like any other remote filesystem. Use this command to install it on Debian/Ubuntu:apt-get install davfs2
Use this command to install it on CentOS, Fedora, and openSUSE:
yum install davfs2
Fügen Sie sich selbst zur
davfs2-Gruppe hinzu:usermod -aG davfs2 <username>
Then create a
nextclouddirectory in your home directory for the mountpoint, and.davfs2/for your personal configuration file:mkdir ~/nextcloud mkdir ~/.davfs2
Kopieren Sie
/etc/davfs2/secretsnach~/.davfs2:cp /etc/davfs2/secrets ~/.davfs2/secrets
Set yourself as the owner and make the permissions read-write owner only:
chown <linux_username>:<linux_username> ~/.davfs2/secrets
chmod 600 ~/.davfs2/secrets
Add your Nextcloud login credentials to the end of the
secretsfile, using your Nextcloud server URL and your Nextcloud username and password:https://example.com/nextcloud/remote.php/dav/files/USERNAME/ <username> <password> or $PathToMountPoint $USERNAME $PASSWORD for example /home/user/nextcloud john 1234
Add the mount information to
/etc/fstab:https://example.com/nextcloud/remote.php/dav/files/USERNAME/ /home/<linux_username>/nextcloud davfs user,rw,auto 0 0
Then test that it mounts and authenticates by running the following command. If you set it up correctly you won’t need root permissions:
mount ~/nextcloud
You should also be able to unmount it:
umount ~/nextcloud
Now every time you login to your Linux system your Nextcloud share should
automatically mount via WebDAV in your ~/nextcloud directory. If you prefer
to mount it manually, change auto to noauto in /etc/fstab.
Bekannte Probleme
Problem
Resource temporarily unavailable
Lösung
If you experience trouble when you create a file in the directory,
edit /etc/davfs2/davfs2.conf and add:
use_locks 0
Problem
Zertifikatswarnungen
Lösung
If you use a self-signed certificate, you will get a warning. To
change this, you need to configure davfs2 to recognize your certificate.
Copy mycertificate.pem to /etc/davfs2/certs/. Then edit
/etc/davfs2/davfs2.conf and uncomment the line servercert. Now add the
path of your certificate as in this example:
servercert /etc/davfs2/certs/mycertificate.pem
Accessing files using macOS
Bemerkung
The macOS Finder suffers from a series of implementation problems and should only be used if the Nextcloud server runs on Apache and mod_php, or Nginx 1.3.8+. Alternative macOS-compatible clients capable of accessing WebDAV shares include open source apps like Cyberduck (see instructions here) and Filezilla. Commercial clients include Mountain Duck, Forklift, Transmit, and Commander One.
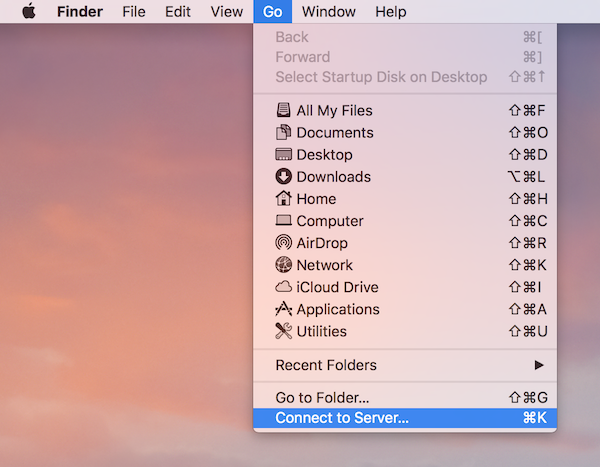
To access files through the macOS Finder:
From the Finder’s top menu bar, choose Go > Connect to Server…
When the Connect to Server… window opens, enter your Nextcloud server’s WebDAV address in the Server Address: field, ie:
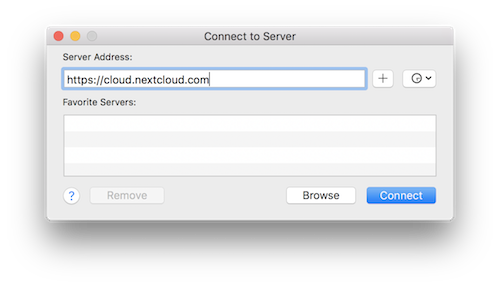
Click Connect. Your WebDAV server should appear on the Desktop as a shared disk drive.
Zugriff aus das Dateimenü mittels Microsoft Windows
If you use the native Windows implementation of WebDAV, you can map Nextcloud to a new drive using Windows Explorer. Mapping to a drive enables you to browse files stored on a Nextcloud server the way you would files stored in a mapped network drive.
Using this feature requires network connectivity. If you want to store your files offline, use the Desktop Client to sync all files on your Nextcloud to one or more directories of your local hard drive.
Bemerkung
Windows 10 now defaults to allow Basic Authentication if HTTPS is enabled prior to mapping your drive. On older versions of Windows, you must permit the use of Basic Authentication in the Windows Registry: launch „regedit“ and navigate to HKEY_LOCAL_MACHINESYSTEMCurrentControlSetServicesWebClientParameters. Create or edit the DWORD value „BasicAuthLevel“ (Windows Vista, 7 and 8) or „UseBasicAuth“ (Windows XP and Windows Server 2003) and set its value data to 1 for SSL connections. Value 0 means that Basic Authentication is disabled, a value of 2 allows both SSL and non-SSL connections (not recommended). Then exit Registry Editor, and restart the computer.
Mapping drives with the command line
The following example shows how to map a drive using the command line. To map the drive:
Open a command prompt in Windows.
Enter the following line in the command prompt to map to the computer Z drive:
net use Z: https://<drive_path>/remote.php/dav/files/USERNAME/ /user:youruser
yourpassword
where <drive_path> is the URL to your Nextcloud server.
For example: net use Z: https://example.com/nextcloud/remote.php/dav/files/USERNAME/
/user:youruser yourpassword
The computer maps the files of your Nextcloud account to the drive letter Z.
Bemerkung
Though not recommended, you can also mount the Nextcloud server using HTTP, leaving the connection unencrypted. If you plan to use HTTP connections on devices while in a public place, we strongly recommend using a VPN tunnel to provide the necessary security.
An alternative command syntax is:
net use Z: \\example.com@ssl\nextcloud\remote.php\dav /user:youruser
yourpassword
Mapping drives with Windows Explorer
To map a drive using the Microsoft Windows Explorer:
Migrate to your computer in Windows Explorer.
Right-click on Computer entry and select Map network drive… from the drop-down menu.
Choose a local network drive to which you want to map Nextcloud.
Specify the address to your Nextcloud instance, followed by /remote.php/dav/files/USERNAME/.
For example:
https://example.com/nextcloud/remote.php/dav/files/USERNAME/
Bemerkung
For SSL protected servers, check Reconnect at sign-in to ensure that the mapping is persistent upon subsequent reboots. If you want to connect to the Nextcloud server as a different user, check Connect using different credentials.
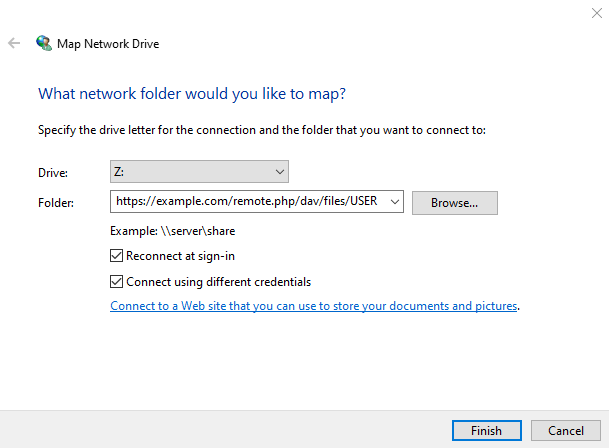
Click the
Finishbutton.
Windows Explorer maps the network drive, making your Nextcloud instance available.
Accessing files using Cyberduck
Cyberduck is an open source FTP and SFTP, WebDAV, OpenStack Swift, and Amazon S3 browser designed for file transfers on macOS and Windows.
Bemerkung
This example uses Cyberduck version 4.2.1.
To use Cyberduck:
Specify a server without any leading protocol information. For example:
example.com
2. Specify the appropriate port. The port you choose depends on whether or not your Nextcloud server supports SSL. Cyberduck requires that you select a different connection type if you plan to use SSL. For example:
80 (für WebDAV)
443 (für WebDAV (HTTPS/SSL))
3. Use the ‚More Options‘ drop-down menu to add the rest of your WebDAV URL into the ‚Path‘ field. For example:
remote.php/dav/files/USERNAME/
Now Cyberduck enables file access to the Nextcloud server.
Bekannte Probleme
Problem
Windows does not connect using HTTPS.
Lösung 1
The Windows WebDAV Client might not support Server Name Indication (SNI) on encrypted connections. If you encounter an error mounting an SSL-encrypted Nextcloud instance, contact your provider about assigning a dedicated IP address for your SSL-based server.
Lösung 2
The Windows WebDAV Client might not support TLSv1.1 / TLSv1.2 connections. If you have restricted your server config to only provide TLSv1.1 and above the connection to your server might fail. Please refer to the WinHTTP documentation for further information.
Problem
You receive the following error message: Error 0x800700DF: The file size exceeds the limit allowed and cannot be saved.
Lösung
Windows limits the maximum size a file transferred from or to a WebDAV share may have. You can increase the value FileSizeLimitInBytes in HKEY_LOCAL_MACHINE\SYSTEM\CurrentControlSet\Services\WebClient\Parameters by clicking on Modify.
To increase the limit to the maximum value of 4GB, select Decimal, enter a value of 4294967295, and reboot Windows or restart the WebClient service.
Problem
Accessing your files from Microsoft Office via WebDAV fails.
Lösung
Known problems and their solutions are documented in the KB2123563 article.
Problem
Cannot map Nextcloud as a WebDAV drive in Windows using self-signed certificate.
Lösung
Go to the your Nextcloud instance via your favorite Web browser.
Click through until you get to the certificate error in the browser status line.
View the cert, then from the Details tab, select Copy to File.
Save to the desktop with an arbitrary name, for example
myNextcloud.pem.Start, Run, MMC.
File, Add/Remove Snap-In.
Select Certificates, Click Add, My User Account, then Finish, then OK.
Dig down to Trust Root Certification Authorities, Certificates.
Right-Click Certificate, Select All Tasks, Import.
Select the Save Cert from the Desktop.
Select Place all Certificates in the following Store, Click Browse,
Check the Box that says Show Physical Stores, Expand out Trusted Root Certification Authorities, and select Local Computer there, click OK, Complete the Import.
Check the list to make sure it shows up. You will probably need to Refresh before you see it. Exit MMC.
Open Browser, select Tools, Delete Browsing History.
Select all but In Private Filtering Data, complete.
Go to Internet Options, Content Tab, Clear SSL State.
Close browser, then re-open and test.
Problem
You cannot download more than 50 MB or upload large files when the upload takes longer than 30 minutes using Web Client in Windows 7.
Lösung
Workarounds are documented in the KB2668751 article.
Accessing files using cURL
Since WebDAV is an extension of HTTP cURL can be used to script file operations.
To create a folder with the current date as name:
$ curl -u user:pass -X MKCOL "https://example.com/nextcloud/remote.php/dav/files/USERNAME/$(date '+%d-%b-%Y')"
To upload a file error.log into that directory:
$ curl -u user:pass -T error.log "https://example.com/nextcloud/remote.php/dav/files/USERNAME/$(date '+%d-%b-%Y')/error.log"
Um eine Datei zu verschieben:
$ curl -u user:pass -X MOVE --header 'Destination: https://example.com/nextcloud/remote.php/dav/files/USERNAME/target.jpg' https://example.com/nextcloud/remote.php/dav/files/USERNAME/source.jpg
To get the properties of files in the root folder:
    $ curl -X PROPFIND -H "Depth: 1" -u user:pass https://example.com/nextcloud/remote.php/dav/files/USERNAME/ | xml_pp
    <?xml version="1.0" encoding="utf-8"?>
<d:multistatus xmlns:d="DAV:" xmlns:oc="http://nextcloud.org/ns" xmlns:s="http://sabredav.org/ns">
  <d:response>
    <d:href>/nextcloud/remote.php/dav/files/USERNAME/</d:href>
    <d:propstat>
      <d:prop>
        <d:getlastmodified>Tue, 13 Oct 2015 17:07:45 GMT</d:getlastmodified>
        <d:resourcetype>
          <d:collection/>
        </d:resourcetype>
        <d:quota-used-bytes>163</d:quota-used-bytes>
        <d:quota-available-bytes>11802275840</d:quota-available-bytes>
        <d:getetag>"561d3a6139d05"</d:getetag>
      </d:prop>
      <d:status>HTTP/1.1 200 OK</d:status>
    </d:propstat>
  </d:response>
  <d:response>
    <d:href>/nextcloud/remote.php/dav/files/USERNAME/welcome.txt</d:href>
    <d:propstat>
      <d:prop>
        <d:getlastmodified>Tue, 13 Oct 2015 17:07:35 GMT</d:getlastmodified>
        <d:getcontentlength>163</d:getcontentlength>
        <d:resourcetype/>
        <d:getetag>"47465fae667b2d0fee154f5e17d1f0f1"</d:getetag>
        <d:getcontenttype>text/plain</d:getcontenttype>
      </d:prop>
      <d:status>HTTP/1.1 200 OK</d:status>
    </d:propstat>
  </d:response>
</d:multistatus>