Utiliser l’application Agenda
Note
The Calendar app comes installed with Nextcloud Hub by default, but can be disabled. Please ask your Administrator for it.
L’application Nextcloud Agenda fonctionne de la même façon que les autres applications d’agendas avec lesquelles vous pouvez synchroniser vos événements et calendriers Nextcloud.
When you first access the Calendar app, a default first calendar will be created for you.
Gestion de vos agendas
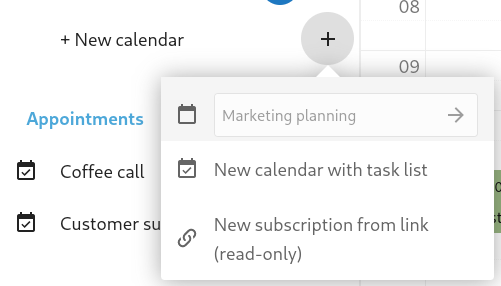
Créer un nouvel agenda
If you plan on setting up a new calendar without transferring any old data from your previous calendar, creating a new calendar is the way you should go.
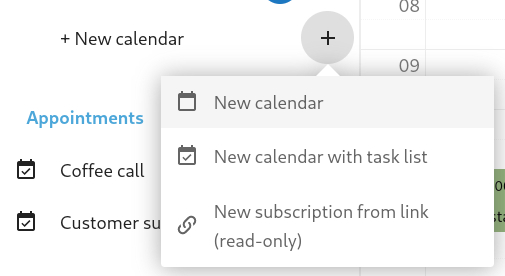
Cliquer sur « Nouvel Agenda » dans le barre latérale.
Type in a name for your new calendar, e.g. « Work », « Home » or « Marketing planning ».
Après avoir cliqué la case de vérification, votre nouvel agenda est crée et peut être synchronisé sur vos appareils, avec les nouveaux événements et partagé avec vos amis et collègues
Importer un agenda
Si vous voulez transférer vos agendas et leurs évènements dans votre instance Netxcloud, le meilleur moyen est de les importer.

Cliquez sur l’icône roue dentée
Paramètres & Importationen bas à gauche.Après avoir cliqué sur
+ Importer un agenda, vous pouvez sélectionner un ou plusieurs fichiers de calendrier à téléverser depuis votre appareil.L’envoi du fichier peut prendre un certain temps en fonction de la taille de l’agenda importé.
Note
L’application Agenda de Nextcloud prend uniquement en charge les fichiers .ics compatibles iCalendar, conformément à la RFC 5545.
Edit, Export or Delete a Calendar
Parfois vous désirez changer la couleur ou le nom d’un agenda déjà importé ou créé. Vous pouvez aussi vouloir l’exporter vers votre disque local ou le supprimer de manière définitive
Note
Noter que la suppression d’un agenda est une action irréverssible. Après sa suppression, il n’y a aucun moyen de restaurer l’agenda à moins que vous disposiez d’une sauvegarde locale.
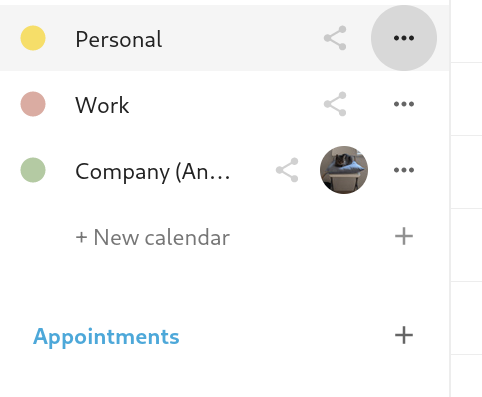
Cliquer sur le menu Trois Petits Points de l’agenda sélectionné
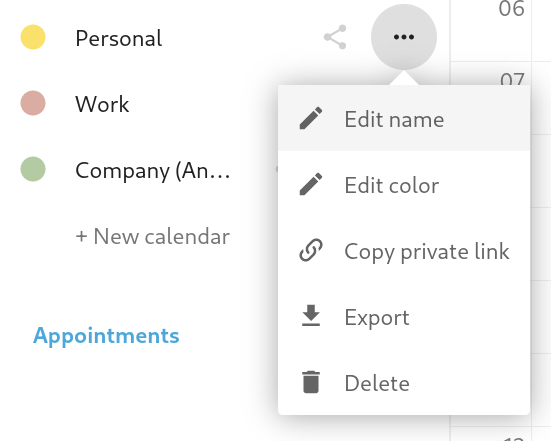
Click on Edit name, Edit color, Export or Delete.
Publier un agenda
Les agendas peuvent être publiés via un lien public pour les rendre accessibles (en lecture seule) à des utilisateurs externes. Vous pouvez créer un lien public en ouvrant le menu Partage d’agenda et cliquer sur « + » en face de « Lien de Partage ». Une fois créé, vous pouvez copier le lien public dans votre presse-papier ou l’envoyer par mail.
Il y a aussi un « code d’insertion » qui fournit un iframe HTML pour insérer votre calendrier dans des pages publics
Plusieurs agendas peuvent être partagés en ajoutant leur identifiant unique à la fin d’un lien interne. L’identifiant unique peut être trouvé à la fin du lien de partage de chaque agenda. L’adresse complète ressemble à « https://cloud.exemple.com/index.php/apps/agenda/lien interne/1 - 2 -3
To change the default view or date of an embedded calendar, you need to provide an URL that looks like https://cloud.example.com/index.php/apps/calendar/embed/<token>/<view>/<date>.
In this url you need to replace the following variables:
<token>with the calendar’s token,<view>with one ofmonth,week,day,listMonth,listWeek,listDay. The default view ismonthand the normally used list islistMonth,« 1 » avec « maintenant » ou toute autre date avec le format suivant « 2 - 3 - 4 « (par ex. « 2019-12-28 « ).
On the public page, users are able to get the subscription link for the calendar and export the whole calendar directly.
S’abonner à un agenda
Vous pouvez accéder à des agendas Ical dans Nextcloud. Par le support du protocole d’interopérabilité (RFC 5545) nous assurons la compatibilité du calendrier Nextcloud avec ceux de Google d’Apple Icloud et bien d’autres calendriers de serveurs, de sorte que vous pouvez faire des échanges entre calendriers y compris celui de liens d’un agenda publié sur d’autre instances de Nextcloud, comme décrit ci-dessus.
Cliquer sur « + Nouvel abonnement « dans le panneau latéral à gauche.
Saisir ou coller le lien d’un agenda partagé auquel vous voulez vous abonner.
Terminé. Vos abonnements à un agenda seront mis à jour de manière régulière.
Note
Les abonnements sont rafraichis chaque semaine par défaut. Votre adminstrateur peut changer ce paramétrage
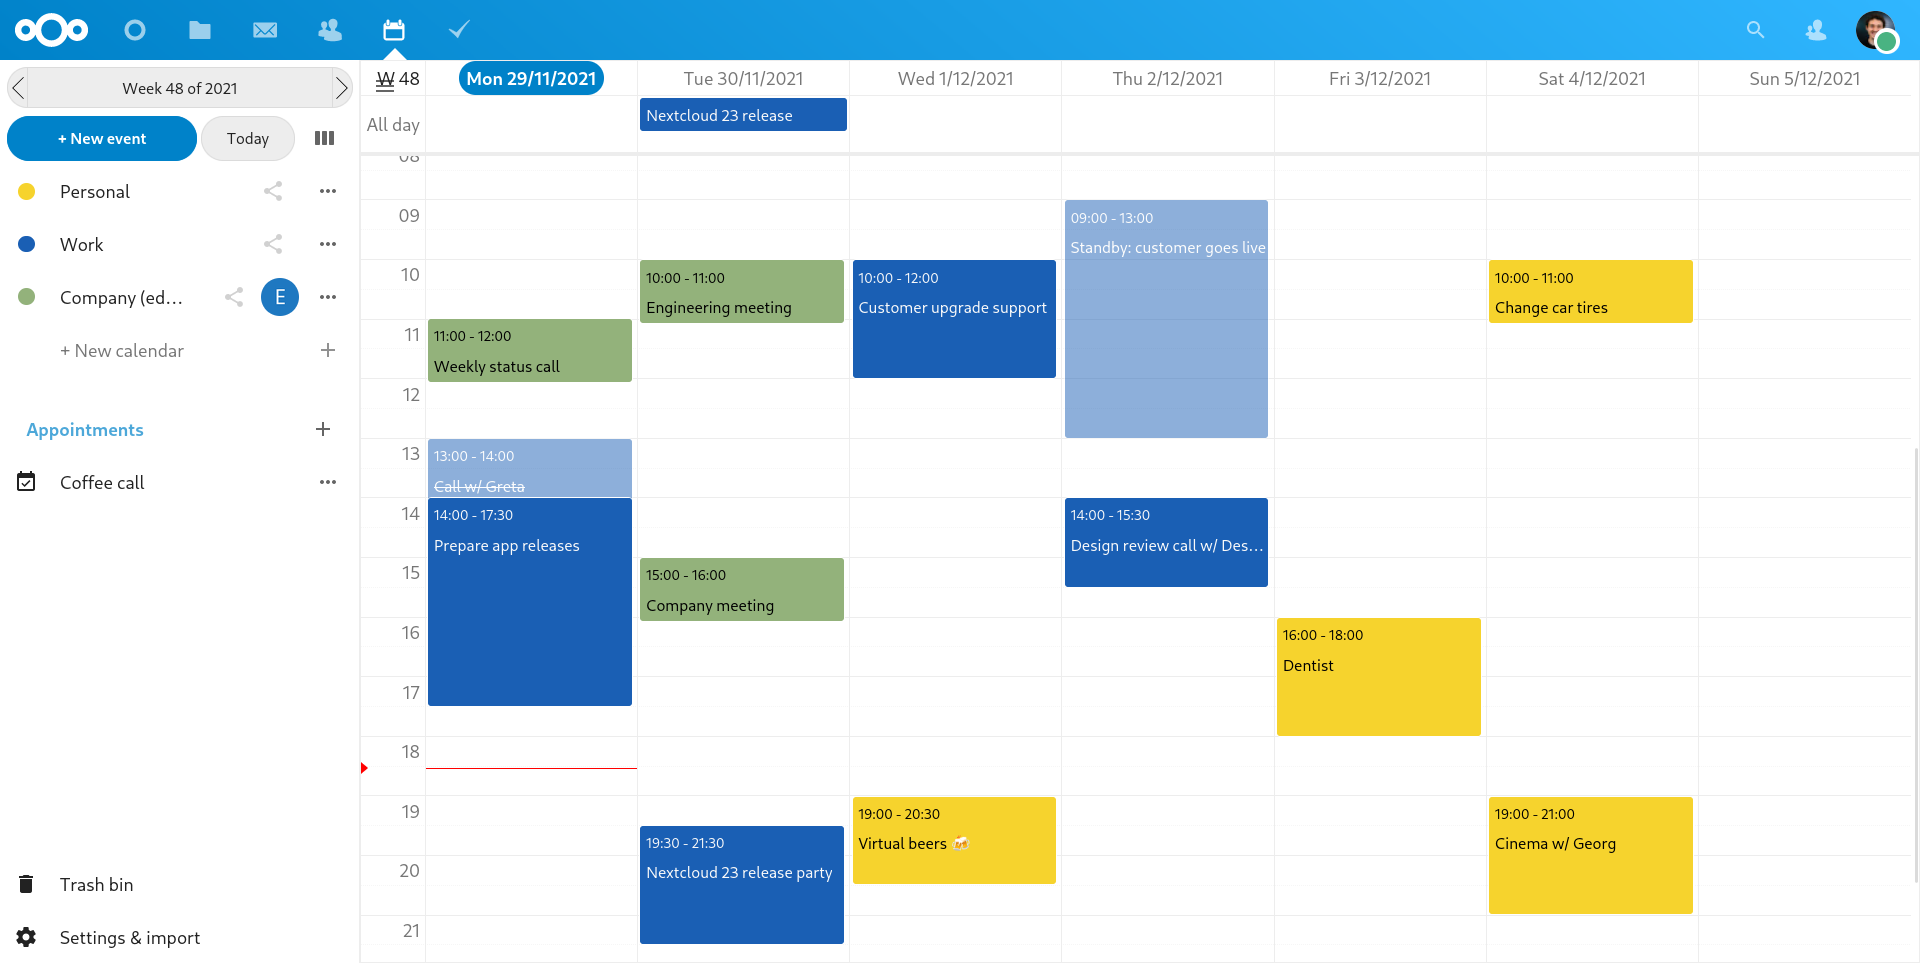
Gérer les évènements
Créer un nouvel évènement
Les événements peuvent être créés en cliquant dans la zone du jour de l’évènement. Dans la vue journalière ou hebdomadaire, cliquer, tirer el relâcher le curseur dans la zone ou l’évènement se réalisera
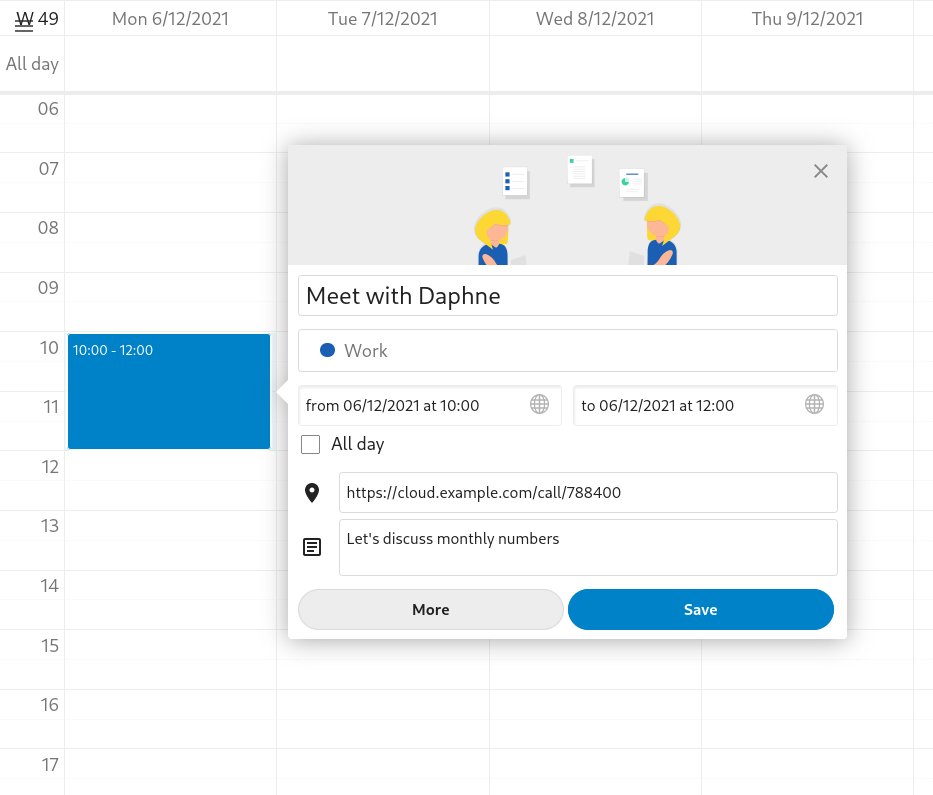
The month-view only requires a single click into the area of the target day.
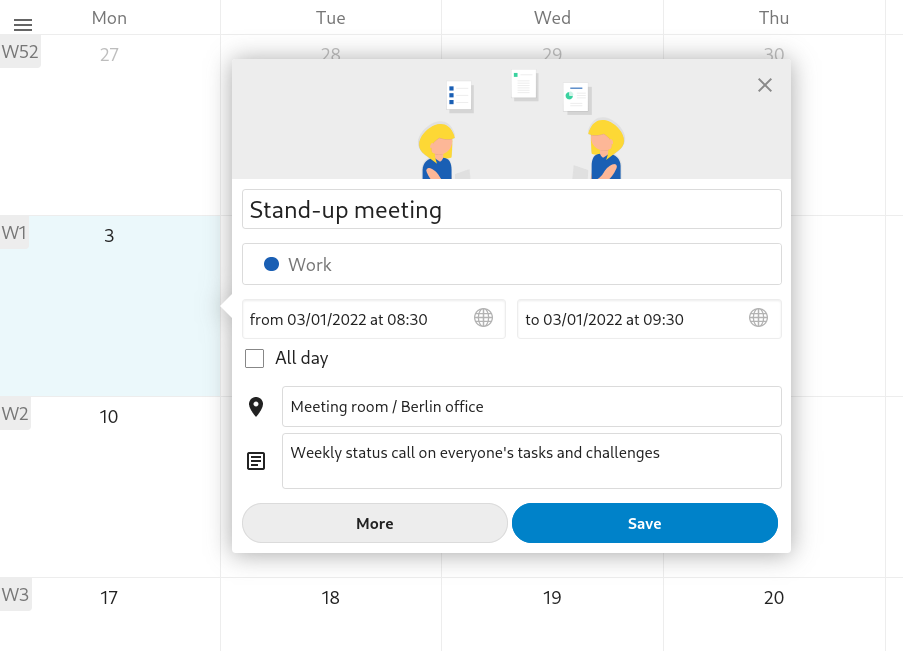
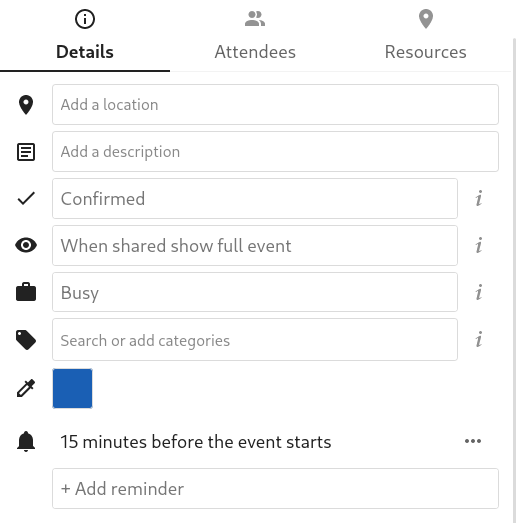
After that, you can type in the event’s name (e.g. Meeting with Lukas), choose the calendar in which you want to save the event to (e.g. Personal, Work), check and concretize the time span or set the event as an all-day event. Optionally you can specify a location and a description.
If you want to edit advanced details such as the Attendees or Reminders, or if you
want to set the event as a repeating-event, click on the More button to open the advanced
sidebar editor.
Note
If you always want to open the advanced sidebar editor instead of the
simple event editor popup, you can set a Skip simple event
editor checkmark in the Settings & Import section of the app.
Clicking on the blue Create button will finally create the event.
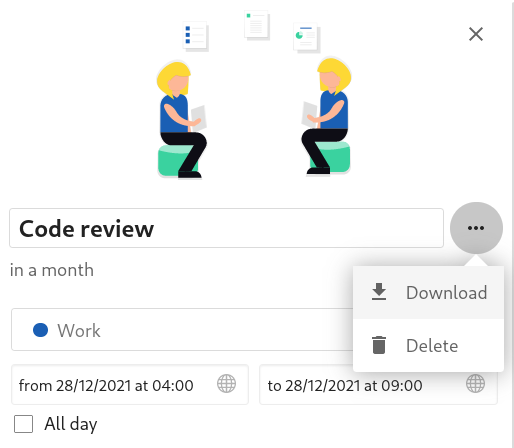
Edit or delete an event
Pour modifier ou supprimer un évènement spécifique, sélectionnez l’évènement. Ensuite, vous pourrez modifier tous les détails de l’évènement et ouvrir l’éditeur avancé de la barre latérale par un clic sur « Plus…. ».
Clicking on the Update button will update the event. To cancel your changes, click on the close icon on top right of the popup or sidebar editor.
Si vous ouvrez le panneau latéral et cliquez sur le menu des 3 points en face du nom de l’évènement, vous avez une option pour exporter l’évènement comme fichier .ics ou de supprimer l’évènement de votre agenda.
Astuce
If you delete events they will go into your trash bin. You can restore accidentally deleted events there.
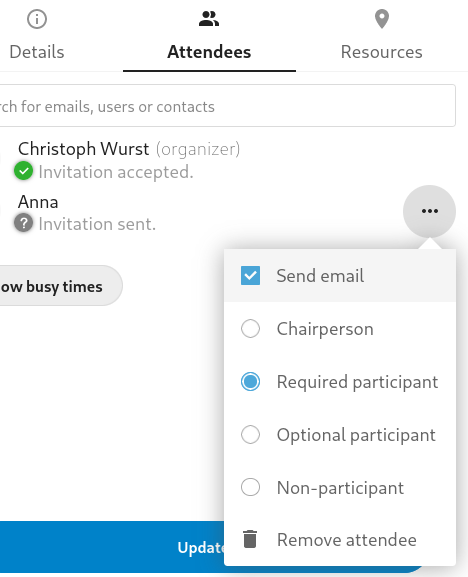
Inviter des participants à un évènement
You may add attendees to an event to let them know they’re invited. They will receive an email invitation and will be able to confirm or cancel their participation to the event. Attendees may be other users on your Nextcloud instances, contacts in your address books and direct email addresses. You may also change the level of participation per attendees, or disable the email information for a specific attendee.
Astuce
When adding other Nextcloud users as attendees to an event, you may access their free-busy information if available, helping you determine when the best time slot for your event is. Set your working hours to let others know when you are available. Free-busy information is only available for other users on the same Nextcloud instance.
Attention
Only the calendar owner can send out invitations. The sharees are not able to do that, whether they have write access to the event’s calendar or not.
Attention
The server administration needs to setup the e-mail server in the Basic settings tab, as this mail will be used to send invitations.
Assign rooms and resources to an event
Similar to attendees you can add rooms and resources to your events. The system will make sure that each room and resource is booked without conflict. The first time a user adds the room or resource to an event, it will show as accepted. Any further events at overlapping times will show the room or resource as rejected.
Note
Rooms and resources are not managed by Nextcloud itself and the Calendar app will not allow you to add or change a resource. Your Administrator has to install and possibly configure resource back ends before you can use them as a user.
Set up reminders
You can set up reminders to be notified before an event occurs. Currently supported notification methods are:
Notifications par mail
Notifications par Nextcloud
Vous pouvez définir des rappels relatifs à la survenance de l’évènement ou à une date spécifique
Note
Seul le propriétaire de l’agenda et les personnes ou groupes avec lesquels l’agenda a été partagé avec des accès en écriture recevront des notifications. Si vous ne recevez aucunes notifications et que vous pensez devoir en recevoir, votre Adminsitrateur a peut-être désactivé cette option sur le serveur.
Note
Si l’agenda est synchronisé avec des appareils mobiles ou d’autres clients tiers, les notifications peuvent apparaître sur ceux-ci.
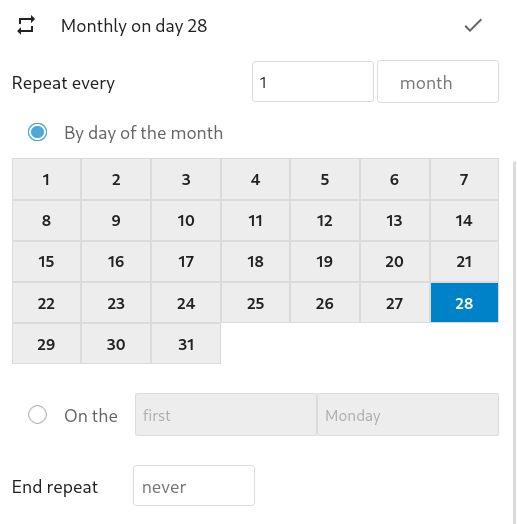
Ajouter des options de récurrence
Un évènement peut être défini comme récurrent, de sorte qu’il se reproduit chaque jour, semaine, mois ou année. Des règles spécifiques peuvent être paramétrées pour définir quel jour de la semaine l’évènement se produit ou d’autres règles plus complexes, telles que chaque quatrième Mercredi de chaque mois.
Vous pouvez aussi paramétrer quand la réccurrence se termine.
Trash bin
If you delete events, tasks or a calendar in Calendar, your data is not gone yet. Instead, those items will be collected in a trash bin. This offers you to undo a deletion. After a period which defaults to 30 days (your administration may have changed this setting), those items will be deleted permanently. You can also permanently delete items earlier if you wish.

The Empty trash bin buttons will wipe all trash bin contents in one step.
Astuce
The trash bin is only accessible from the Calendar app. Any connected application or app won’t be able to display its contents. However, events, tasks and calendars deleted in connected applications or app will also end up in the trash bin.
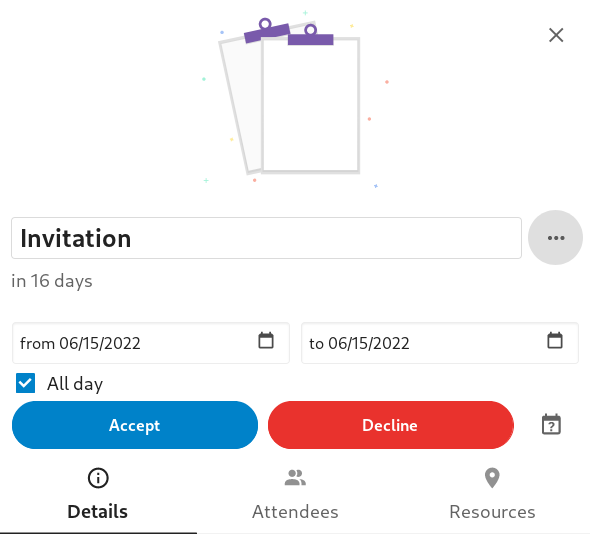
Responding to invitations
You can directly respond to invitations inside the app. Click on the event and select your participation status. You can respond to an invitation by accepting, declining or accepting tentatively.
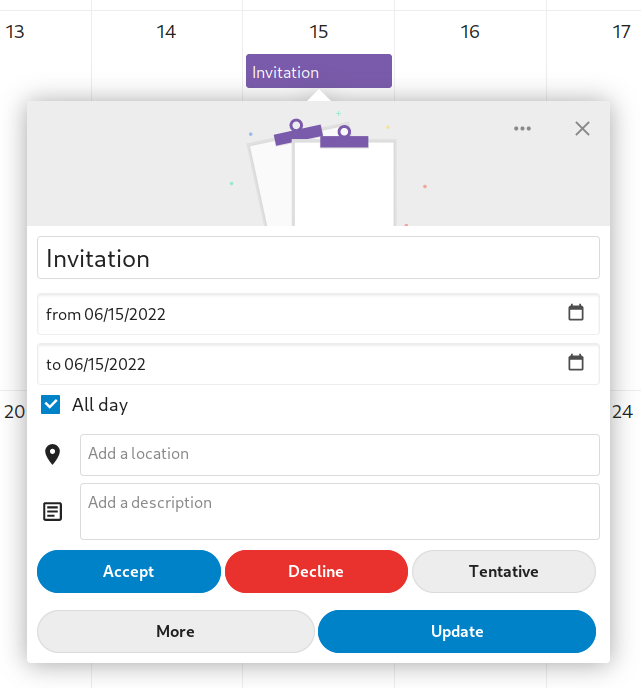
You can respond to an invitation from the sidebar too.
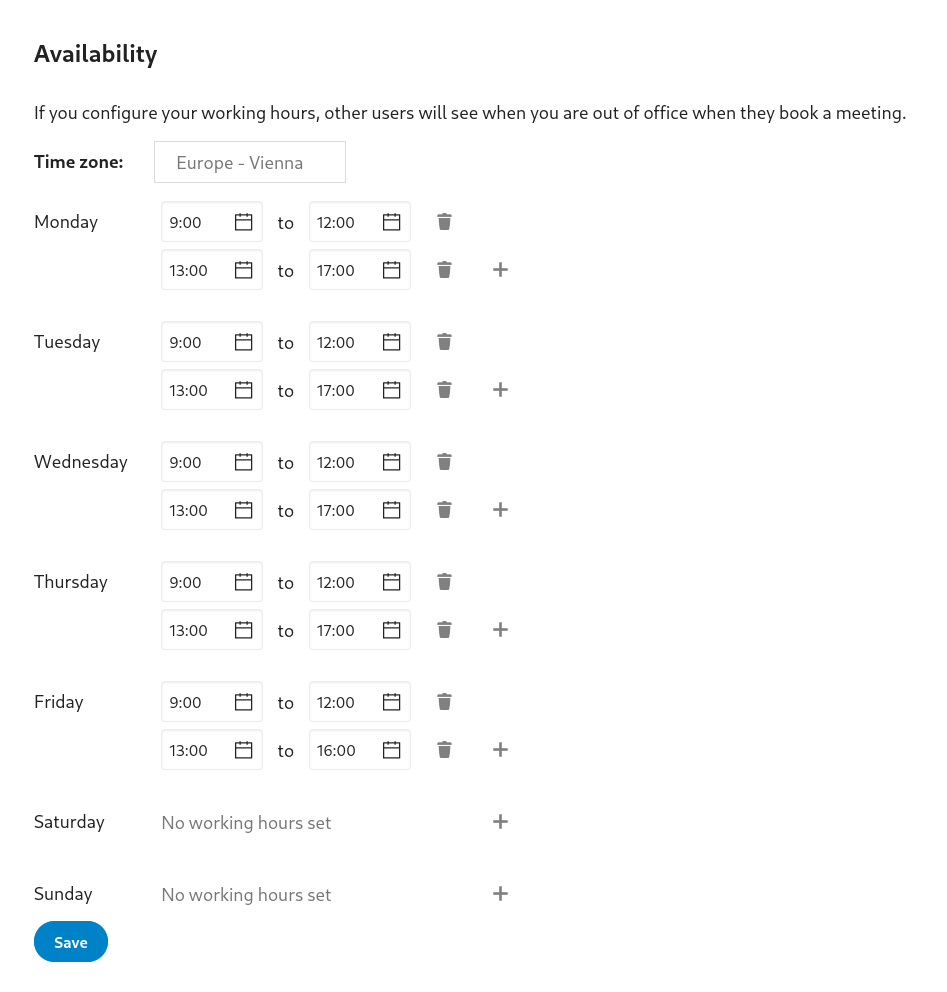
Availability (Working Hours)
The general availability independent of scheduled events can be set in the groupware settings of Nextcloud. These settings will be reflected in the free-busy view when you schedule a meeting with other people in Calendar. Some connected clients like Thunderbird will show this data as well.
Agenda des anniversaires
L’agenda des Anniversaires est un agenda généré automatiquement en recherchant les dates anniversaires de vos contacts. La seule manière pour modifier cet agenda est de renseigner la date d’anniversaire de vos contacts. Vous ne pouvez pas modifier directement cet agenda à partir de l’application Agenda.
Note
Si vous ne voyez pas l’agenda des Anniversaires, votre Adminstrateur a peut-être désactivé cette option sur le serveur.
Appointments
As of Calendar v3 the app can generate appointment slots which other Nextcloud users but also people without an account on the instance can book. Appointments offer fine-granular control over when you are possibly free to meet up. This can eliminate the need to send emails back and forth to settle on a date and time.
In this section we’ll use the term organizer for the person who owns the calendar and sets up appointment slots. The attendee is the person who books one of the slots.
Creating an appointment configuration
As an organizer of appointments you open the main Calendar web UI. In the left sidebar you’ll find a section for appointments, were you can open the dialogue to create a new one.
One of the basic infos of every appointment is a title describing what the appointment is about, e.g. « One-on-one » when a user wants to offer colleagues a personal call. The duration of the appointment can be picked from a predefined list. Next, you can set the desired increment. The increment is the rate at which possible slots are available. For example, you could have one hour long slots, but you give them away at 30 minute increments so an attendee can book at 9:00AM but also at 9:30AM. Optional infos about location and a description give the attendees some more context.
Every booked appointment will be written into one of your calendars, so you can chose which one that should be. Only slots that do not conflict with existing events in your calendars will be shown to attendees.
Appointments can be public or private. Public appointments can be discovered through the profile page of a Nextcloud user. Private appointments are only accessible to the people who receive the secret URL.
The organizer of an appointment can specify at which times of the week it’s generally possible to book a slot. This could be the working hours but also any other customized schedule.
Some appointments require time to prepare, e.g. when you meet at a venue and you have to drive there. The organizer can chose to select a time duration that must be free. Only slots that do not conflict with other events during the preparation time will be available. Moreover there is the option to specify a time after each appointment that has to be free.
To prevent an attendee from booking too short notice it’s possible to configure how soon the next possible appointment might take place.
Setting a maximum number of slots per day can limit how many appointments are possibly booked by attendees.
The configured appointment will then be listed in the left sidebar. You can copy its link and share it with the target attendees, or let them discover your public appointment via the profile page.
Booking an appointment
The booking page shows an attendee the title, location, description and length of an appointment. For a selected day there will be a list with all the possible time slots. On days with no available slots, too many conflicts or a reached daily maximum limit of already booked appointments, the list might be empty.
For the booking users have to enter a name and an email address. Optionally they can also add a comment.
To verify that the email is valid, a confirmation email will be sent. Only after clicking the confirmation link from the email the appointment booking will be finished. Until then the time slot might also be booked by another user who confirms their booking earlier. The system will detect the conflict and offer to pick a new time slot.
Working with the booked appointment
Once the booking is done, the organizer will find an event in their calendar with the appointment details and the attendee. As with any other event that has attendees, changes and cancellations will trigger a notification to the attendee’s email.
If attendees wish to cancel the appointment they have to get in contact with the organizer, so that the organizer can cancel or even delete the event.