Grundlagen von Nextcloud Talk
Mit Nextcloud Talk können Sie auf Ihrem eigenen Server chatten und Videoanrufe führen.
Getting started
Chats and calls take place in conversations. You can create any number of conversations. There are different types of conversations:
1. Private (one-to-one) conversations
This is where you have a private chat or call with another Talk user.
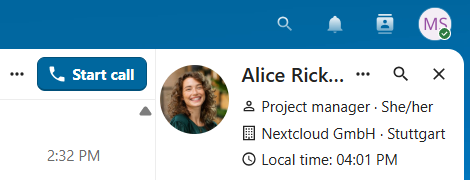
In content sidebar, you can find additional information about the person you are chatting with, such as their email address, phone number, or other details they have shared in their profile.
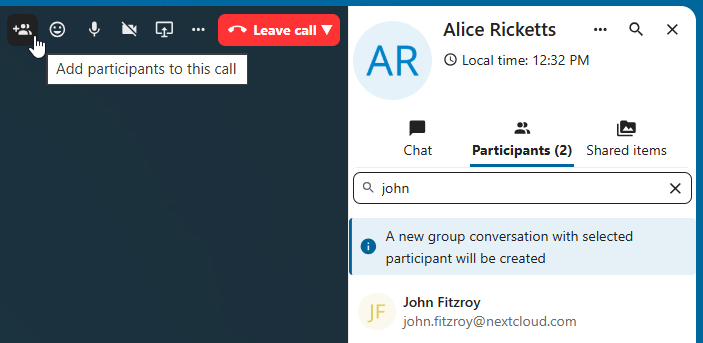
Nobody except you and the other person can see this conversation or join a call in it. You can extend an ongoing call to a new group conversation by adding more people. Call will be continued there without interruption.
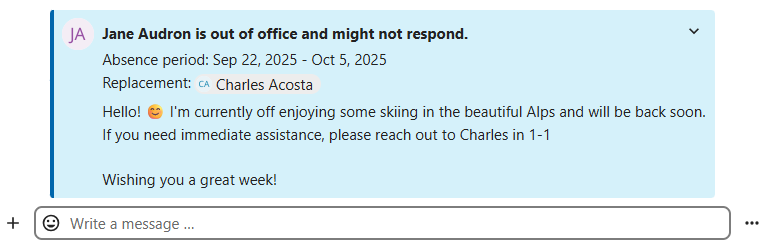
If a user becomes unavailable and set an out-of-office status in Personal settings > Availability, you will find additional information in this conversation, such as provided description, absence date, or their replacement person.
2. Group conversations
A group conversation can have any number of people in it.
You can add internal users, email guests, groups or teams to a group conversation upon creation, or when it already exists, via the Participants tab.
A group conversation can be shared with a public link, so guests can join a chat and a call. It can also be opened to registered users (or users from ‚Guests‘ app), so they can discover and join this conversation.
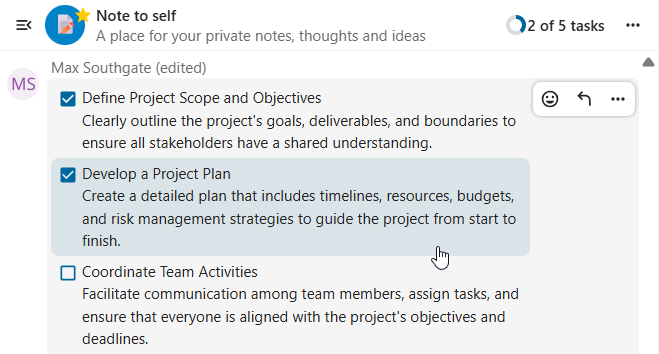
3. Note to self
This is a special conversation with yourself. Messages here do not have a limit for editing or deletion. You can use it to:
Take notes: write down ideas, reminders, or important information you want to keep handy.
Create to-do lists: use Markdown syntax to create checklists for tasks you need to complete.
Forward messages from other chat: use the message menu to forward important messages from other conversations to your Note to self.
4. Disposable conversations
These conversations cover some special cases and exist for a limited period of time. Retention period can be configured by an instance administration:
Instant meetings: these conversations can be created for quick, ad-hoc meetings. They can be started instantly from the Talk Dashboard.
Event conversations: these are created when set as an event location by Calendar app.
Phone conversations: these are dedicated for SIP dial-in & dial-out phone calls (requires a SIP gateway).
Video verification: these are created, when someone tries to access a public link, protected by password with video verification (deleted instantly after call ends).

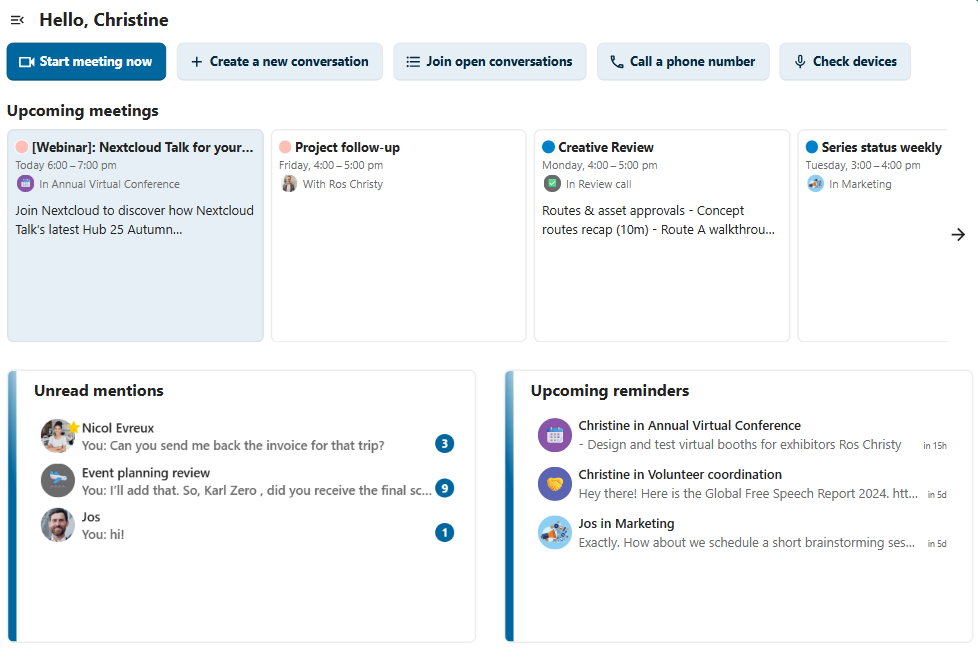
Talk Dashboard
The Talk Dashboard is your central hub for managing and accessing your conversations. It provides an overview of your:
Unread mentions and messages in private chats;
Message reminders, scheduled to be tackled on later;
Scheduled meetings, with event details and shortcut buttons to join them;
Shortcut actions to create new conversations, join open ones, or quickly check your media devices.
Einen Chat erstellen
You can create a private (one-to-one) chat by searching for the name of a user, a group or a team and clicking it. For a single user, a conversation is immediately created and you can start your chat. For a group or circle you get to pick a name and settings before you create the conversation and add the participants.

If you want to create a custom group conversation, click the button next to the search field and filters button and then on Create a new conversation.

Sie können dann einen Namen für die Unterhaltung auswählen, eine Beschreibung hinzufügen und einen Avatar dafür einrichten (mit hochgeladenem Foto oder Emoji). Weiter können Sie auswählen, ob die Unterhaltung für externe Benutzer geöffnet sein soll und ob andere Benutzer auf dem Server diese sehen und dem Gespräch beitreten können.

Im zweiten Schritt fügen Sie die Teilnehmer hinzu und stellen die Unterhaltung fertig.

After confirmation you will be redirected to the new conversation and can start communicating right away.

Alle offenen Unterhaltungen anzeigen
You can view all the conversations that you can join by clicking the button next to the search field and filters button and then on Join open conversations.

Filtern Sie Ihre Unterhaltungen
You can filter your conversations using the filter button next to the search field. There are several options for filtering: 1. Unread mentions: view unread private conversations, or group conversations, where you have been mentioned. 2. Unread messages: view unread messages in all conversations you are a part of. 2. Event conversations: view all conversations, created for upcoming or past events.

Anschließend können Sie den Filter im Filtermenü löschen.

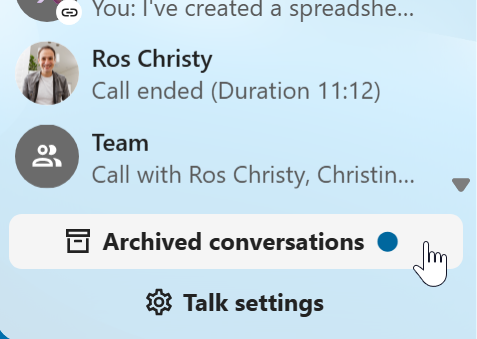
Archive conversations
You can archive conversations that you no longer need to see in your main conversation list. When a conversation is archived, it will be moved to the Archived conversations section.
An archived conversation will not appear in your main conversation list, but it will still align with notification level set in its settings.
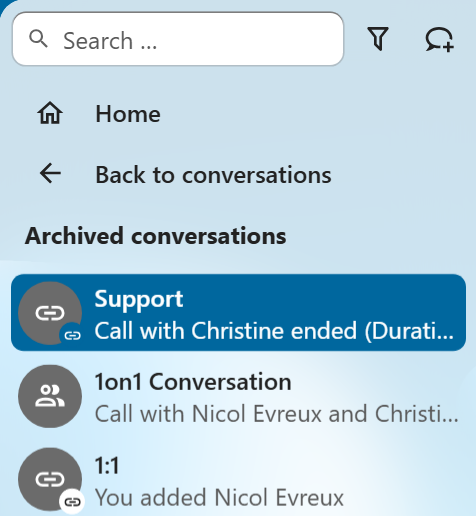
The list is accessible from the button at the bottom of the navigation bar.
Dateien in einem Chat teilen
Sie können Dateien in einem Chat auf drei Arten teilen.
Erstens können Sie die Dateien einfach per Drag’n’Drop in den Chat ziehen.

Zweitens können Sie eine Datei aus Ihren Nextcloud-Dateien oder einem Dateimanager auswählen, indem Sie auf die kleine Büroklammer klicken und auswählen, aus welchem Ordner Sie die Datei holen möchten.


You can add more files until you are done and decide to share the files. You can also add a text caption to your shared files, providing a brief description or context.

Alle Benutzer können auf die Dateien klicken, um sie anzusehen, zu bearbeiten oder herunterzuladen, unabhängig davon, ob sie ein Benutzerkonto haben. Für Benutzer mit einem Konto wird die Datei automatisch freigegeben, während sie für externe Gastnutzer als öffentlicher Link freigegeben wird.

Emoji einfügen
Sie können Emojis mit der Auswahlfunktion auf der linken Seite des Texteingabefelds hinzufügen.

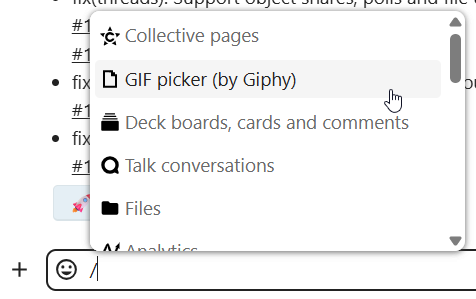
Smart Picker
Smart picker shortcut makes it easier to insert links, files, or other content into your conversations. Just choose the type of content you want to insert (files, Talk conversations, Deck cards, GIFs, etc.) You can also type / in the chat input to open the selector.
Editing messages
You can edit messages and captions to file shares up to 6 hours after sending.

Using Markdown
You can enhance your messages with a markdown syntax support. See list for usage:
Headings and dividers
# Heading 1
## Heading 2
### Heading 3
#### Heading 4
##### Heading 5
###### Heading 6

Heading
===
Normal text
***
Normal text
Inline decorations
**bold text** __bold text__
*italicized text* _italicized text_
`inline code` ``inline code``
```
.code-block {
  display: pre;
}
```
Lists
1. Ordered list
2. Ordered list

* Unordered list
- Unordered list
+ Unordered list
Quotes
> blockquote
second line of blockquote
Task lists
- [ ] task to be done
- [x] completed task
Tables
Column A | Column B
-- | --
Data A | Data B
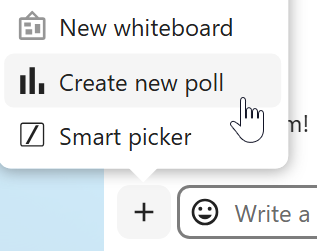
Polls in chat
You can create a poll in groups chats from the new message additional actions.
A poll has two settings:
Anonymous polls: Participants cannot see who voted for which option.
Allow multiple choices: Participants can select more than one option.
You can also import polls for auto-fill and export polls as JSON files to save it locally.
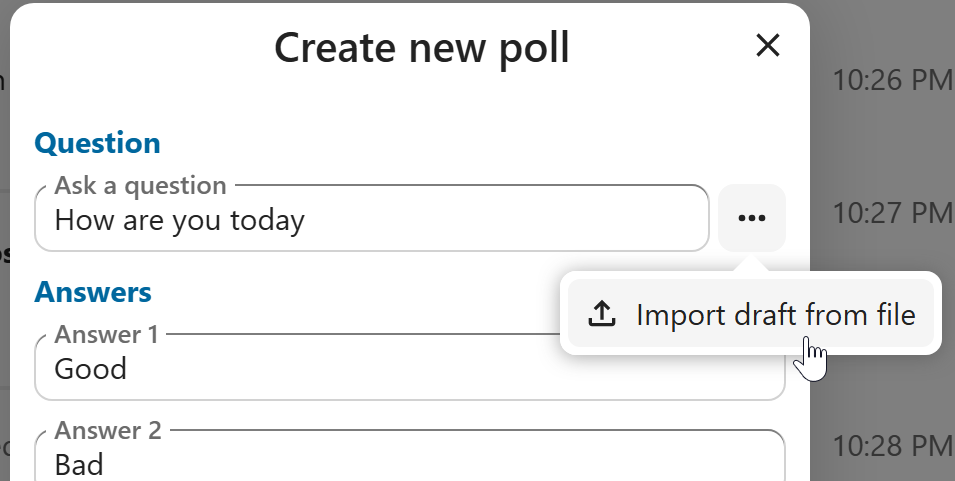
Closing poll is possible from the poll dialog.
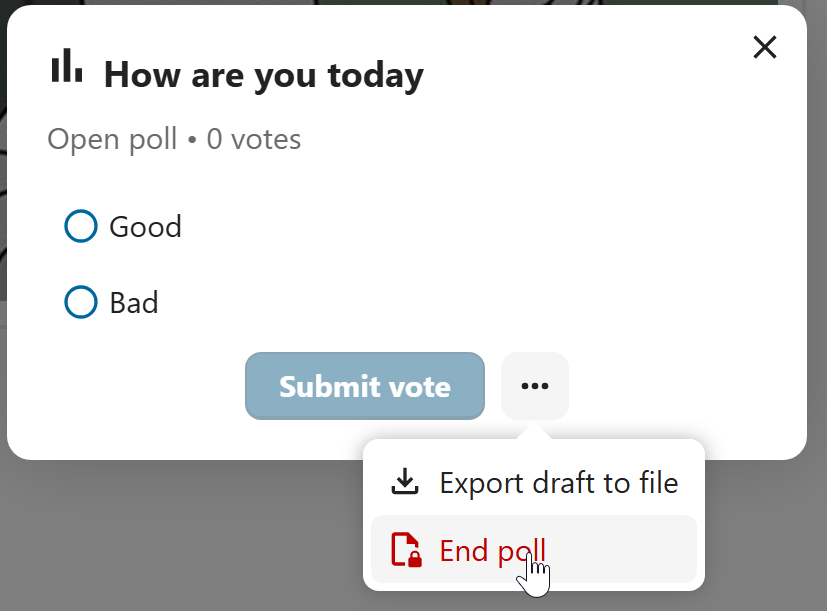
As a moderator, you can create the poll directly or you can save it as a draft to edit it later.
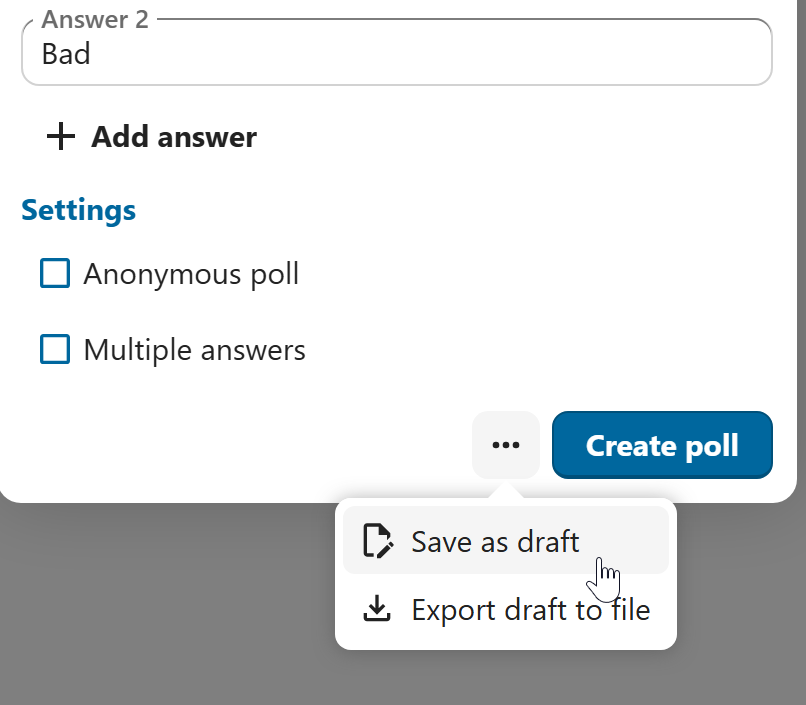
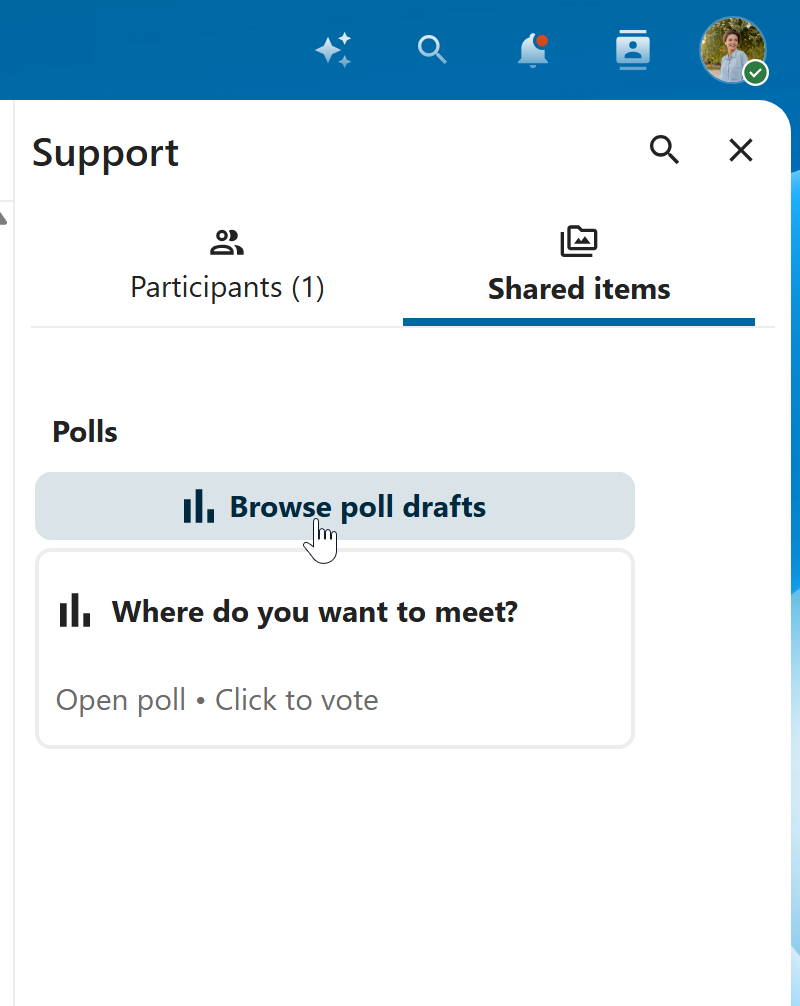
You can find poll drafts in Shared items tab or next to the poll title input field.
Setting reminder on messages
You can set reminders on specific messages. If there’s an important message you want to be notified about later, simply hover over it and click on the reminder icon.

In the submenu, you can select an appropriate time to receive a notification later.

Auf Nachrichten antworten und mehr
Sie können auf eine Nachricht antworten, indem Sie den Pfeil benutzen, der erscheint, wenn Sie den Mauszeiger über eine Nachricht bewegen.

In the ... menu you can also choose to reply privately. This will open a one-to-one chat.

Hier können Sie auch einen direkten Link zu der Nachricht erstellen oder sie als ungelesen markieren, so dass Sie beim nächsten Mal, wenn Sie den Chat betreten, dorthin zurückblättern können. Wenn es sich um eine Datei handelt, können Sie die Datei unter Dateien anzeigen.
Silent messages
If you don’t want to disturb anyone in the middle of the night, there is a silent mode for chatting. While it is enabled, other participants will not receive notifications from your messages.

Eine Unterhaltung verwalten
Sie sind immer Moderator in Ihrer neuen Unterhaltung. In der Teilnehmerliste auf der rechten Seite können Sie andere Teilnehmer über das Menü ... rechts neben ihrem Benutzernamen zu Moderatoren ernennen, ihnen benutzerdefinierte Berechtigungen zuweisen oder sie aus der Unterhaltung entfernen.
Durch das Ändern der Berechtigungen eines Benutzers, der einer öffentlichen Konversation beigetreten ist, wird dieser auch dauerhaft zur Konversation hinzugefügt.

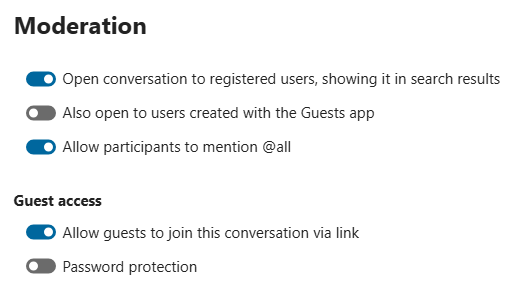
Moderatoren können die Unterhaltung konfigurieren. Wählen Sie Unterhaltungseinstellungen aus dem Menü ... der Unterhaltung oben, um auf die Einstellungen zuzugreifen.

Hier können Sie die Beschreibung, den Gastzugang, ob die Unterhaltung für andere auf dem Server sichtbar ist, und mehr konfigurieren.

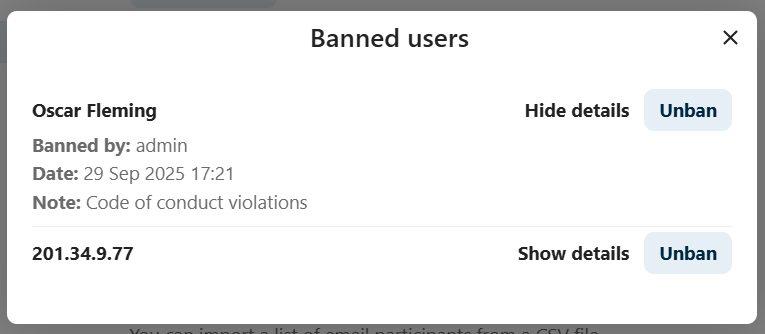
Ban participants
To help keep discussions safe and under control, moderators can ban participants from conversations. It could be internal users or guests (in this case their IP-addresse will additionally be banned).
In the participants list, select the user or guest you, and click Remove participant.
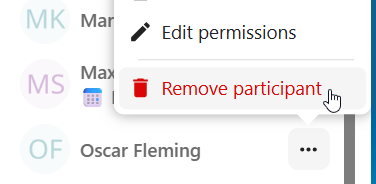
There, toggle checkbox Also ban from this conversation and provide a reason for the ban. The banned user will be removed and prevented from rejoining.
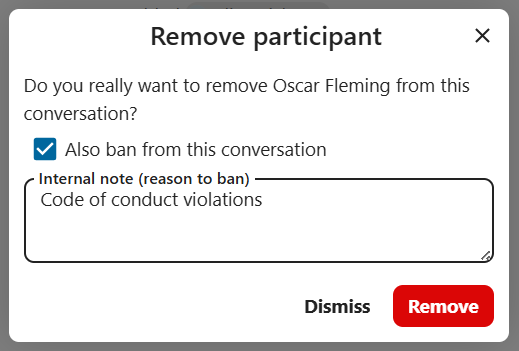
You can later find the list of banned users in the Moderation section of conversation settings.
Here, you can see the reason for the ban and revert it if needed.
Messages expiration
A moderator can configure message expiration under the Conversation settings within the Moderation section. Once a message reaches its expiration time, it is automatically removed from the conversation.
The available expiration durations are 1 hour, 8 hours, 1 day, 1 week, 4 weeks, or never (which is the default setting).

Einen Anruf beginnen
Wenn Sie sich in einer Unterhaltung befinden, können Sie jederzeit über die Schaltfläche Anruf starten einen Anruf starten. Andere Teilnehmer werden benachrichtigt und können dem Anruf beitreten.

Wenn bereits jemand anderes einen Anruf gestartet hat, ändert sich die Schaltfläche in eine grüne Schaltfläche Anruf beitreten.

Während eines Anrufs können Sie Ihr Mikrofon stummschalten und Ihr Video mit den Schaltflächen auf der rechten Seite der oberen Leiste deaktivieren oder mit den Tastenkombinationen M zum Stummschalten von Audio und V zum Deaktivieren von Video verwenden. Sie können auch die Leertaste verwenden, um die Stummschaltung zu aktivieren. Wenn Sie stummgeschaltet sind, können Sie durch Drücken der Leertaste die Stummschaltung aufheben, so dass Sie sprechen können, bis Sie die Leertaste loslassen. Wenn die Stummschaltung aufgehoben ist, werden Sie durch Drücken der Leertaste stummgeschaltet, bis Sie die Leertaste loslassen.
Mit dem kleinen Pfeil über dem Videostream können Sie Ihr Video ausblenden (nützlich bei einer Bildschirmfreigabe). Mit dem kleinen Pfeil können Sie es wieder einblenden.
Sie können auf Ihre Einstellungen zugreifen und eine andere Webcam, ein anderes Mikrofon und andere Einstellungen im Menü ... in der oberen Leiste auswählen.

From media settings dialog, you can also change the background of your video.

Weitere Einstellungen können Sie im Dialog Unterhaltungseinstellungen ändern.

Eine Bildschirmfreigabe starten
You can click the monitor icon on your video stream to share your screen. Depending on your browser, you will get the option to share a monitor, an application window or a single browser tab. If video from your camera is also available, other participants will see it in a small presenter view next to the screen share.

You can zoom in and out of the shared screen with mouse wheel, double click or touchpad gestures.
Die Ansicht in einem Anruf wechseln
Sie können die Ansicht während eines Anrufs mit dem kleinen Vier-Block-Symbol oben rechts zwischen der Sprecheransicht und der Kachelansicht wechseln. In der Rasteransicht werden alle Personen gleich groß angezeigt. Wenn die Personen nicht auf den Bildschirm passen, werden links und rechts Schaltflächen angezeigt, mit denen Sie navigieren können.

Die Sprecheransicht zeigt den Sprecher groß und die anderen in einer Reihe darunter. Wenn die Personen nicht auf den Bildschirm passen, werden links und rechts Schaltflächen angezeigt, mit denen Sie navigieren können.

Download call participants list
You can download the list of participants in a call from the ... menu in the top bar. This will download a CSV file with the names and email addresses of all participants in the call.
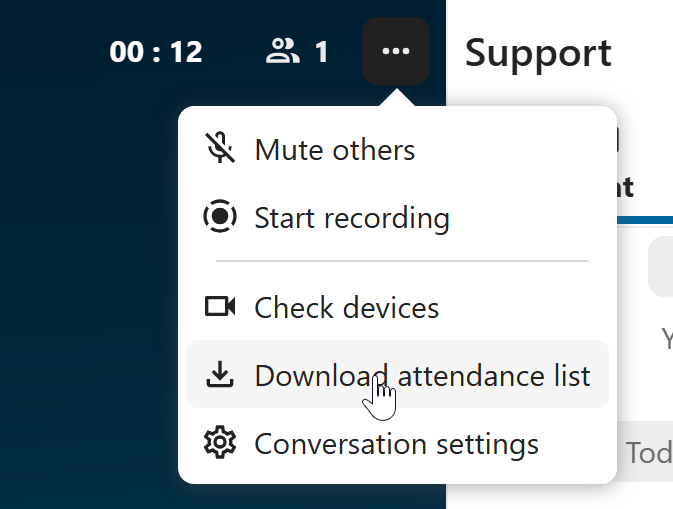
The table in the CSV file contains the following columns:
Name: The name of the participant.
Email: The email address of the participant.
Type: Indicates whether the participant is a registered user or a guest.
Identifier: Unique identifier for the participant.
Compact view of conversations list
Compact view allows to hide last message preview in the conversation list, providing a more focused interface.
You can enable it from the Talk settings dialog in Appearance section.
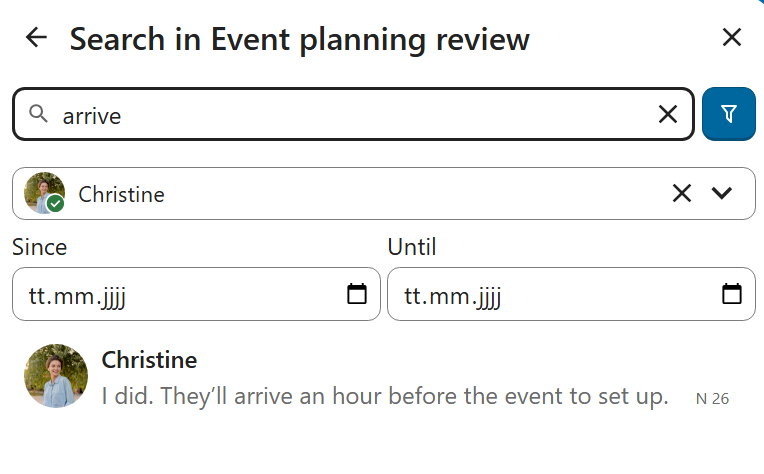
Messages search in a conversation
In addition to global unified search, you can search for messages within a specific conversation. In the content sidebar of a conversation, click the search icon to open the search tab.
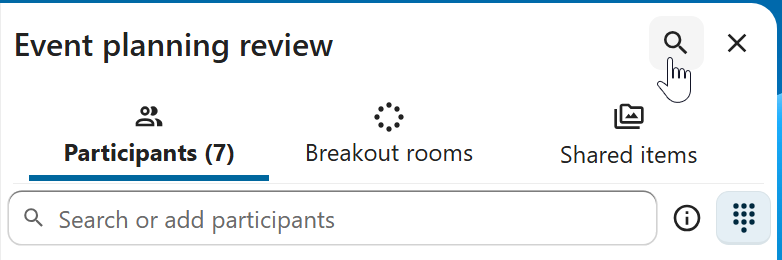
You can narrow down your search by using filters such as date range, and sender.