Ag baint úsáide as an aip Mail
Note
Tagann an aip Mail suiteáilte le Nextcloud Hub de réir réamhshocraithe, ach is féidir é a dhíchumasú. Iarr ar do Riarthóir é.

Do chuntas ríomhphoist a bhainistiú
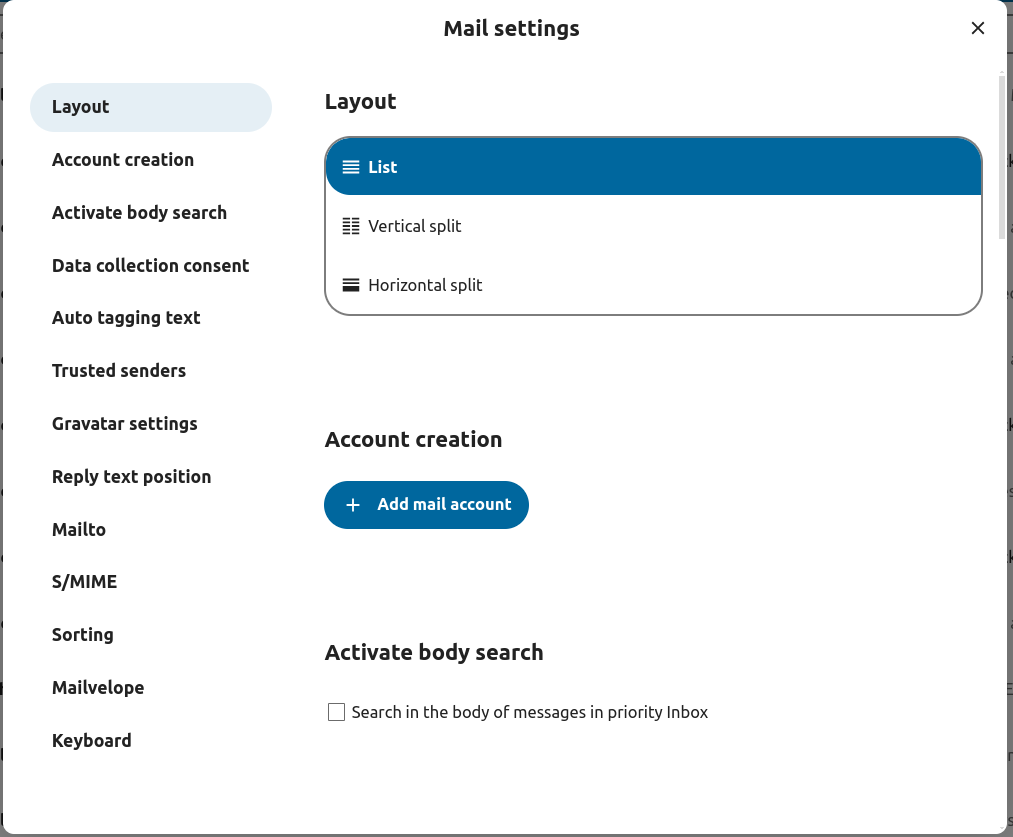
Athraigh leagan amach
Added in version 3.6.
Tabhair cuairt ar shocruithe ríomhphoist
Roghnaigh idir Liosta, Roinnt ingearach agus Roinnt chothrománach
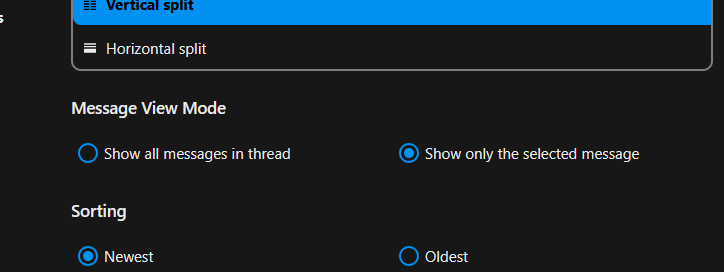
Taispeántas Teachtaireachtaí / Mód Oibríochta
Added in version 5.2.
Tá an cumas ag Mail aistriú idir dhá mhodh éagsúla radhairc agus oibríochta teachtaireachtaí: Snáithithe agus Singleton.
Sa mhodh Snáithithe, déantar teachtaireachtaí a ghrúpáil de réir comhrá. Sa liosta teachtaireachtaí bosca poist, déantar teachtaireachtaí gaolmhara a chruachadh ionas nach dtaispeántar ach an teachtaireacht is déanaí, agus taispeántar gach teachtaireacht ghaolmhar sa phainéal taispeána teachtaireachtaí tar éis an teachtaireacht chruachta a roghnú. Tá sé seo úsáideach chun plé a leanúint agus comhthéacs na bhfreagraí a thuiscint. Sa mhodh seo, baineann oibríocht teachtaireachta cosúil le bogadh agus scriosadh leis an snáithe ar fad, rud a chiallaíonn nuair a bhogann tú nó a scriosann tú snáithe, go mbíonn tionchar ar gach teachtaireacht laistigh den snáithe sin.
I mód Singleton, taispeántar teachtaireachtaí ina n-aonar, i liosta teachtaireachtaí an bhosca poist agus sa phainéal taispeána teachtaireachtaí araon, agus ní bhaineann oibríochtaí cosúil le bogadh agus scriosadh ach leis an teachtaireacht roghnaithe. Tá an mód seo úsáideach nuair is mian leat teachtaireachtaí a bhainistiú ar leithligh gan cur isteach ar an gcomhrá ar fad.
Tabhair cuairt ar shocruithe ríomhphoist
Roghnaigh idir Snáithithe, Singleton
Cuir cuntas ríomhphoist nua leis
Cumasaigh feidhmchlár ríomhphoist ó na haipeanna
Cliceáil ar an deilbhín ríomhphoist ar an gceanntásc
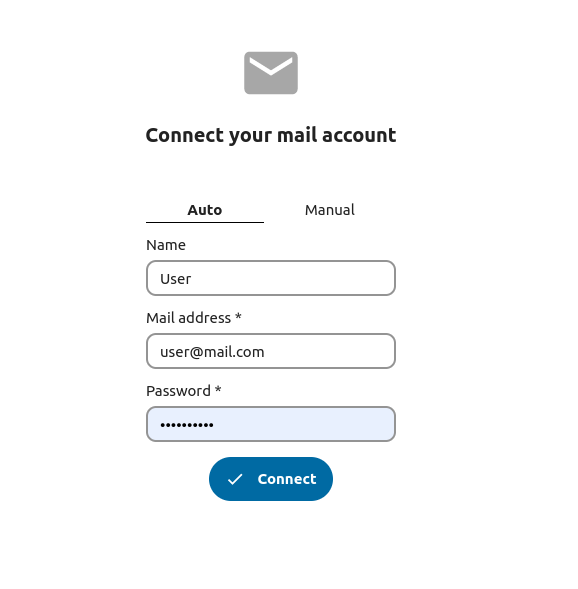
Líon suas an fhoirm logáil isteach (uathoibríoch nó lámhleabhar)
Athraigh ord sórtála
Added in version 3.5.
Tabhair cuairt ar shocruithe ríomhphoist
Téigh go dtí Sórtáil
Is féidir leat ríomhphost Is sine nó is Déanaí a roghnú ar dtús
Note
Beidh an t-athrú seo i bhfeidhm thar do chuntais agus boscaí poist go léir
Sort favorites up
Added in version 5.7: Nextcloud 31 or newer
This setting allows you to show messages set as favorite in a separate section on top of the message list.
Tabhair cuairt ar shocruithe ríomhphoist
Go to Appearance
Enable sorting favorites up
Teachtaireachtaí sceidealaithe
Cliceáil ar an gcnaipe teachtaireachta nua ar bharr clé do scáileáin
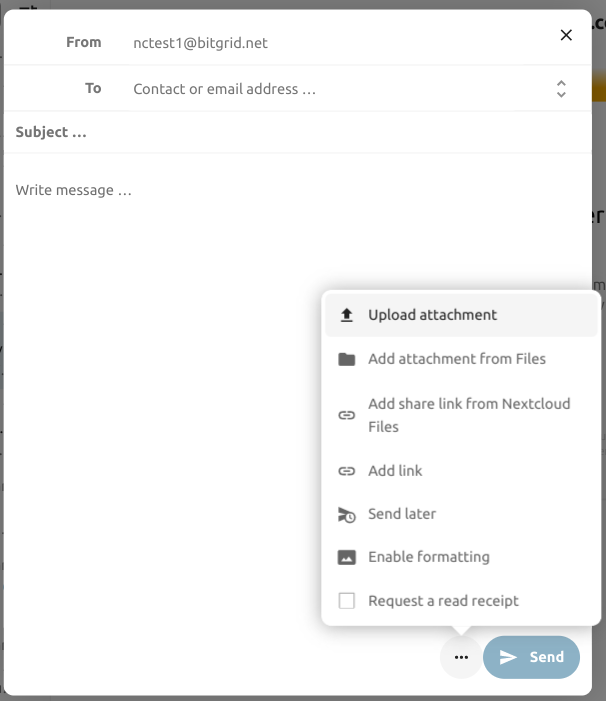
Cliceáil ar an roghchlár gníomhaíochta (...) ar an gcumadóir módúil
Cliceáil seol níos déanaí
Bosca isteach tosaíochta
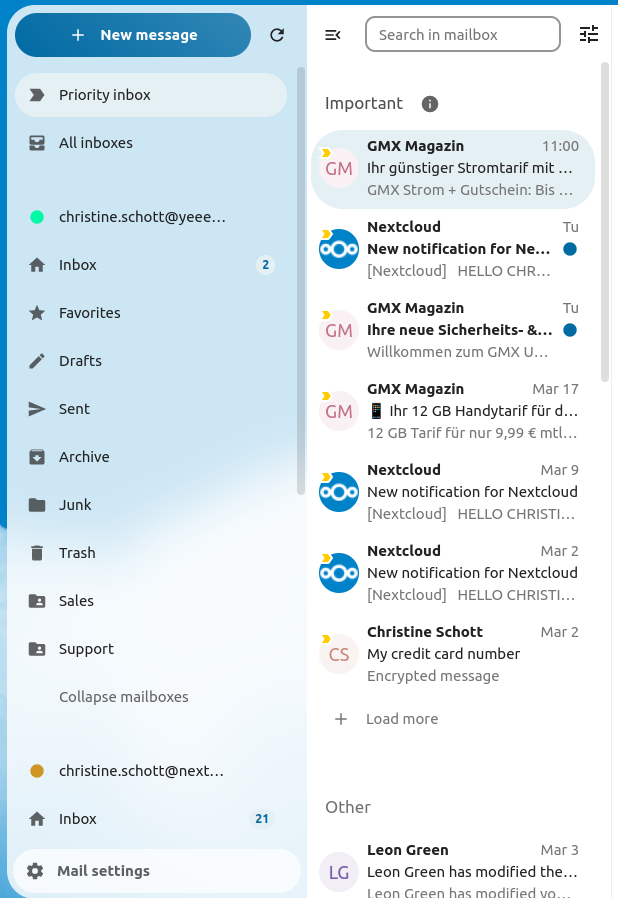
Tá 2 roinn Tábhachtach agus Eile sa bhosca isteach tosaíochta. Déanfar teachtaireachtaí a mharcáil go huathoibríoch mar thábhachtach, bunaithe ar na teachtaireachtaí a ndearna tú idirghníomhú leo nó a mharcáil tú a bheith tábhachtach. Ar dtús b'fhéidir go mbeadh ort an tábhacht a bhaineann leis an gcóras a mhúineadh a athrú de láimh, ach feabhsóidh sé le himeacht ama.
The automatic classification is optional. You can opt-out when setting up an account. The classification can also be turned on and off in the account settings at any time.
Gach bosca isteach
Taispeánfar gach teachtaireacht ó na cuntais go léir a logáil tú isteach anseo go croineolaíoch.
Socruithe cuntas
Do shocruithe cuntais ar nós:
Ailiasanna
Síniú
Fillteáin Réamhshocraithe
Uathfhreagróir
Seoltóirí iontaofa
..agus eile
Is féidir é a fháil sa roghchlár gníomhaíochta de chuntas ríomhphoist. Is féidir leat socruithe a chur in eagar, a chur leis nó a bhaint ag brath ar do riachtanas.
Bog teachtaireachtaí chuig an bhfillteán Dramhaíola
Added in version 3.4.
Is féidir le post teachtaireacht a aistriú go fillteán eile nuair a mharcáiltear é mar dhramhphost.
Tabhair cuairt ar shocruithe Cuntais
Téigh go dtí fillteáin Réamhshocraithe
Seiceáil go bhfuil fillteán roghnaithe do na dramhtheachtaireachtaí
Téigh go dtí socruithe Junk
Cliceáil Bog teachtaireachtaí chuig fillteán Junk

Refresh mailbox
You can manually trigger a sync of your mailbox by clicking the refresh button located at the top of the mailbox list.
Starting from version 5.7 triggering the sync will also refresh the list of folders for the selected account.
Cuardaigh sa bhosca poist
Added in version 2.1.
Ag barr an liosta clúdaigh in aon leagan amach ríomhphoist, tá aicearra réimse cuardaigh chun ábhair ríomhphoist a chuardach. Ag tosú le leagan 3.7, ceadaíonn an aicearra seo duit cuardach a dhéanamh de réir ábhair, faighteoir (chuig), nó seoltóir (ó) de réir réamhshocraithe.
Cuardach casta sa bhosca poist
Added in version 3.4.
Is féidir leat ár ngné ardchuardaigh a rochtain trí mhodh atá suite ag deireadh an aicearra cuardaigh.
Cumasaigh cuardach coirp poist
Added in version 3.5.
Is féidir comhlachtaí poist a chuardach anois, tá rogha an diúltaithe sa ghné seo mar gheall ar cheisteanna feidhmíochta féideartha.
Chun é a chumasú:
Tabhair cuairt ar shocruithe Cuntais
Téigh chuig cuardach Bosca Poist
Cumasaigh cuardach coirp poist
Warning
Más mian leat é a chumasú freisin do bhoscaí poist aontaithe caithfidh tú é sin a dhéanamh i socruithe Ríomhphoist
Trí é a chumasú déanfaidh an príomhbhosca cuardaigh cuardach anois in ábhair agus i gcomhlachtaí poist, agus beidh rogha Comhlacht ar leith le feiceáil san ardchuardach.
Tarmligean cuntais
Ceadaíonn an aip tarmligean cuntais ionas gur féidir le húsáideoir amháin ríomhphoist a sheoladh ó sheoladh duine eile.
Ní mór don riarthóir an tarmligean a chumrú ar an bhfreastalaí ríomhphoist
Cuir an seoladh ríomhphoist eile leis mar ailias do do chuntas ríomhphoist féin
Agus ríomhphost á sheoladh, roghnaigh an ailias mar sheoltóir
Warning
Seans nach mbeidh an ríomhphost seolta le feiceáil ag an mbunchuntas má tá sé stóráilte i do bhosca ríomhphoist pearsanta Sent.
Bruscar a scriosadh go huathoibríoch
Added in version 3.4.
Is féidir leis an app Mail teachtaireachtaí a scriosadh go huathoibríoch sa fhillteán bruscar tar éis roinnt laethanta áirithe.
Tabhair cuairt ar shocruithe Cuntais
Téigh go dtí Scriosadh Bruscar Uathoibríoch
Cuir isteach an líon laethanta ina dhiaidh sin ba cheart teachtaireachtaí a scriosadh
Díchumasaigh coinneáil bruscair tríd an bpáirc a fhágáil folamh nó é a shocrú go 0.
Note
Ní phróiseálfar ach ríomhphoist a scriostar tar éis coinneáil bruscair a chumasú.

Teachtaireachtaí a chumadh
Cliceáil ar theachtaireacht nua ar bharr do scáileáin ar chlé
Tosaigh ag scríobh do theachtaireacht
Íoslaghdaigh modúl an chumadóra
Added in version 3.2.
Is féidir an modúl cumadóra a íoslaghdú agus teachtaireacht nua á scríobh, dréacht atá ann cheana féin á chur in eagar nó teachtaireacht ón mbosca amach. Cliceáil an cnaipe íoslaghdaithe ag barr ar dheis an mhodúil nó cliceáil áit ar bith lasmuigh den mhodúil.

Is féidir leat do theachtaireacht íoslaghdaithe a atosú trí chliceáil áit ar bith ar an táscaire ar thaobh na láimhe deise ag bun do scáileáin.

Brúigh an cnaipe dúnta ar an modal nó an táscaire sa chúinne íochtarach ar dheis chun stop a chur le teachtaireacht a chur in eagar. Sábhálfar dréacht go huathoibríoch i do bhosca poist dréachta.
Eolas faighteoir faoin gcumadóir
Added in version 4.2.
Nuair a chuirfidh tú do chéad faighteoir nó teagmhálaí sa réimse "Chuig", feicfear pana ar dheis a thaispeánfaidh sonraí próifíle sábháilte an teagmhála sin. Má chuirtear an dara teagmhálaí leis, scriosfar an liosta, rud a ligfidh duit aon teagmhálaí a chuir tú leis a roghnú agus a leathnú chun féachaint ar a gcuid sonraí. Más fearr leat díriú ar scríbhneoireacht amháin sa chumadóir, is féidir leat an phána ar dheis a cheilt ach cliceáil ar an deilbhín leathnaithe sa chúinne uachtarach ar dheis. Chun an phána ceart a thaispeáint arís, níl le déanamh ach cliceáil ar an deilbhín íoslaghdaithe san áit chéanna.
Luaigh teagmhálaithe
Added in version 4.2.
Is féidir leat teagmhálaithe a lua i do theachtaireacht trí @ a chlóscríobh agus ansin an teagmhálaí a roghnú ón liosta. Trí seo a dhéanamh cuirfear an teagmhálaí leis go huathoibríoch mar fhaighteoir.
Note
Ní mholtar ach teagmhálaithe a bhfuil seoladh ríomhphoist bailí acu.
Bloic téacs
Added in version 5.2.
Is píosaí téacs réamhshainithe iad bloic téacs is féidir a chur isteach i do ríomhphost. Is féidir iad a chruthú agus a bhainistiú i socruithe an ríomhphoist. Is féidir iad a chur isteach sa chumadóir trí ! a chlóscríobh agus ansin an bloc a roghnú ón liosta nó ó ghníomhartha an chumadóra. Is féidir bloic téacs a roinnt le húsáideoirí agus le grúpaí úsáideoirí.
Bosca Amach
Nuair a bhíonn teachtaireacht curtha le chéile agus cliceáil ar an gcnaipe "Seol", cuirtear an teachtaireacht leis an mbosca amach atá le fáil sa chúinne ag bun ar chlé den bharra taoibh ar chlé.
Is féidir leat freisin an dáta agus an t-am don oibríocht seolta a shocrú go pointe sa todhchaí (féach :tag:`Teachtaireachtaí sceidealta <mail-scheduled-messages>`) - coinneofar an teachtaireacht sa bhosca amach go dtí go dtiocfaidh an dáta agus an t-am roghnaithe agat, ansin seolfar go huathoibríoch í.
Ní bhíonn an bosca amach le feiceáil ach amháin nuair a bhíonn teachtaireacht ag fanacht le láimhseáil ag an mbosca amach.
Is féidir leat an cumadóir a athoscailt le haghaidh teachtaireachta sa bhosca amach am ar bith sula gcuirtear tús leis an oibríocht "seol".
Note
Nuair a tharlaíonn earráid le linn seolta, is féidir trí theachtaireacht earráide:
- Níorbh fhéidir cóip a dhéanamh chuig an mbosca ríomhphoist "Seolta".
Seoladh an ríomhphost ach níorbh fhéidir é a chóipeáil chuig an mbosca ríomhphoist "Seolta". Déanfaidh an bosca amach an earráid seo a láimhseáil agus bainfear triail eile as an oibríocht chóipeála.
- Earráid freastalaí ríomhphoist
Níor éirigh leis an seoladh le staid ná mar is féidir a fháil ar ais (mar shampla: níorbh fhéidir an freastalaí SMTP a bhaint amach). Déanfaidh an bosca amach iarracht an teachtaireacht a sheoladh arís.
- Níorbh fhéidir an teachtaireacht a sheoladh
Seans gur theip nó nár theip ar an seoladh. Ní féidir leis an bhfreastalaí ríomhphoist staid na teachtaireachta a insint dúinn. Ós rud é nach bhfuil aon bhealach ag an aip Mail chun staid na teachtaireachta a chinneadh (seolta nó nár seoladh) fanfaidh an teachtaireacht sa bhosca amach agus caithfidh úsáideoir an chuntais cinneadh a dhéanamh conas dul ar aghaidh.
Gníomhartha bosca poist
Cuir bosca poist leis
Oscail an roghchlár gníomhaíochta de chuntas
Cliceáil cuir bosca poist leis
Cuir bosca fo-phoist leis
Oscail an roghchlár gníomhaíochta de bhosca poist
Cliceáil cuir fo-bhosca leis
Gníomhartha clúdaigh
Cruthaigh imeacht
Cruthaigh imeacht le haghaidh teachtaireacht / snáithe áirithe go díreach tríd an aip ríomhphoist
Oscail roghchlár gníomhaíochta an chlúdaigh
Cliceáil Tuilleadh gníomhartha
Cliceáil Cruthaigh imeacht
Note
Cruthaítear teideal an imeachta agus clár oibre duit má tá sé cumasaithe ag an riarthóir.
Cruthaigh tasc
Added in version 3.2.
Cruthaigh tasc le haghaidh teachtaireacht / snáithe áirithe go díreach tríd an aip ríomhphoist
Oscail roghchlár gníomhaíochta an chlúdaigh
Cliceáil tuilleadh gníomhartha
Cliceáil cruthaigh tasc
Note
Stóráiltear tascanna i bhféilirí tacaithe. Mura bhfuil aon fhéilire comhoiriúnach ann is féidir leat ceann nua a chruthú leis an calendar app.
Achoimre AI
Added in version 4.2.
Agus tú ag féachaint trí do bhosca poist feicfidh tú achoimre ghearr a ghintear le AI ar do ríomhphoist mar réamhamharc.
Note
Tabhair faoi deara go gcaithfidh an riarthóir an ghné a chumasú
Quick actions
Added in version 5.5: (Nextcloud 30)
Allows you to group action steps that you would normally perform on envelopes such as tagging, moving, marking as read ... into quick actions that can be executed with a single click. Quick actions are scoped to one mail account and can be created and managed in the mail settings under "Quick actions" or directly from the envelope action menu.
Note
Some action steps such as Mark as spam, Move thread and Delete thread are mutually exclusive and cannot be part of the same quick action, they also can't be re-ordered and will always be executed last.
Note
Please note that quick actions will be performed on all messages in a thread when executed on one.
Gníomhartha teachtaireachta
Díliostáil ó liosta seoltaí
Added in version 3.1.
Ligeann roinnt liostaí seoltaí agus nuachtlitreacha díliostáil go héasca. Má bhraitheann an aip Mail teachtaireachtaí ó sheoltóir den sórt sin, taispeánfaidh sé cnaipe Díliostáil in aice le faisnéis an tseoltóra. Cliceáil agus deimhnigh chun díliostáil ón liosta.
Cur ar suan
Added in version 3.4.
Má chuirtear teachtaireacht nó snáithe ar suan, bogtar isteach i mbosca poist tiomnaithe é go dtí go sroichtear an dáta ar suan roghnaithe agus bogtar an teachtaireacht nó an snáithe ar ais go dtí an bosca poist bunaidh.
Oscail roghchlár gníomhaíochta clúdach litreach nó snáithe
Cliceáil Snooze
Roghnaigh cá fhad ar cheart an teachtaireacht nó an snáithe a chur ar suan
Freagraí cliste
Added in version 3.6.
Nuair a osclaíonn tú teachtaireacht san aip Mail, molann sé freagraí a ghintear le AI. Trí chliceáil ar fhreagra molta, osclaíonn an cumadóir agus an freagra réamhlíonta.
Note
Tabhair faoi deara go gcaithfidh an riarthóir an ghné a chumasú
Note
Braitheann teangacha a dtacaítear leo ar an múnla mór teangacha a úsáidtear
Aistriúchán ríomhphoist
Added in version 4.2.
Tá tú in ann teachtaireachtaí a aistriú chuig do theangacha cumraithe mar an gcéanna le Talk.
Note
Tabhair faoi deara go gcaithfidh gnéithe aistriúcháin a bheith cumasaithe ar an bhfreastalaí
Note
Ó leagan 5.3, má tá LLM cumasaithe ag an riarthóir, molfar aistriúcháin
Achoimre snáithe
Tacaíonn an aip ríomhphoist le snáitheanna teachtaireachta a achoimriú ina bhfuil 3 theachtaireacht nó níos mó.
Added in version 3.4.
Note
Tabhair faoi deara go gcaithfidh an riarthóir an ghné a chumasú
Note
Tabhair faoi deara nach n-oibríonn an ghné seo ach go maith le integration_openai. Tógann sé ró-fhada ar LLManna áitiúla freagra a thabhairt agus is dócha go dtiocfaidh deireadh leis an iarratas achomair agus go gcruthóidh sé ualach suntasach córais fós.
Scagadh agus uathfhreagróir
Tá eagarthóir ag an aip Mail le haghaidh scripteanna Sieve, comhéadan chun uathfhreagróirí a chumrú agus comhéadan chun scagairí a chumrú. Ní mór criathar a chumasú sna socruithe cuntais.
Uathfhreagróirí
Added in version 3.5: Is féidir le uathfhreagróir socruithe an chórais a leanúint.
Tá an t-uathfhreagraí múchta de réir réamhshocraithe. Is féidir é a shocrú de láimh, nó socruithe an chórais a leanúint. Nuair a leanann tú socruithe an chórais, cuirtear an teachtaireacht asláithreachta fada a iontráladh ar an Socruithe Neamhláithreachta rannán i bhfeidhm go huathoibríoch.
Scagaire
Added in version 4.1.
Cuimsíonn Mail 4.1 eagarthóir simplí chun rialacha scagaire a chumrú.
Note
Ní thacaítear le hiompórtáil na scagairí atá ann cheana. Mar sin féin, fanfaidh na scagairí atá ann cheana féin gníomhach agus gan athrú. Molaimid tacaíocht a thabhairt do do script reatha tríd an eagarthóir scripte Sieve mar réamhchúram.
Conas Scagaire Nua a Chur Leis
Oscail do shocruithe cuntais.
Fíoraigh go bhfuil Sieve cumasaithe do do chuntas (féach socruithe freastalaí Sieve).
Cliceáil ar Scagairí.
Roghnaigh Scagaire Nua chun riail nua a chruthú.
Conas Scagaire a Scriosadh
Oscail do shocruithe cuntais.
Cinntigh go bhfuil Sieve cumasaithe do do chuntas (féach socruithe freastalaí Sieve).
Cliceáil ar Scagairí.
Ainligh thar an scagaire is mian leat a scriosadh, ansin cliceáil ar an deilbhín bruscar.
Coinníollacha
Cuirtear coinníollacha i bhfeidhm ar ríomhphoist isteach ar do fhreastalaí ríomhphoist, ag díriú ar réimsí ar nós Ábhar, Seoltóir, agus Faighteoir. Is féidir leat na hoibreoirí seo a leanas a úsáid chun coinníollacha a shainiú do na réimsí seo:
tá sé go díreach: Meaitseáil chruinn. Ní mór don réimse a bheith comhionann leis an luach a cuireadh ar fáil.
tá: Cluiche fotheaghrán. Meaitseálann an réimse má tá an luach soláthraithe istigh ann. Mar shampla, bheadh "tuairisc" ag teacht le "port".
meaitseanna: Meaitseáil phatrúin ag baint úsáide as saoróga. Seasann an tsiombail "*" d'aon líon carachtar (gan aon cheann san áireamh), agus "?" is ionann é agus carachtar amháin. Mar shampla, bheadh "tuairisc" ag teacht le "Tuarascáil Gnó 2024".
Gníomhartha
Spreagtar gníomhartha nuair a bhíonn na tástálacha sonraithe fíor. Tá na gníomhartha seo a leanas ar fáil:
fileinto: Bogtar an teachtaireacht isteach i bhfillteán sonraithe.
addflag: Cuireann sé bratach leis an teachtaireacht.
stop: Cuireann sé seo stop le feidhmiú na scripte scagaire. Ní dhéanfar aon scagairí eile a phróiseáil tar éis an ghnímh seo.
Cruthaigh scagaire ó theachtaireacht
Added in version 5.2.
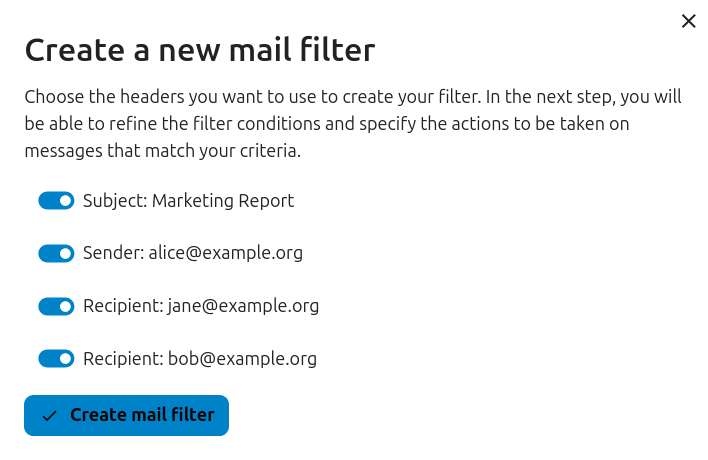
Chun scagaire a chruthú ó theachtaireacht ar leith, oscail an teachtaireacht agus ansin oscail an roghchlár trí chliceáil ar na trí phonc. Ansin, cliceáil ar "Tuilleadh gníomhartha" agus ansin "Cruthaigh scagaire ríomhphoist".
Sa dialóg, roghnaigh na coinníollacha chun teachtaireachtaí isteach a mheaitseáil agus lean ar aghaidh trí chliceáil ar "Cruthaigh scagaire ríomhphoist".
Meabhrúcháin leantacha
Added in version 4.0.
Cuirfidh an aip Mail i gcuimhne duit go huathoibríoch nuair nach bhfuair ríomhphost amach freagra. Déanfaidh AI anailís ar gach ríomhphost seolta chun a sheiceáil an bhfuiltear ag súil le freagra. Tar éis ceithre lá taispeánfar gach ríomhphost ábhartha i do bhosca tosaíochta.
Nuair a chliceálann tú ar ríomhphost den sórt sin taispeánfar cnaipe chun na faighteoirí go léir a leanúint go tapa. Is féidir freisin meabhrúcháin leantacha a dhíchumasú le haghaidh ríomhphost seolta.
Note
Tabhair faoi deara go gcaithfidh an riarthóir an ghné a chumasú.
Slándáil
Brath fioscaireachta
Added in version 4.0.
Seiceálfaidh an aip Mail le haghaidh iarrachtaí fioscaireachta féideartha agus taispeánfaidh sé rabhadh don úsáideoir.
Seo a leanas na seiceálacha:
Níl an seoladh seoltóra atá sábháilte sa leabhar seoltaí mar an gcéanna leis an seoladh sa chuntas ríomhphoist
Tá seoladh ríomhphoist saincheaptha in úsáid ag an seoltóir nach bhfuil ag teacht leis an seoladh ón seoladh
Socraítear an dáta seolta amach anseo
Níl naisc i gcorp na teachtaireachta ag díriú ar an téacs atá ar taispeáint
Níl an seoladh freagartha mar an gcéanna leis an seoladh seoltóra
Note
Tabhair faoi deara le do thoil nach gciallaíonn an rabhadh gur iarracht fioscaireachta atá sa teachtaireacht. Ní chiallaíonn sé ach gur bhraith an app Mail iarracht fioscaireachta féideartha.
Seoltaí inmheánacha
Added in version 4.0.
Ceadaíonn an app Mail seoltaí inmheánacha agus fearainn a chur leis, agus tabharfaidh sé rabhadh don úsáideoir mura bhfuil an seoladh ar an liosta, nuair a sheoltar agus nuair a fhaigheann sé teachtaireacht.
Chun seoladh inmheánach a chur leis:
Oscail na socruithe ríomhphoist
Déan nascleanúint chuig an rannán Príobháideachta agus slándála
Cumasaigh na seoltaí inmheánacha trí chliceáil ar an ticbhosca
Cliceáil ar an gcnaipe Cuir seoladh inmheánach leis
Cuir isteach an seoladh nó an fearann agus cliceáil Cuir
Comhtháthú painéil
Added in version 1.8.
Cuireann an aip ríomhphoist dhá ghiuirléid ar fáil atá deartha le haghaidh comhtháthú le painéal Nextcloud:
Ríomhphoist neamhléite: Taispeánann an giuirléid seo ríomhphoist neamhléite.
Ríomhphoist thábhachtacha: Taispeánann an giuirléid seo ríomhphoist atá marcáilte mar thábhachtach.
Úsáideann na giuirléidí seo na ríomhphoist ó na cuntais ríomhphoist atá socraithe do do chuntas.
Calendar integration
The Mail app integrates with the Calendar app to help you manage meeting invitations and keep your calendar up to date.
Meeting invitations
When you receive a message containing a meeting invitation, the Mail app automatically detects the attached calendar file and displays a formatted action section to help you respond.
You can:
Accept the invitation
Decline the invitation
Tentatively accept the invitation
Your response is sent directly from the Mail app, and the event is added to your primary calendar accordingly.
You can also manually add a meeting invitation to a specific calendar:
Open the message with the meeting invitation
Scroll to the bottom of the message to the attachments section
Select the calendar file (usually with a .ics extension), then click the three dots menu.
Click "Import in to calendar" and choose the desired calendar.
Meeting invitation automation
When a meeting organizer sends updates to an existing event (such as time changes or location updates), the Mail app processes these automatically and updates the corresponding event in your calendar.
Added in version 5.7: (Nextcloud 32 or newer)
You can also configure Mail to automatically add all new meeting invitations to your calendar without requiring manual acceptance. The invitations will be added to the calendar as tentative.
To enable this feature:
Visit account settings of a specific mail account
Navigate to Calendar settings section
Enable Automatically create tentative appointments in calendar
Note
With this setting enabled, invitations will still appear in your mail list, but they will be automatically added to your calendar.
Keyboard shortcuts
The Mail app implements several keyboard shortcuts to speed up your experience.
For a full list of the supported shortcuts, check out the Mail settings in your instance.

