Πρόσβαση σε αρχεία Nextcloud χρησιμοποιώντας το WebDAV
Το Nextcloud υποστηρίζει πλήρως το πρωτόκολο WebDAV, και μπορείτε να συνδέσετε και να συγχρονίσετε τα αρχεία του Nextcloud με το WebDAV. Στο κεφάλαιο αυτό θα μάθετε πως να συνδέετε Linux, macOS, Windows και κινητά τηλέγωνα με τον σέρβερ του Nextcloud.
Το WebDAV σημαίνει Κατανεμημένη Συγγραφή και Διαχείριση Εκδόσεων. Είναι μια επέκταση HTTP που καθιστά εύκολη τη δημιουργία, ανάγνωση και επεξεργασία αρχείων που φιλοξενούνται σε απομακρυσμένους διακομιστές Web. Με έναν πελάτη WebDAV, μπορείτε να αποκτήσετε πρόσβαση στα αρχεία Nextcloud (συμπεριλαμβανομένων των κοινόχρηστων) σε Linux, macOS και Windows με παρόμοιο τρόπο όπως οποιαδήποτε απομακρυσμένη κοινή χρήση δικτύου και να παραμείνετε συγχρονισμένοι.
Πριν προχωρήσουμε στη διαμόρφωση του WebDAV, ας ρίξουμε μια γρήγορη ματιά στον προτεινόμενο τρόπο σύνδεσης συσκευών πελατών στο Nextcloud.
Επίσημοι πελάτες του Nextcloud υπολογιστών και κινητών συσκευών
Ο προτεινόμενος τρόπος συγχρονισμού ενός υπολογιστή με έναν διακομιστή Nextcloud είναι με τη χρήση των επίσημων πελατών συγχρονισμού Nextcloud. Μπορείτε να διαμορφώσετε τον πελάτη να αποθηκεύει αρχεία σε οποιονδήποτε τοπικό κατάλογο και να επιλέξετε ποιους καταλόγους στον διακομιστή Nextcloud να συγχρονίσετε. Ο πελάτης εμφανίζει την τρέχουσα κατάσταση σύνδεσης και καταγράφει όλη τη δραστηριότητα, ώστε να γνωρίζετε πάντα ποια απομακρυσμένα αρχεία έχουν ληφθεί στον υπολογιστή σας και μπορείτε να επαληθεύσετε ότι τα αρχεία που δημιουργούνται και ενημερώνονται στον τοπικό σας υπολογιστή συγχρονίζονται σωστά με τον διακομιστή.
Ο προτεινόμενος τρόπος συγχρονισμού συσκευών Android και Apple iOS είναι με τη χρήση των επίσημων εφαρμογών Nextcloud για κινητά.
Για να συνδέσετε τις επίσημες εφαρμογές Nextcloud σε έναν διακομιστή Nextcloud χρησιμοποιήστε την ίδια διεύθυνση URL που χρησιμοποιείτε για πρόσβαση στο Nextcloud από το πρόγραμμα περιήγησής σας - π.χ.:
https://cloud.example.com
Εάν το Nextcloud είναι εγκατεστημένο σε έναν υποκατάλογο με όνομα «nextcloud»:
https://example.com/nextcloud
Πελάτες WebDAV τρίτων
Εάν προτιμάτε, μπορείτε επίσης να συνδέσετε τον υπολογιστή σας με τον διακομιστή Nextcloud χρησιμοποιώντας οποιονδήποτε πελάτη τρίτου που υποστηρίζει το πρωτόκολλο WebDAV (συμπεριλαμβανομένου αυτού που μπορεί να είναι ενσωματωμένο στο λειτουργικό σας σύστημα).
Μπορείτε επίσης να χρησιμοποιήσετε εφαρμογές τρίτων που υποστηρίζουν WebDAV για να συνδέσετε την κινητή σας συσκευή στο Nextcloud.
Όταν χρησιμοποιείτε πελάτες τρίτων, λάβετε υπόψη ότι ενδέχεται να μην είναι βελτιστοποιημένοι για χρήση με το Nextcloud ή να μην υλοποιούν δυνατότητες που θεωρείτε σημαντικές για τη χρήση σας.
Πελάτες κινητών που μέλη της κοινότητας Nextcloud έχουν αναφέρει ότι χρησιμοποιούν περιλαμβάνουν:
Η διεύθυνση URL που χρησιμοποιείται κατά τη διαμόρφωση εφαρμογών τρίτων για σύνδεση στο Nextcloud είναι λίγο μεγαλύτερη από αυτήν για τους επίσημους πελάτες:
https://cloud.example.com/remote.php/dav/files/USERNAME/
Εάν το Nextcloud είναι εγκατεστημένο σε έναν υποκατάλογο με όνομα «nextcloud»:
https://example.com/nextcloud/remote.php/dav/files/USERNAME/
Σημείωση
Όταν χρησιμοποιείτε έναν πελάτη WebDAV τρίτου (συμπεριλαμβανομένου του ενσωματωμένου πελάτη του λειτουργικού σας συστήματος), θα πρέπει να χρησιμοποιήσετε έναν κωδικό πρόσβασης εφαρμογής για σύνδεση αντί του κανονικού σας κωδικού πρόσβασης. Εκτός από τη βελτιωμένη ασφάλεια, αυτό αυξάνει σημαντικά την απόδοση. Για να διαμορφώσετε έναν κωδικό πρόσβασης εφαρμογής, συνδεθείτε στη διεπαφή Web του Nextcloud, κάντε κλικ στο avatar στην επάνω δεξιά γωνία και επιλέξτε Προσωπικές ρυθμίσεις. Στη συνέχεια επιλέξτε Ασφάλεια στην αριστερή πλαϊνή γραμμή και μετακινηθείτε στο κάτω μέρος. Εκεί μπορείτε να δημιουργήσετε ένα συνθηματικό εφαρμογής (ο οποίος μπορεί επίσης να ανακληθεί στο μέλλον χωρίς να αλλάξετε το κύριο συνθηματικό χρήστη).
Σημείωση
Στα ακόλουθα παραδείγματα, θα πρέπει να αντικαταστήσετε το example.com/nextcloud με τη διεύθυνση URL του διακομιστή Nextcloud σας (παραλείψτε το τμήμα καταλόγου εάν η εγκατάσταση είναι στη ρίζα του domain σας) και το USERNAME με το όνομα χρήστη του συνδεδεμένου χρήστη.
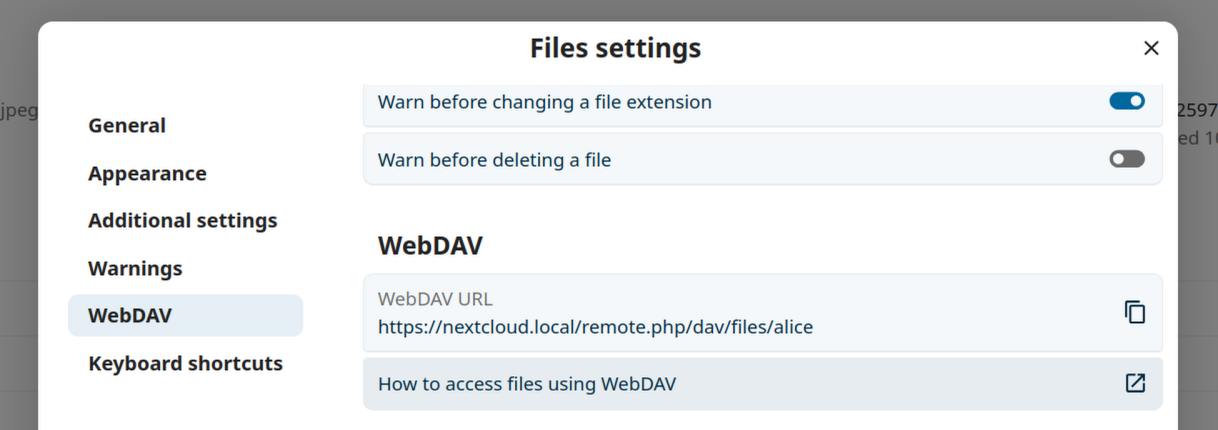
See the WebDAV URL, to be found in Files Settings -> WebDAV in the Files on your Nextcloud account.
Πρόσβαση σε αρχεία χρησιμοποιώντας Linux
Μπορείτε να αποκτήσετε πρόσβαση σε αρχεία σε λειτουργικά συστήματα Linux χρησιμοποιώντας τις ακόλουθες μεθόδους.
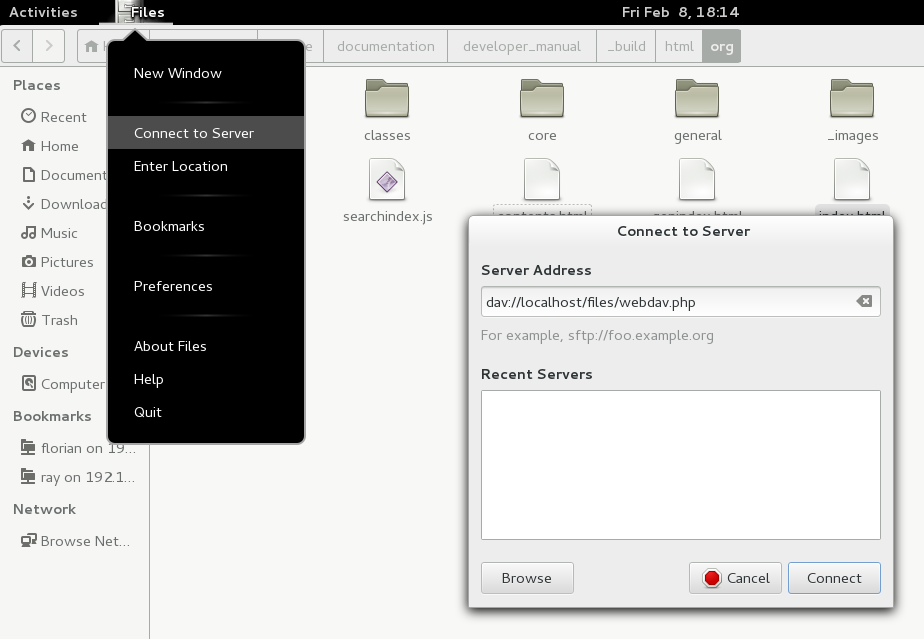
Διαχειριστής αρχείων Nautilus
When you configure your Nextcloud account in the GNOME Control Center, your files will automatically be mounted by Nautilus as a WebDAV share, unless you deselect file access.
Μπορείτε επίσης να προσαρτήσετε τα αρχεία Nextcloud σας χειροκίνητα. Χρησιμοποιήστε το πρωτόκολλο davs:// για να συνδέσετε τον διαχειριστή αρχείων Nautilus στην κοινή χρήση Nextcloud σας:
davs://example.com/nextcloud/remote.php/dav/files/USERNAME/
Σημείωση
Εάν η σύνδεση του διακομιστή σας δεν είναι ασφαλής μέσω HTTPS, χρησιμοποιήστε dav:// αντί για davs://:
Σημείωση
Η ίδια μέθοδος λειτουργεί για άλλους διαχειριστές αρχείων που χρησιμοποιούν GVFS, όπως το Caja του MATE και το Nemo του Cinnamon.
Πρόσβαση σε αρχεία με τον διαχειριστή αρχείων KDE και Dolphin
Πλοηγηθείτε στις Ρυθμίσεις Συστήματος -> Δικτύωση -> Διαδικτυακοί Λογαριασμοί
Κάντε κλικ στο «Προσθήκη Λογαριασμού…»
Κάντε κλικ στο Nextcloud
Εισάγετε τη διεύθυνση του διακομιστή σας
Ακολουθήστε τις οδηγίες στην οθόνη για να συνδεθείτε
Μετά τη σύνδεση, βεβαιωθείτε ότι ενεργοποιείτε το «Αποθήκευση» στην ενότητα «Χρήση αυτού του λογαριασμού για»
Μπορείτε τώρα να αποκτήσετε πρόσβαση στα αρχεία σας στο Dolphin κάτω από «Δίκτυο» στην πλαϊνή γραμμή
(Προαιρετικό) Για να το προσθέσετε ως συντόμευση στην πλαϊνή γραμμή, κάντε δεξί κλικ στο «Αποθήκευση Nextcloud» και μετά «Προσθήκη στους Τόπους»
(Προαιρετικό) Για να προσαρμόσετε τη συντόμευση, κάντε δεξί κλικ στη συντόμευση στην πλαϊνή γραμμή και μετά «Επεξεργασία…» και προσαρμόστε το εικονίδιο και την ετικέτα όπως θέλετε
Δημιουργία προσθηκών WebDAV στη γραμμή εντολών Linux
Μπορείτε να δημιουργήσετε προσαρτήσεις WebDAV από τη γραμμή εντολών Linux. Αυτό είναι χρήσιμο εάν προτιμάτε να αποκτάτε πρόσβαση στο Nextcloud με τον ίδιο τρόπο όπως οποιαδήποτε άλλη απομακρυσμένη προσάρτηση συστήματος αρχείων. Το ακόλουθο παράδειγμα δείχνει πώς να δημιουργήσετε μια προσωπική προσάρτηση και να την προσαρτήσετε αυτόματα κάθε φορά που συνδέεστε στον υπολογιστή σας Linux.
Εγκαταστήστε τον οδηγό συστήματος αρχείων WebDAV
davfs2, ο οποίος σας επιτρέπει να προσαρτάτε κοινές χρήσεις WebDAV όπως οποιοδήποτε άλλο απομακρυσμένο σύστημα αρχείων. Χρησιμοποιήστε αυτήν την εντολή για να το εγκαταστήσετε στο Debian/Ubuntu:apt-get install davfs2
Χρησιμοποιήστε αυτήν την εντολή για να το εγκαταστήσετε στο CentOS, Fedora και openSUSE:
yum install davfs2
Προσθέστε τον εαυτό σας στην ομάδα
davfs2:usermod -aG davfs2 <username>
Σημείωση
If the davfs2 group doesn’t exist after installing the package, you may need to create it yourself and, possibly, adjust the davfs config file to use the group after you’ve created it.
Στη συνέχεια δημιουργήστε έναν κατάλογο
nextcloudστον προσωπικό σας κατάλογο για το σημείο προσάρτησης και.davfs2/για το προσωπικό σας αρχείο διαμόρφωσης:mkdir ~/nextcloud mkdir ~/.davfs2
Αντιγράψτε το
/etc/davfs2/secretsστο~/.davfs2:cp /etc/davfs2/secrets ~/.davfs2/secrets
Ορίστε τον εαυτό σας ως κάτοχο και κάντε τα δικαιώματα μόνο ανάγνωσης-εγγραφής για τον κάτοχο:
chown <linux_username>:<linux_username> ~/.davfs2/secrets
chmod 600 ~/.davfs2/secrets
Προσθέστε τα διαπιστευτήρια σύνδεσης Nextcloud σας στο τέλος του αρχείου
secrets, χρησιμοποιώντας τη διεύθυνση URL του διακομιστή Nextcloud και το όνομα χρήστη και συνθηματικό Nextcloud σας:https://example.com/nextcloud/remote.php/dav/files/USERNAME/ <username> <password> or $PathToMountPoint $USERNAME $PASSWORD for example /home/user/nextcloud john 1234
Προσθέστε τις πληροφορίες προσάρτησης στο
/etc/fstab:https://example.com/nextcloud/remote.php/dav/files/USERNAME/ /home/<linux_username>/nextcloud davfs user,rw,auto 0 0
Στη συνέχεια δοκιμάστε ότι προσαρτάται και πιστοποιεί εκτελώντας την ακόλουθη εντολή. Εάν το ρυθμίσετε σωστά δεν θα χρειαστείτε δικαιώματα root:
mount ~/nextcloud
Θα πρέπει επίσης να μπορείτε να το αποπροσαρτήσετε:
umount ~/nextcloud
Τώρα κάθε φορά που συνδέεστε στο σύστημα Linux σας, η κοινή χρήση Nextcloud θα πρέπει να προσαρτάται αυτόματα μέσω WebDAV στον κατάλογο ~/nextcloud σας. Εάν προτιμάτε να την προσαρτάτε χειροκίνητα, αλλάξτε το auto σε noauto στο /etc/fstab.
Γνωστά προβλήματα
Πρόβλημα
Ο πόρος δεν είναι διαθέσιμος προσωρινά
Λύση
Εάν αντιμετωπίζετε προβλήματα όταν δημιουργείτε ένα αρχείο στον κατάλογο, επεξεργαστείτε το /etc/davfs2/davfs2.conf και προσθέστε:
use_locks 0
Πρόβλημα
Προειδοποιήσεις πιστοποιητικών
Λύση
Εάν χρησιμοποιείτε ένα αυτο-υπογεγραμμένο πιστοποιητικό, θα λάβετε μια προειδοποίηση. Για να το αλλάξετε αυτό, πρέπει να διαμορφώσετε το davfs2 να αναγνωρίζει το πιστοποιητικό σας. Αντιγράψτε το mycertificate.pem στο /etc/davfs2/certs/. Στη συνέχεια επεξεργαστείτε το /etc/davfs2/davfs2.conf και αποσχολιάστε τη γραμμή servercert. Τώρα προσθέστε τη διαδρομή του πιστοποιητικού σας όπως σε αυτό το παράδειγμα:
servercert /etc/davfs2/certs/mycertificate.pem
Πρόσβαση σε αρχεία χρησιμοποιώντας macOS
Σημείωση
The macOS Finder suffers from a series of implementation problems and should only be used if the Nextcloud server runs on Apache and mod_php, or Nginx 1.3.8+. Alternative macOS-compatible clients capable of accessing WebDAV shares include open source apps like Cyberduck (see instructions here) and Filezilla. Commercial clients include Mountain Duck, Forklift, Transmit, and Commander One.
Για πρόσβαση σε αρχεία μέσω του macOS Finder:
Από τη μενού γραμμή του Finder, επιλέξτε Μετάβαση > Σύνδεση με Διακομιστή…:

Όταν ανοίξει το παράθυρο Σύνδεση με Διακομιστή…, εισάγετε τη διεύθυνση WebDAV του διακομιστή Nextcloud σας στο πεδίο Διεύθυνση Διακομιστή:, π.χ.:
https://cloud.YOURDOMAIN.com/remote.php/dav/files/USERNAME/

Κάντε κλικ στο Σύνδεση. Ο διακομιστής WebDAV σας θα πρέπει να εμφανίζεται στην επιφάνεια εργασίας ως κοινόχρηστη μονάδα δίσκου.
Πρόσβαση σε αρχεία χρησιμοποιώντας τα Microsoft Windows
Εάν χρησιμοποιείτε την εγγενή υλοποίηση WebDAV των Windows, μπορείτε να αντιστοιχίσετε το Nextcloud σε μια νέα μονάδα δίσκου χρησιμοποιώντας την Εξερεύνηση των Windows. Η αντιστοίχιση σε μια μονάδα δίσκου σας επιτρέπει να περιηγηθείτε σε αρχεία που είναι αποθηκευμένα σε έναν διακομιστή Nextcloud με τον τρόπο που θα περιηγηθείτε σε αρχεία που είναι αποθηκευμένα σε μια αντιστοιχισμένη μονάδα δικτύου.
Η χρήση αυτής της δυνατότητας απαιτεί συνδεσιμότητα δικτύου. Εάν θέλετε να αποθηκεύσετε τα αρχεία σας εκτός σύνδεσης, χρησιμοποιήστε τον Πελάτη Επιφάνειας Εργασίας για να συγχρονίσετε όλα τα αρχεία στο Nextcloud σας σε έναν ή περισσότερους καταλόγους του τοπικού σκληρού δίσκου σας.
Σημείωση
Τα Windows 10 πλέον επιτρέπουν από προεπιλογή Βασική Πιστοποίηση εάν το HTTPS είναι ενεργοποιημένο πριν από την αντιστοίχιση της μονάδας δίσκου σας.
Σε παλαιότερες εκδόσεις των Windows, πρέπει να επιτρέψετε τη χρήση Βασικής Πιστοποίησης στο Μητρώο των Windows:
εκκινήστε το
regeditκαι πλοηγηθείτε στοHKEY_LOCAL_MACHINE\SYSTEM\CurrentControlSet\Services\WebClient\Parameters.Δημιουργήστε ή επεξεργαστείτε την τιμή
BasicAuthLevel(Windows Vista, 7 και 8), ήUseBasicAuth(Windows XP και Windows Server 2003),DWORDκαι ορίστε τα δεδομένα τιμής της σε1για συνδέσεις SSL. Μια τιμή0σημαίνει ότι η Βασική Πιστοποίηση είναι απενεργοποιημένη και μια τιμή2επιτρέπει τόσο συνδέσεις SSL όσο και μη SSL (δεν συνιστάται).Στη συνέχεια, κλείστε τον Επεξεργαστή Μητρώου και επανεκκινήστε τον υπολογιστή.
Αντιστοίχιση μονάδων δίσκου με τη γραμμή εντολών
Το ακόλουθο παράδειγμα δείχνει πώς να αντιστοιχίσετε μια μονάδα δίσκου χρησιμοποιώντας τη γραμμή εντολών. Για να αντιστοιχίσετε τη μονάδα δίσκου:
Ανοίξτε μια γραμμή εντολών στα Windows.
Εισάγετε την ακόλουθη γραμμή στη γραμμή εντολών για αντιστοίχιση στη μονάδα δίσκου Z του υπολογιστή:
net use Z: https://<drive_path>/remote.php/dav/files/USERNAME/ /user:youruser yourpassword
με <drive_path> ως τη διεύθυνση URL του διακομιστή Nextcloud σας. Για παράδειγμα:
net use Z: https://example.com/nextcloud/remote.php/dav/files/USERNAME/ /user:youruser yourpassword
Ο υπολογιστής αντιστοιχίζει τα αρχεία του λογαριασμού Nextcloud σας στο γράμμα Z.
Σφάλμα
Εάν λάβετε το ακόλουθο σφάλμα Σφάλμα συστήματος 67. Το όνομα δικτύου δεν μπορεί να βρεθεί., ή συχνές αποσυνδέσεις, ανοίξτε την εφαρμογή Υπηρεσίες και βεβαιωθείτε ότι η υπηρεσία WebClient εκτελείται και ξεκινά αυτόματα κατά την εκκίνηση.
Σημείωση
Αν και δεν συνιστάται, μπορείτε επίσης να προσαρτήσετε τον διακομιστή Nextcloud χρησιμοποιώντας HTTP, αφήνοντας τη σύνδεση μη κρυπτογραφημένη.
Εάν σκοπεύετε να χρησιμοποιήσετε συνδέσεις HTTP σε συσκευές ενώ βρίσκεστε σε δημόσιο χώρο, συνιστούμε ανεπιφύλακτα τη χρήση σήραγγας VPN για την παροχή της απαραίτητης ασφάλειας.
Μια εναλλακτική σύνταξη εντολής είναι:
net use Z: \\example.com@ssl\nextcloud\remote.php\dav /user:youruser
yourpassword
Αντιστοίχιση μονάδων δίσκου με την Εξερεύνηση των Windows
Για να αντιστοιχίσετε μια μονάδα δίσκου χρησιμοποιώντας την Εξερεύνηση των Windows:
Ανοίξτε την Εξερεύνηση των Windows στον υπολογιστή σας με MS Windows.
Κάντε δεξί κλικ στην εγγραφή Υπολογιστής και επιλέξτε Αντιστοίχιση μονάδας δικτύου… από το αναπτυσσόμενο μενού.
Επιλέξτε μια τοπική μονάδα δικτύου στην οποία θέλετε να αντιστοιχίσετε το Nextcloud.
Καθορίστε τη διεύθυνση στην παρουσία Nextcloud σας, ακολουθούμενη από /remote.php/dav/files/USERNAME/.
Για παράδειγμα:
https://example.com/nextcloud/remote.php/dav/files/USERNAME/
Σημείωση
Για διακομιστές προστατευμένους με SSL, επιλέξτε Επανασύνδεση κατά τη σύνδεση για να διασφαλίσετε ότι η αντιστοίχιση είναι μόνιμη σε επόμενες επανεκκινήσεις. Εάν θέλετε να συνδεθείτε στον διακομιστή Nextcloud ως διαφορετικός χρήστης, επιλέξτε Σύνδεση χρησιμοποιώντας διαφορετικά διαπιστευτήρια.

Κάντε κλικ στο κουμπί
Τέλος.
Η Εξερεύνηση των Windows αντιστοιχίζει τη μονάδα δικτύου, καθιστώντας διαθέσιμη την παρουσία Nextcloud σας.
Πρόσβαση σε αρχεία χρησιμοποιώντας το Cyberduck
Το Cyberduck είναι ένας περιηγητής ανοιχτού κώδικα για FTP, SFTP, WebDAV, OpenStack Swift και Amazon S3 σχεδιασμένος για μεταφορές αρχείων σε macOS και Windows.
Σημείωση
Αυτό το παράδειγμα χρησιμοποιεί την έκδοση 4.2.1 του Cyberduck.
Για να χρησιμοποιήσετε το Cyberduck:
Καθορίστε έναν διακομιστή χωρίς καμία πληροφορία πρωτοκόλλου στην αρχή.
Για παράδειγμα:
example.comΚαθορίστε την κατάλληλη θύρα.
Η θύρα που επιλέγετε εξαρτάται από το αν ο διακομιστής Nextcloud σας υποστηρίζει SSL. Το Cyberduck απαιτεί να επιλέξετε διαφορετικό τύπο σύνδεσης εάν σκοπεύετε να χρησιμοποιήσετε SSL.
- Για παράδειγμα:
80για μη κρυπτογραφημένο WebDAV443για ασφαλές WebDAV (HTTPS/SSL)
Χρησιμοποιήστε το αναπτυσσόμενο μενού “Περισσότερες Επιλογές” για να προσθέσετε το υπόλοιπο της διεύθυνσης URL WebDAV σας στο πεδίο “Διαδρομή”.
Για παράδειγμα:
remote.php/dav/files/USERNAME/
Τώρα το Cyberduck επιτρέπει την πρόσβαση αρχείων στον διακομιστή Nextcloud.
Γνωστά προβλήματα
Πρόβλημα
Τα Windows δεν συνδέονται χρησιμοποιώντας HTTPS.
Λύση 1
Ο Πελάτης WebDAV των Windows ενδέχεται να μην υποστηρίζει την Ένδειξη Ονόματος Διακομιστή (SNI) σε κρυπτογραφημένες συνδέσεις. Εάν αντιμετωπίσετε σφάλμα κατά την προσάρτηση μιας κρυπτογραφημένης με SSL παρουσίας Nextcloud, επικοινωνήστε με τον πάροχό σας σχετικά με την εκχώρηση μιας αποκλειστικής διεύθυνσης IP για τον διακομιστή σας που βασίζεται σε SSL.
Λύση 2
Ο Πελάτης WebDAV των Windows ενδέχεται να μην υποστηρίζει συνδέσεις TLSv1.1 και TLSv1.2. Εάν έχετε περιορίσει τη διαμόρφωση του διακομιστή σας να παρέχει μόνο TLSv1.1 και άνω, η σύνδεση με τον διακομιστή σας ενδέχεται να αποτύχει. Παρακαλώ ανατρέξτε στην τεκμηρίωση WinHTTP για περισσότερες πληροφορίες.
Πρόβλημα
Λαμβάνετε το ακόλουθο μήνυμα σφάλματος: Σφάλμα 0x800700DF: Το μέγεθος του αρχείου υπερβαίνει το επιτρεπόμενο όριο και δεν μπορεί να αποθηκευτεί.
Λύση
Τα Windows περιορίζουν το μέγιστο μέγεθος που μπορεί να έχει ένα αρχείο που μεταφέρεται από ή προς μια κοινή χρήση WebDAV. Μπορείτε να αυξήσετε την τιμή FileSizeLimitInBytes στο HKEY_LOCAL_MACHINE\\SYSTEM\\CurrentControlSet\\Services\\WebClient\\Parameters κάνοντας κλικ στο Τροποποίηση.
Για να αυξήσετε το όριο στη μέγιστη τιμή των 4GB, επιλέξτε Δεκαδικό, εισάγετε μια τιμή 4294967295 και επανεκκινήστε τα Windows ή επανεκκινήστε την υπηρεσία WebClient.
Πρόβλημα
Η προσθήκη μιας μονάδας δίσκου WebDAV στα Windows μέσω των παραπάνω βημάτων δεν εμφανίζει το σωστό μέγεθος του διαθέσιμου χώρου στο Nextcloud και αντίθετα εμφανίζει το μέγεθος της μονάδας δίσκου C: με τον διαθέσιμο χώρο της.
Απάντηση
Δυστυχώς αυτός είναι ένας περιορισμός του ίδιου του WebDAV, επειδή δεν παρέχει τρόπο για τον πελάτη να λάβει τον διαθέσιμο ελεύθερο χώρο από τον διακομιστή. Τα Windows αυτόματα επιστρέφουν στην εμφάνιση του μεγέθους της μονάδας δίσκου C: με τον διαθέσιμο χώρο της. Δυστυχώς λοιπόν δεν υπάρχει πραγματική λύση σε αυτό το πρόβλημα.
Πρόβλημα
Αποτυγχάνει η πρόσβαση στα αρχεία σας από το Microsoft Office μέσω WebDAV.
Λύση
Τα γνωστά προβλήματα και οι λύσεις τους τεκμηριώνονται στο άρθρο KB2123563.
Πρόβλημα
Δεν είναι δυνατή η αντιστοίχιση του Nextcloud ως μονάδας δίσκου WebDAV στα Windows χρησιμοποιώντας αυτο-υπογεγραμμένο πιστοποιητικό.
Λύση
Πρόσβαση στην παρουσία Nextcloud σας μέσω του αγαπημένου σας προγράμματος περιήγησης Web.
Κάντε κλικ μέχρι να φτάσετε στο σφάλμα πιστοποιητικού στη γραμμή κατάστασης του προγράμματος περιήγησης.
Προβάλετε το πιστοποιητικό, στη συνέχεια από την καρτέλα Λεπτομέρειες, επιλέξτε “Αντιγραφή σε Αρχείο”.
Αποθηκεύστε το αρχείο στην επιφάνεια εργασίας σας με ένα αυθαίρετο όνομα, για παράδειγμα
myNextcloud.pem.Μεταβείτε στο μενού Έναρξη > Εκτέλεση, πληκτρολογήστε MMC και κάντε κλικ στο “OK” για να ανοίξετε την Κονσόλα Διαχείρισης της Microsoft.
Μεταβείτε στο Αρχείο > Προσθήκη/Αφαίρεση Snap-In.
Επιλέξτε Πιστοποιητικά, Κάντε κλικ στο “Προσθήκη”, επιλέξτε “Ο Λογαριασμός Μου”, στη συνέχεια “Τέλος” και τελικά “OK”.
Πλοηγηθείτε στις Αρχές Πιστοποίησης Ρίζας Αξιοπιστίας, Πιστοποιητικά.
Κάντε δεξί κλικ στο Πιστοποιητικό, Επιλέξτε Όλες τις Εργασίες και Εισαγωγή.
Επιλέξτε το αποθηκευμένο πιστοποιητικό από την Επιφάνεια Εργασίας.
Επιλέξτε Τοποθέτηση όλων των Πιστοποιητικών στο ακόλουθο Αποθετήριο και κάντε κλικ στο Περιήγηση.
Επιλέξτε το πλαίσιο που λέει Εμφάνιση Φυσικών Αποθετηρίων, αναπτύξτε τις Αρχές Πιστοποίησης Ρίζας Αξιοπιστίας, επιλέξτε Τοπικός Υπολογιστής εκεί, κάντε κλικ στο “OK” και Ολοκληρώστε την Εισαγωγή.
Ελέγξτε τη λίστα για να βεβαιωθείτε ότι εμφανίζεται το πιστοποιητικό. Πιθανότατα θα χρειαστεί να Ανανεώσετε πριν το δείτε.
Κλείστε το MMC.
Για χρήστες Firefox:
Εκκινήστε το πρόγραμμα περιήγησής σας, μεταβείτε στο Μενού Εφαρμογής > Ιστορικό > Εκκαθάριση πρόσφατου ιστορικού…
Επιλέξτε “Όλα” στο αναπτυσσόμενο μενού “Χρονικό εύρος εκκαθάρισης”
Επιλέξτε το πλαίσιο ελέγχου “Ενεργές Συνδέσεις”
Κάντε κλικ στο κουμπί “Εκκαθάριση τώρα”
Κλείστε το πρόγραμμα περιήγησης, στη συνέχεια ανοίξτε ξανά και δοκιμάστε.
Για χρήστες προγραμμάτων περιήγησης βασισμένων στο Chrome (Chrome, Chromium, Microsoft Edge):
Ανοίξτε τον Πίνακα Ελέγχου των Windows, πλοηγηθείτε στις Επιλογές Διαδικτύου
Στην καρτέλα Περιεχόμενο, κάντε κλικ στο κουμπί Εκκαθάριση Κατάστασης SSL.
Κλείστε το πρόγραμμα περιήγησης, στη συνέχεια ανοίξτε ξανά και δοκιμάστε.
Πρόσβαση σε αρχεία χρησιμοποιώντας το cURL
Εφόσον το WebDAV είναι μια επέκταση του HTTP, το cURL μπορεί να χρησιμοποιηθεί για δέσμες ενεργειών λειτουργιών αρχείων.
Σημείωση
Ρυθμίσεις → Διαχείριση → Κοινή χρήση → Να επιτρέπεται στους χρήστες αυτού του διακομιστή να στέλνουν κοινές χρήσεις σε άλλους διακομιστές. Εάν αυτή η επιλογή είναι απενεργοποιημένη, η επιλογή --header "X-Requested-With: XMLHttpRequest" πρέπει να περαστεί στο cURL.
Για να δημιουργήσετε ένα φάκελο με την τρέχουσα ημερομηνία ως όνομα:
$ curl -u user:pass -X MKCOL "https://example.com/nextcloud/remote.php/dav/files/USERNAME/$(date '+%d-%b-%Y')"
Για να ανεβάσετε ένα αρχείο error.log σε αυτόν τον κατάλογο:
$ curl -u user:pass -T error.log "https://example.com/nextcloud/remote.php/dav/files/USERNAME/$(date '+%d-%b-%Y')/error.log"
Για να μετακινήσετε ένα αρχείο:
$ curl -u user:pass -X MOVE --header 'Destination: https://example.com/nextcloud/remote.php/dav/files/USERNAME/target.jpg' https://example.com/nextcloud/remote.php/dav/files/USERNAME/source.jpg
Για να λάβετε τις ιδιότητες των αρχείων στον ριζικό φάκελο:
    $ curl -X PROPFIND -H "Depth: 1" -u user:pass https://example.com/nextcloud/remote.php/dav/files/USERNAME/ | xml_pp
    <?xml version="1.0" encoding="utf-8"?>
<d:multistatus xmlns:d="DAV:" xmlns:oc="http://nextcloud.org/ns" xmlns:s="http://sabredav.org/ns">
  <d:response>
    <d:href>/nextcloud/remote.php/dav/files/USERNAME/</d:href>
    <d:propstat>
      <d:prop>
        <d:getlastmodified>Tue, 13 Oct 2015 17:07:45 GMT</d:getlastmodified>
        <d:resourcetype>
          <d:collection/>
        </d:resourcetype>
        <d:quota-used-bytes>163</d:quota-used-bytes>
        <d:quota-available-bytes>11802275840</d:quota-available-bytes>
        <d:getetag>"561d3a6139d05"</d:getetag>
      </d:prop>
      <d:status>HTTP/1.1 200 OK</d:status>
    </d:propstat>
  </d:response>
  <d:response>
    <d:href>/nextcloud/remote.php/dav/files/USERNAME/welcome.txt</d:href>
    <d:propstat>
      <d:prop>
        <d:getlastmodified>Tue, 13 Oct 2015 17:07:35 GMT</d:getlastmodified>
        <d:getcontentlength>163</d:getcontentlength>
        <d:resourcetype/>
        <d:getetag>"47465fae667b2d0fee154f5e17d1f0f1"</d:getetag>
        <d:getcontenttype>text/plain</d:getcontenttype>
      </d:prop>
      <d:status>HTTP/1.1 200 OK</d:status>
    </d:propstat>
  </d:response>
</d:multistatus>
Πρόσβαση σε αρχεία χρησιμοποιώντας το WinSCP
Το WinSCP είναι ένας πελάτης ανοιχτού κώδικα δωρεάν για SFTP, FTP, WebDAV, S3 και SCP για Windows. Η κύρια λειτουργία του είναι η μεταφορά αρχείων μεταξύ ενός τοπικού και ενός απομακρυσμένου υπολογιστή. Εκτός από αυτό, το WinSCP προσφέρει δέσμες ενεργειών και βασική λειτουργικότητα διαχείρισης αρχείων.
Μπορείτε να κατεβάσετε την φορητή έκδοση του WinSCP και να την εκτελέσετε σε Linux μέσω του Wine.
Για να εκτελέσετε το WinSCP σε Linux, κατεβάστε το wine μέσω του διαχειριστή πακέτων της διανομής σας, στη συνέχεια εκτελέστε το με την εντολή: wine WinSCP.exe.
Για σύνδεση στο Nextcloud:
Εκκινήστε το WinSCP
Πατήστε “Συνεδρία” στο μενού
Πατήστε την επιλογή μενού “Νέα Συνεδρία”
Ορίστε το αναπτυσσόμενο “Πρωτόκολλο Αρχείου” σε WebDAV
Ορίστε το αναπτυσσόμενο “Κρυπτογράφηση” σε TLS/SSL Απόλυτη κρυπτογράφηση
Συμπληρώστε το πεδίο όνομα κεντρικού υπολογιστή:
example.comΣυμπληρώστε το πεδίο όνομα χρήστη:
NEXTCLOUDUSERNAMEΣυμπληρώστε το πεδίο συνθηματικού:
NEXTCLOUDPASSWORDΠατήστε το κουμπί “Για προχωρημένους…”
Πλοηγηθείτε στο “Περιβάλλον”, “Κατάλογοι” στην αριστερή πλευρά
Συμπληρώστε το πεδίο “Απομακρυσμένος κατάλογος” με τα ακόλουθα:
/nextcloud/remote.php/dav/files/NEXTCLOUDUSERNAME/Πατήστε το κουμπί “OK”
Πατήστε το κουμπί “Αποθήκευση”
Επιλέξτε τις επιθυμητές επιλογές και πατήστε το κουμπί “OK”
Πατήστε το κουμπί “Σύνδεση” για σύνδεση στο Nextcloud
Σημείωση
Συνιστάται η χρήση συνθηματικού εφαρμογής για το συνθηματικοό εάν χρησιμοποιείτε TOTP, καθώς το WinSCP δεν κατανοεί το TOTP με το Nextcloud κατά το χρόνο συγγραφής (2022-11-07).