Verwenden der E-Mail-App
Bemerkung
Die E-Mail-App wird standardmäßig mit Nextcloud Hub installiert, kann aber deaktiviert werden. Bitte fragen Sie Ihre Administration.

Ihr E-Mail-Konto verwalten
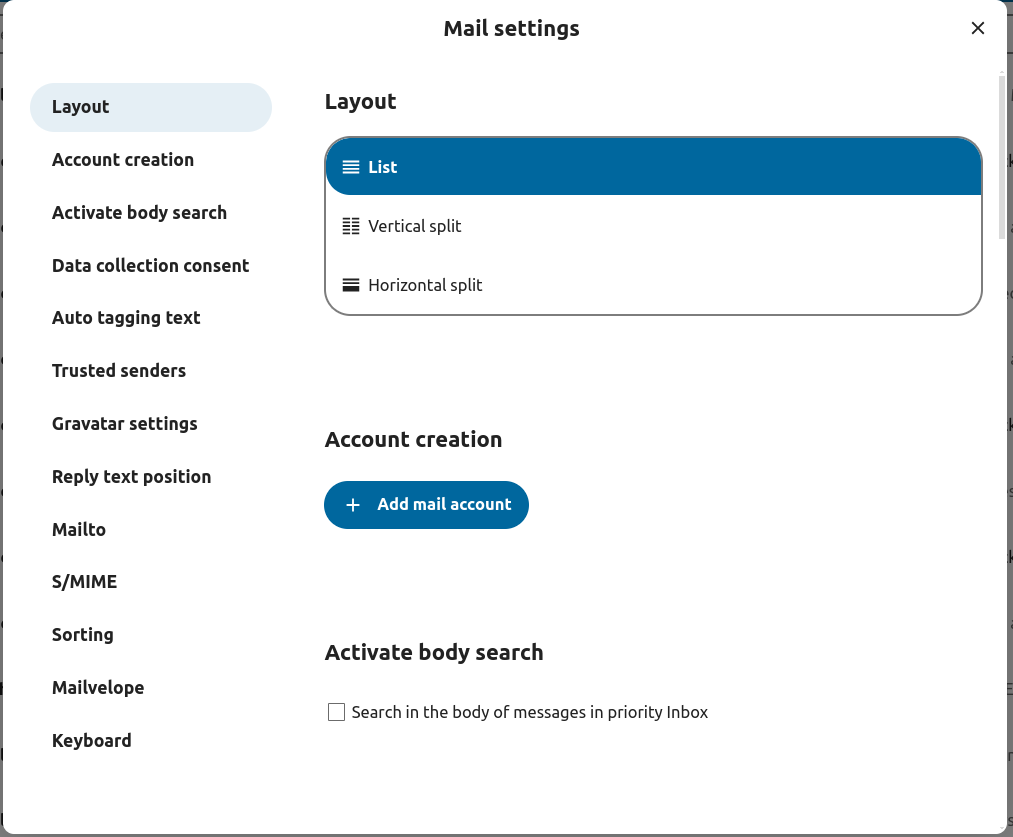
Layout umschalten
Added in version 3.6.
E-Mail-Einstellungen besuchen
Zwischen Liste, Vertikale Aufteilung und Horizontale Aufteilung wählen
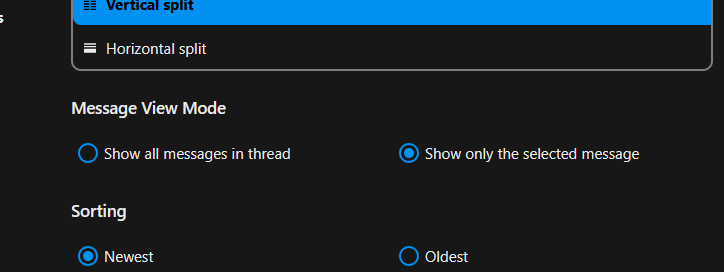
Meldungsanzeige / Betriebsmodus
Added in version 5.2.
Mail bietet die Möglichkeit, zwischen zwei verschiedenen Nachrichtenansichten und Betriebsmodi zu wechseln: Threaded und Singleton.
Im Threaded-Modus werden Nachrichten nach Unterhaltungen gruppiert. In der Mailbox-Nachrichtenliste werden zusammengehörende Nachrichten gestapelt, sodass nur die aktuellste Nachricht angezeigt wird. Alle zugehörigen Nachrichten werden nach Auswahl der gestapelten Nachricht im Nachrichtenanzeigefeld angezeigt. Dies ist hilfreich, um Diskussionen zu verfolgen und den Kontext von Antworten zu verstehen. In diesem Modus gelten Nachrichtenvorgänge wie Verschieben und Löschen für den gesamten Thread. Das bedeutet, dass beim Verschieben oder Löschen eines Threads alle Nachrichten innerhalb dieses Threads betroffen sind.
Im Singleton-Modus werden Nachrichten einzeln angezeigt, sowohl in der Mailbox-Nachrichtenliste als auch im Nachrichtenanzeigefeld. Funktionen wie Verschieben und Löschen gelten nur für die ausgewählte Nachricht. Dieser Modus ist nützlich, wenn Sie Nachrichten separat verwalten möchten, ohne die gesamte Konversation zu beeinflussen.
E-Mail-Einstellungen besuchen
Zwischen Threaded und Singleton wählen
Ein neues E-Mail-Konto hinzufügen
Aktivieren Sie die E-Mail-App über die Apps
Klicken Sie auf das E-Mail-Symbol in der Kopfzeile
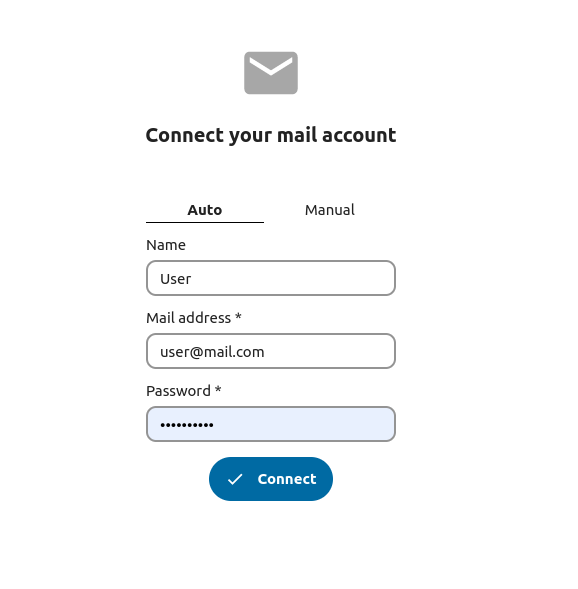
Füllen Sie das Anmeldeformular aus (automatisch oder manuell).
Sortierreihenfolge ändern
Added in version 3.5.
E-Mail-Einstellungen besuchen
Zu Sortierung wechseln
Sie können wählen, ob die älteste oder neueste E-Mail zuerst angezeigt wird.
Bemerkung
Diese Änderung gilt für alle Ihrer Konten und Postfächer
Sort favorites up
Added in version 5.7: Nextcloud 31 or newer
This setting allows you to show messages set as favorite in a separate section on top of the message list.
E-Mail-Einstellungen besuchen
Go to Appearance
Enable sorting favorites up
Geplante Nachrichten
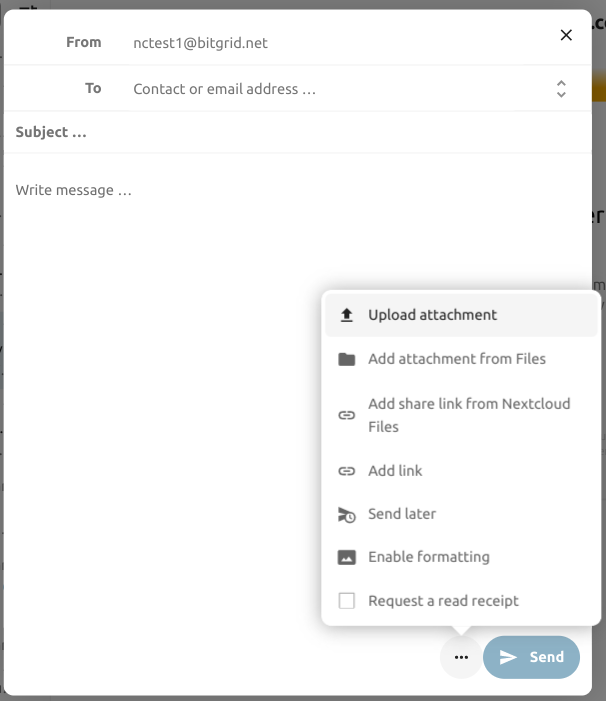
Klicken Sie oben links auf dem Bildschirm auf die Schaltfläche „Neue Nachricht“.
Klicken Sie im Erstellungsbereich auf das Aktionsmenü (…).
Klicken Sie auf „Später senden“
Priorisierter Posteingang
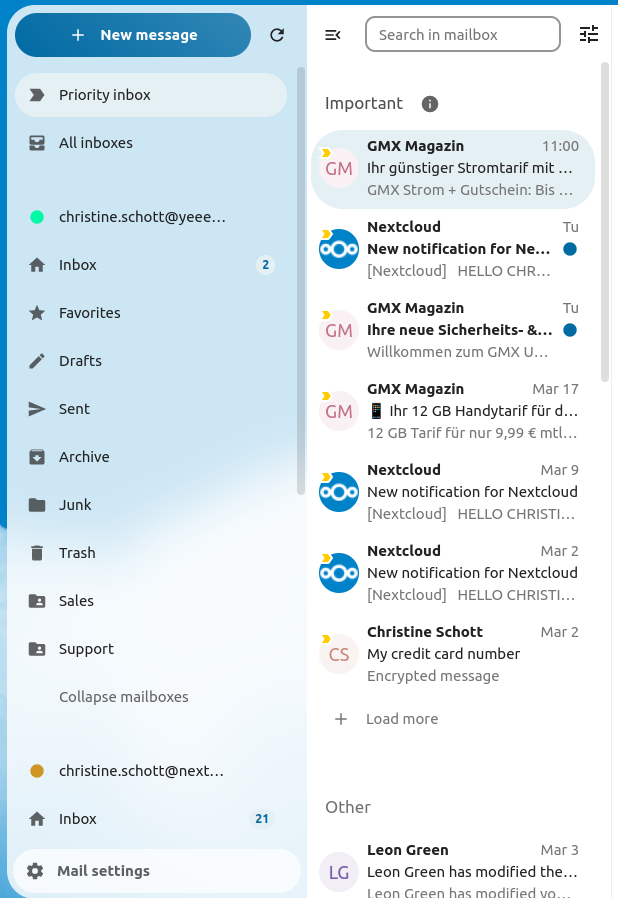
Der priorisierte Posteingang besteht aus den Abschnitten „Wichtig“ und „Sonstiges“. Nachrichten werden automatisch als wichtig markiert, basierend darauf, mit welchen Nachrichten Sie interagiert oder welche Nachrichten Sie als wichtig markiert haben. Zu Beginn müssen Sie möglicherweise manuell die Wichtigkeit ändern, um das System zu trainieren, aber das wird sich mit der Zeit verbessern.
The automatic classification is optional. You can opt-out when setting up an account. The classification can also be turned on and off in the account settings at any time.
Alle Posteingänge
Alle Nachrichten von allen Konten, bei denen Sie angemeldet sind, werden hier chronologisch angezeigt.
Kontoeinstellungen
Ihre Kontoeinstellungen wie z. B.:
Aliase
Signatur
Standardordner
Autoresponder
Vertrauenswürdige Absender
… und mehr
Zu finden im Aktionsmenü eines E-Mail-Kontos. Dort können Sie je nach Bedarf Einstellungen bearbeiten, hinzufügen oder entfernen.
Nachrichten in den Junk-Ordner verschieben
Added in version 3.4.
Mail kann eine Nachricht in einen anderen Ordner verschieben, wenn sie als Junk markiert ist.
Kontoeinstellungen besuchen
Zu Standardordner wechseln
Prüfen Sie, ob ein Ordner für die Junk-Mails ausgewählt ist.
Zu den Junk-Einstellungen wechseln
„Nachrichten in den Junk-Ordner verschieben“ anklicken

Refresh mailbox
You can manually trigger a sync of your mailbox by clicking the refresh button located at the top of the mailbox list.
Starting from version 5.7 triggering the sync will also refresh the list of folders for the selected account.
Im Postfach suchen
Added in version 2.1.
Oben in der Umschlagliste in jedem Mail-Layout gibt es eine Suchfeldverknüpfung zum Suchen nach E-Mail-Betreffzeilen. Ab Version 3.7 können Sie mit dieser Verknüpfung standardmäßig nach Betreff, Empfänger (An) oder Absender (Von) suchen.
Erweiterte Suche im Postfach
Added in version 3.4.
Sie können über ein Modalfenster am Ende der Suchverknüpfung auf unsere erweiterte Suchfunktion zugreifen.
E-Mail-Text-Suche aktivieren
Added in version 3.5.
E-Mail-Texte können jetzt durchsucht werden. Aufgrund potenzieller Leistungsprobleme ist diese Funktion optional.
So aktivieren Sie dies:
Kontoeinstellungen besuchen
Zur Postfachsuche wechseln
E-Mail-Text-Suche aktivieren
Warnung
Wenn Sie dies auch für einheitliche Postfächer aktivieren möchten, müssen Sie dies auch in den Mail-Einstellungen tun
Wenn Sie diese Option aktivieren, durchsucht das Hauptsuchfeld jetzt sowohl Betreffzeilen als auch E-Mail-Texte. Außerdem wird in der erweiterten Suche eine separate Option Text angezeigt.
Konto delegieren
Die App ermöglicht die Kontodelegierung, so dass ein Benutzer E-Mails von der Adresse eines anderen Benutzers senden kann.
Die Delegation muss auf dem Mailserver von einem Administrator konfiguriert werden
Fügen Sie die andere E-Mail-Adresse als Alias für Ihr eigenes E-Mail-Konto hinzu
Wählen Sie beim Senden einer E-Mail den Alias als Absender aus
Warnung
Die gesendete E-Mail ist für das ursprüngliche Konto möglicherweise nicht sichtbar, wenn sie in Ihrem persönlichen Gesendet-Postfach gespeichert ist.
Automatisches Löschen des Papierkorbs
Added in version 3.4.
Die Mail-App kann Nachrichten im Papierkorb nach einer bestimmten Anzahl von Tagen automatisch löschen.
Kontoeinstellungen besuchen
Zum automatischen Löschen des Papierkorbs wechseln
Geben Sie die Anzahl der Tage ein, nach denen Nachrichten gelöscht werden sollen
Deaktivieren Sie die Papierkorbaufbewahrung, indem Sie das Feld leer lassen oder auf 0 setzen.
Bemerkung
Es werden nur E-Mails verarbeitet, die nach der Aktivierung der Papierkorbaufbewahrung gelöscht wurden.

Nachrichten erstellen
Klicken Sie oben links auf dem Bildschirm auf „Neue Nachricht“.
Beginnen Sie Ihre Nachricht zu schreiben
Erstellungsbreich minimieren
Added in version 3.2.
Der Erstellungsbereich kann minimiert werden, während Sie eine neue Nachricht schreiben, einen vorhandenen Entwurf oder eine Nachricht aus dem Postausgang bearbeiten. Klicken Sie einfach oben rechts im Modal auf die Schaltfläche „Minimieren“ oder klicken Sie auf eine beliebige Stelle außerhalb des Erstellungsbereichs.

Sie können Ihre minimierte Nachricht fortsetzen, indem Sie irgendwo auf die Anzeige unten rechts auf Ihrem Bildschirm klicken.

Drücken Sie die Schaltfläche „Schließen“ im Modal oder die Anzeige in der unteren rechten Ecke, um die Bearbeitung einer Nachricht zu beenden. Ein Entwurf wird automatisch in Ihrem Entwurfspostfach gespeichert.
Empfängerinfo beim Erstellen
Added in version 4.2.
Wenn Sie Ihren ersten Empfänger oder Kontakt im Feld „An“ hinzufügen, wird ein rechter Bereich mit den gespeicherten Profildetails dieses Kontakts angezeigt. Wenn Sie einen zweiten Kontakt hinzufügen, wird die Liste ausgeblendet, sodass Sie jeden hinzugefügten Kontakt auswählen und erweitern können, um dessen Details anzuzeigen. Wenn Sie sich lieber ausschließlich auf das Schreiben im Editor konzentrieren möchten, können Sie den rechten Bereich ausblenden, indem Sie auf das Erweiterungssymbol in der oberen rechten Ecke klicken. Um den rechten Bereich wieder anzuzeigen, klicken Sie einfach an derselben Stelle auf das Minimierungssymbol.
Kontakte erwähnen
Added in version 4.2.
Sie können Kontakte in Ihrer Nachricht erwähnen, indem Sie @ eingeben und dann den Kontakt aus der Liste auswählen. Dadurch wird der Kontakt automatisch als Empfänger hinzugefügt.
Bemerkung
Es werden nur Kontakte mit einer gültigen E-Mail-Adresse vorgeschlagen.
Textblöcke
Added in version 5.2.
Textblöcke sind vordefinierte Textausschnitte, die in Ihre E-Mail eingefügt werden können. Sie können in den E-Mail-Einstellungen erstellt und verwaltet werden. Sie können in den Editor eingefügt werden, indem Sie „!“ eingeben und anschließend den Block aus der Liste oder den Editor-Aktionen auswählen. Textblöcke können mit Benutzern und Benutzergruppen geteilt werden.
Postausgang
Wenn eine Nachricht verfasst und auf die Schaltfläche „Senden“ geklickt wurde, wird die Nachricht zum Postausgang hinzugefügt, der sich in der unteren linken Ecke der linken Seitenleiste befindet.
Sie können Datum und Uhrzeit des Sendevorgangs auch auf einen Zeitpunkt in der Zukunft festlegen (siehe Geplante Nachrichten) - die Nachricht bleibt im Postausgang, bis das von Ihnen gewählte Datum und die gewählte Uhrzeit erreicht sind, und wird dann automatisch gesendet.
Der Postausgang ist nur sichtbar, wenn eine Nachricht darauf wartet, im Postausgang bearbeitet zu werden.
Sie können den Editor für eine Nachricht im Postausgang jederzeit erneut öffnen, bevor der „Senden“-Vorgang ausgelöst wird.
Bemerkung
Tritt beim Senden ein Fehler auf, sind drei Fehlermeldungen möglich:
- Konnte nicht in das Postfach „Gesendet“ kopiert werden
Die Mail wurde versendet, konnte aber nicht in das Postfach „Gesendet“ kopiert werden. Dieser Fehler wird vom Postausgang behandelt und der Kopiervorgang wird erneut versucht.
- E-Mail-Serverfehler
Das Senden war nicht erfolgreich und kann in einem Status wiederholt werden (z. B.: Der SMTP-Server konnte nicht erreicht werden). Der Postausgang versucht erneut, die Nachricht zu senden.
- Nachricht konnte nicht gesendet werden
Das Senden kann fehlgeschlagen sein, muss aber nicht. Der Mailserver kann uns den Status der Nachricht nicht mitteilen. Da die Mail-App den Status der Nachricht (gesendet oder nicht gesendet) nicht bestimmen kann, bleibt die Nachricht im Postausgang und der Kontobenutzer muss entscheiden, wie er weiter vorgeht.
Postfachaktionen
Postfach hinzufügen
Öffnen Sie das Aktionsmenü eines Kontos
Klicken Sie auf Postfach hinzufügen
Ein Unterpostfach hinzufügen
Öffnen Sie das Aktionsmenü eines Postfachs
Klicken Sie auf Unterpostfach hinzufügen
Umschlagaktionen
Termin erstellen
Erstellen Sie ein Ereignis für eine bestimmte Nachricht/einen bestimmten Thread direkt über die Mail-App
Aktionsmenü eines Umschlags öffnen
Auf Weitere Aktionen klicken
Auf Ereignis erstellen klicken
Bemerkung
Der Veranstaltungstitel und eine Tagesordnung werden für Sie erstellt, wenn die Administration dies aktiviert hat.
Eine Aufgabe erstellen
Added in version 3.2.
Erstellen Sie eine Aufgabe für eine bestimmte Nachricht/einen bestimmten Thread direkt über die Mail-App
Aktionsmenü eines Umschlags öffnen
Klicken Sie auf Weitere Aktionen
Klicken Sie auf Aufgabe erstellen
Bemerkung
Aufgaben werden in unterstützten Kalendern gespeichert. Wenn kein kompatibler Kalender vorhanden ist, können Sie mit der Kalender-App einen neuen erstellen.
KI-Zusammenfassung
Added in version 4.2.
Beim Durchsuchen Ihres Postfachs wird Ihnen als Vorschau eine kurze, von der KI generierte Zusammenfassung Ihrer E-Mails angezeigt.
Bemerkung
Bitte beachten Sie, dass die Funktion von der Administration aktiviert werden muss
Quick actions
Added in version 5.5: (Nextcloud 30)
Allows you to group action steps that you would normally perform on envelopes such as tagging, moving, marking as read … into quick actions that can be executed with a single click. Quick actions are scoped to one mail account and can be created and managed in the mail settings under „Quick actions“ or directly from the envelope action menu.
Bemerkung
Some action steps such as Mark as spam, Move thread and Delete thread are mutually exclusive and cannot be part of the same quick action, they also can’t be re-ordered and will always be executed last.
Bemerkung
Please note that quick actions will be performed on all messages in a thread when executed on one.
Nachrichtenaktionen
Von Mailingliste abmelden
Added in version 3.1.
Manche Mailinglisten und Newsletter erlauben eine einfache Abmeldung. Wenn die Mail-App Mails solcher Absender entdeckt, zeigt ein ein „Abmelden“-Knopf neben den Sender-Informationen. Klicken und bestätigen Sie diesen, um sich von der Liste abzumelden
Zurückstellen
Added in version 3.4.
Durch das Zurückstellen einer Nachricht oder eines Threads wird diese in ein dediziertes Postfach verschoben, bis das ausgewählte Zurückstelldatum erreicht ist und die Nachricht oder der Thread zurück in das ursprüngliche Postfach verschoben wird.
Aktionsmenü eines Umschlags oder Threads öffnen
„Zurückstellen“ anklicken
Auswählen, wie lange die Nachricht oder der Thread zurückgestellt werden soll
Intelligente Antworten
Added in version 3.6.
Wenn Sie eine Nachricht in der Mail-App öffnen, werden KI-generierte Antworten vorgeschlagen. Durch einfaches Klicken auf eine vorgeschlagene Antwort öffnet sich der Editor mit der vorausgefüllten Antwort.
Bemerkung
Bitte beachten Sie, dass die Funktion von der Administration aktiviert werden muss
Bemerkung
Unterstützte Sprachen hängen vom verwendeten großen Sprachmodell ab
E-Mail-Übersetzung
Added in version 4.2.
Sie können Nachrichten ähnlich wie bei Talk in Ihre konfigurierten Sprachen übersetzen.
Bemerkung
Bitte beachten Sie, dass die Übersetzungsfunktionen auf dem Server aktiviert sein müssen
Bemerkung
Seit Version 5.3 werden Übersetzungen vorgeschlagen, wenn LLM von der Administration aktiviert ist
Thread-Zusammenfassung
Die Mail-App unterstützt das Zusammenfassen von Nachrichten-Threads mit 3 oder mehr Nachrichten.
Added in version 3.4.
Bemerkung
Bitte beachten Sie, dass die Funktion von der Administration aktiviert werden muss
Bemerkung
Bitte beachten Sie, dass diese Funktion nur mit integration_openai gut funktioniert. Lokale LLMs brauchen zu lange, um zu antworten, und die Zusammenfassungsanfrage läuft wahrscheinlich ab und verursacht dennoch eine erhebliche Systemlast.
Filterung und automatische Antworten
Die Mail-App verfügt über einen Editor für Sieve-Skripte, eine Schnittstelle zum Konfigurieren von automatischer Antworten und eine Schnittstelle zum Konfigurieren von Filtern. Sieve muss in den Kontoeinstellungen aktiviert werden.
Automatische Antworten
Added in version 3.5: Automatische Antworten können Systemeinstellungen folgen.
Die automatischen Antworten sind standardmäßig deaktiviert. Es kann manuell eingestellt werden oder den Systemeinstellungen folgen. Den Systemeinstellungen folgen bedeutet, dass die im Abschnitt Abwesenheitseinstellungen eingegebene lange Abwesenheitsnachricht automatisch angewendet wird.
Filter
Added in version 4.1.
Mail 4.1 enthält einen einfachen Editor zum Konfigurieren von Filterregeln.
Bemerkung
Das Importieren vorhandener Filter wird nicht unterstützt. Alle vorhandenen Filter bleiben jedoch aktiv und unverändert. Wir empfehlen, Ihr aktuelles Skript vorsichtshalber über den Sieve-Skripteditor zu sichern.
So fügen Sie einen neuen Filter hinzu
Ihre Kontoeinstellungen öffnen.
Stellen Sie sicher, dass Sieve für Ihr Konto aktiviert ist (siehe Sieve-Servereinstellungen).
Auf Filter klicken.
Neuer Filter auswählen, um eine neue Regel zu erstellen.
So wird ein Filter gelöscht
Ihre Kontoeinstellungen öffnen.
Stellen Sie sicher, dass Sieve für Ihr Konto aktiviert ist (siehe Sieve-Servereinstellungen).
Auf Filter klicken.
Bewegen Sie den Mauszeiger über den Filter, den Sie löschen möchten, und klicken Sie dann auf das Papierkorbsymbol.
Bedingungen
Auf eingehende E-Mails auf Ihrem Mailserver werden Bedingungen angewendet, die auf Felder wie Betreff, Absender und Empfänger abzielen. Sie können die folgenden Operatoren verwenden, um Bedingungen für diese Felder zu definieren:
ist genau: Eine exakte Übereinstimmung. Das Feld muss mit dem angegebenen Wert identisch sein.
contains: Eine Teilzeichenfolgeübereinstimmung. Das Feld stimmt überein, wenn der angegebene Wert darin enthalten ist. Beispielsweise würde „Report“ mit „Port“ übereinstimmen.
matches: Ein Mustervergleich mit Platzhaltern. Das Symbol „*“ steht für eine beliebige Anzahl von Zeichen (auch für keines), während „?“ für genau ein Zeichen steht. So würde beispielsweise „Bericht“ auf „Geschäftsbericht 2024“ passen.
Aktionen
Aktionen werden ausgelöst, wenn die angegebenen Tests wahr sind. Die folgenden Aktionen sind verfügbar:
fileinto: Verschiebt die Nachricht in einen angegebenen Ordner.
addflag: Fügt der Nachricht eine Markierung hinzu.
stop: Hält die Ausführung des Filterskripts an. Nach dieser Aktion werden keine weiteren Filter mehr ausgeführt.
Erstellen eines Filters aus einer Nachricht
Added in version 5.2.
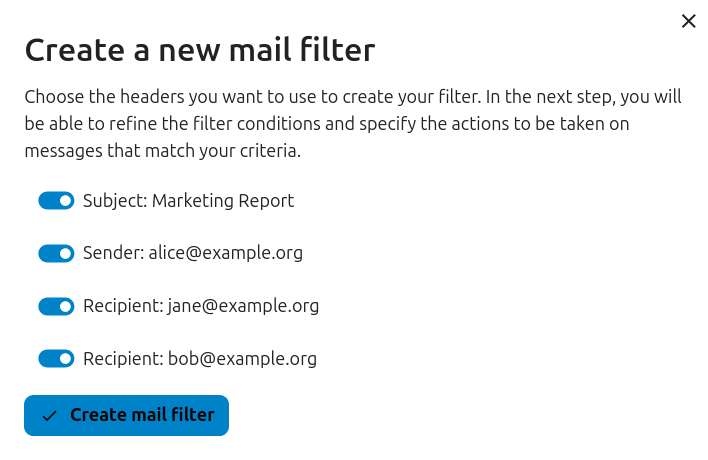
Um einen Filter für eine bestimmte Nachricht zu erstellen, öffnen Sie die Nachricht und öffnen Sie anschließend das Menü, indem Sie auf die drei Punkte klicken. Klicken Sie anschließend auf „Weitere Aktionen“ und anschließend auf „Mail-Filter erstellen“.
Im Dialog die Bedingungen für eingehende Nachrichten auswählen und mit einem Klick auf „Mailfilter erstellen“ fortfahren.
Nachverfolgen-Erinnerungen
Added in version 4.0.
Die Mail-App erinnert Sie automatisch daran, wenn auf eine ausgehende E-Mail keine Antwort eingegangen ist. Jede gesendete E-Mail wird von einer KI analysiert, um zu prüfen, ob eine Antwort erwartet wird. Nach vier Tagen werden alle relevanten E-Mails in Ihrem Prioritäts-Posteingang angezeigt.
Wenn Sie auf eine solche E-Mail klicken, wird eine Schaltfläche angezeigt, mit der Sie schnell die Nachverfolgung für alle Empfänger aktivieren können. Es ist auch möglich, Nachverfolgen-Erinnerungen für eine gesendete E-Mail zu deaktivieren.
Bemerkung
Bitte beachten, dass die Funktion von der Administration aktiviert werden muss.
Sicherheit
Phishing-Erkennung
Added in version 4.0.
Die Mail-App prüft auf mögliche Phishing-Versuche und zeigt dem Benutzer eine Warnung an.
Es werden folgende Kontrollen durchgeführt:
Die im Adressbuch gespeicherte Absenderadresse stimmt nicht mit der im Mailkonto gespeicherten Adresse überein
Der Absender verwendet eine benutzerdefinierte E-Mail-Adresse, die nicht mit der Absenderadresse übereinstimmt.
Das Versanddatum liegt in der Zukunft
Links im Nachrichtentext verweisen nicht auf den angezeigten Text
Die Antwortadresse ist nicht identisch mit der Absenderadresse
Bemerkung
Bitte beachten Sie, dass die Warnung nicht bedeutet, dass es sich bei der Nachricht um einen Phishing-Versuch handelt. Sie bedeutet lediglich, dass die Mail-App einen potenziellen Phishing-Versuch erkannt hat.
Interne Adressen
Added in version 4.0.
Die Mail-App ermöglicht das Hinzufügen interner Adressen und Domänen und warnt den Benutzer beim Senden und Empfangen einer Nachricht, wenn die Adresse nicht in der Liste enthalten ist.
So wird eine interne Adresse hinzugefügt:
E-Mail-Einstellungen öffnen
Zum Abschnitt Datenschutz und Sicherheit navigieren
Die internen Adressen aktivieren durch Klicken auf das Kontrollkästchen
Auf die Schaltfläche „Interne Adresse hinzufügen“ klicken
Adresse oder Domäne eingeben und auf „Hinzufügen“ klicken
Dashboard-Integration
Added in version 1.8.
Die Mail-App bietet zwei Widgets, die für die Integration mit dem Dashboard von Nextcloud entwickelt wurden:
Ungelesene E-Mails: Dieses Widget zeigt ungelesene E-Mails an.
Wichtige E-Mails: Dieses Widget zeigt E-Mails an, die als wichtig gekennzeichnet wurden.
Diese Widgets verwenden die E-Mails der E-Mail-Konten, die für Ihr Konto eingerichtet sind.
Calendar integration
The Mail app integrates with the Calendar app to help you manage meeting invitations and keep your calendar up to date.
Meeting invitations
When you receive a message containing a meeting invitation, the Mail app automatically detects the attached calendar file and displays a formatted action section to help you respond.
You can:
Accept the invitation
Decline the invitation
Tentatively accept the invitation
Your response is sent directly from the Mail app, and the event is added to your primary calendar accordingly.
You can also manually add a meeting invitation to a specific calendar:
Open the message with the meeting invitation
Scroll to the bottom of the message to the attachments section
Select the calendar file (usually with a .ics extension), then click the three dots menu.
Click „Import in to calendar“ and choose the desired calendar.
Meeting invitation automation
When a meeting organizer sends updates to an existing event (such as time changes or location updates), the Mail app processes these automatically and updates the corresponding event in your calendar.
Added in version 5.7: (Nextcloud 32 or newer)
You can also configure Mail to automatically add all new meeting invitations to your calendar without requiring manual acceptance. The invitations will be added to the calendar as tentative.
To enable this feature:
Visit account settings of a specific mail account
Navigate to Calendar settings section
Enable Automatically create tentative appointments in calendar
Bemerkung
With this setting enabled, invitations will still appear in your mail list, but they will be automatically added to your calendar.
Keyboard shortcuts
The Mail app implements several keyboard shortcuts to speed up your experience.
For a full list of the supported shortcuts, check out the Mail settings in your instance.

