Accès aux fichiers Nextcloud avec WebDAV
Nextcloud est pleinement compatible avec le protocole WebDAV, et vous pouvez vous connecter et effectuer une synchronisation de vos fichiers Nextcloud avec WebDAV. Dans ce chapitre, vous apprendrez comment connecter Linux, macOS, Windows ou encore des appareils mobiles à votre serveur Nextcloud.
WebDAV signifie « Distributed Authoring and Versioning ». Il s’agit d’une extension HTTP qui facilite la création, la lecture et la modification des fichiers hébergés sur des serveurs web distants. Avec un client WebDAV, vous pouvez accéder à vos fichiers Nextcloud (dont les partages) sur Linux, macOS et Windows de façon identique à n’importe quel partage réseau et rester synchronisé.
Avant de configurer WebDAV, regardons la méthode recommandée de connecter des appareils client à Nextcloud.
Clients officiels Nextcloud pour ordinateurs et mobiles
La méthode recommandée de synchroniser un ordinateur avec un serveur Nextcloud est d’utiliser le `client de synchronisation officiel Nextcloud<https://nextcloud.com/install/#install-clients>`_. Vous pouvez configurer le client pour sauvegarder des fichiers dans n’importe quel répertoire local et vous pouvez choisir avec quels répertoires du serveur se synchroniser. Le client affiche l’état actuel de la connexion et enregistre toutes les activités, vous pouvez donc toujours savoir quel fichier distant a été téléchargé sur votre ordinateur et vous pouvez vérifier que les fichiers créés et mis à jour sur votre ordinateur local sont bien été synchronisés.
La méthode recommandée pour synchroniser les périphériques Android et Apple iOS est d’utiliser les `applications mobiles officielles Nextcloud<https://nextcloud.com/install/>`_.
Pour connecter les applications Nextcloud officielles à un serveur Nextcloud, utilisez la même URL que celle que vous utilisez pour accéder à Nextcloud depuis votre navigateur web - par ex.:
https://cloud.example.com
Si Nextcloud est installé dans un sous-répertoire nommé « nextcloud »:
https://example.com/nextcloud
Clients WebDAV tiers
Si vous préférez, vous pouvez aussi connecter votre ordinateur à votre serveur Nextcloud en utilisant des clients tiers compatibles avec le protocole WebDAV (dont celui qui peut être fourni sur votre système d’exploitation).
Vous pouvez aussi utiliser des applications tierces compatibles avec WebDAV pour connecter vos appareils mobiles à Nextcloud.
En utilisant les clients tiers, gardez en tête qu’ils peuvent ne pas être optimisés pour une utilisation avec Nextcloud ou n’implémentent pas les fonctionnalités que vous pouvez considérer comme importantes.
Voilà les clients mobiles que les membres de la communauté Nextcloud utilisent :
L’URL à utiliser lors de la configuration des applications tiers pour se connecter à Nextcloud est un peu plus longue que pour les clients officiels
https://cloud.example.com/remote.php/dav/files/USERNAME/
Si Nextcloud est installé dans un sous-répertoire nommé « nextcloud »:
https://example.com/nextcloud/remote.php/dav/files/USERNAME/
Note
Lorsque vous utilisez un client WebDAV tiers (y compris le client intégré de votre système d’exploitation), vous devriez utiliser un mot de passe d’application pour vous connecter plutôt que votre mot de passe habituel. En plus d’améliorer la sécurité, cela « augmente considérablement les performances <https://github.com/nextcloud/server/issues/32729#issuecomment-1556667151> »_. Pour configurer un mot de passe d’application, connectez-vous à l’interface Web Nextcloud, cliquez sur l’avatar en haut à droite et choisissez Paramètres personnels. Choisissez ensuite Sécurité dans la barre latérale gauche et faites défiler jusqu’en bas. Vous pouvez y créer un mot de passe d’application (qui peut également être révoqué à l’avenir sans modifier votre mot de passe d’utilisateur principal).
Note
Dans les exemples suivants, vous devez remplacer example.com/ par l’URL de votre serveur Nextcloud (sans le nom de dossier si l’installation est à la racine de votre domaine) et USERNAME par l’identifiant de la personne qui se connecte.
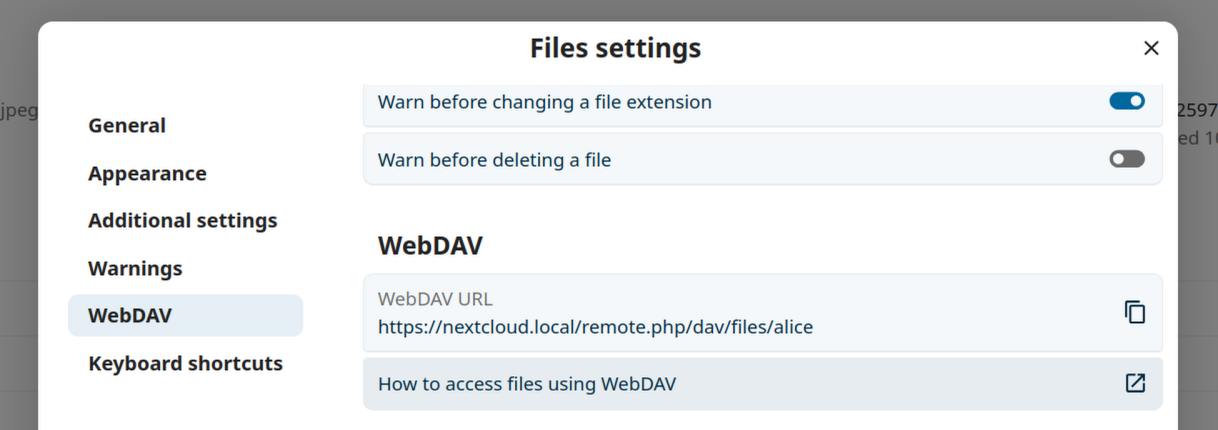
See the WebDAV URL, to be found in Files Settings -> WebDAV in the Files on your Nextcloud account.
Accéder aux fichiers sous Linux
Vous pouvez accéder aux fichiers sous Linux en utilisant les méthodes suivantes.
Gestionnaire de fichiers Nautilus
When you configure your Nextcloud account in the GNOME Control Center, your files will automatically be mounted by Nautilus as a WebDAV share, unless you deselect file access.
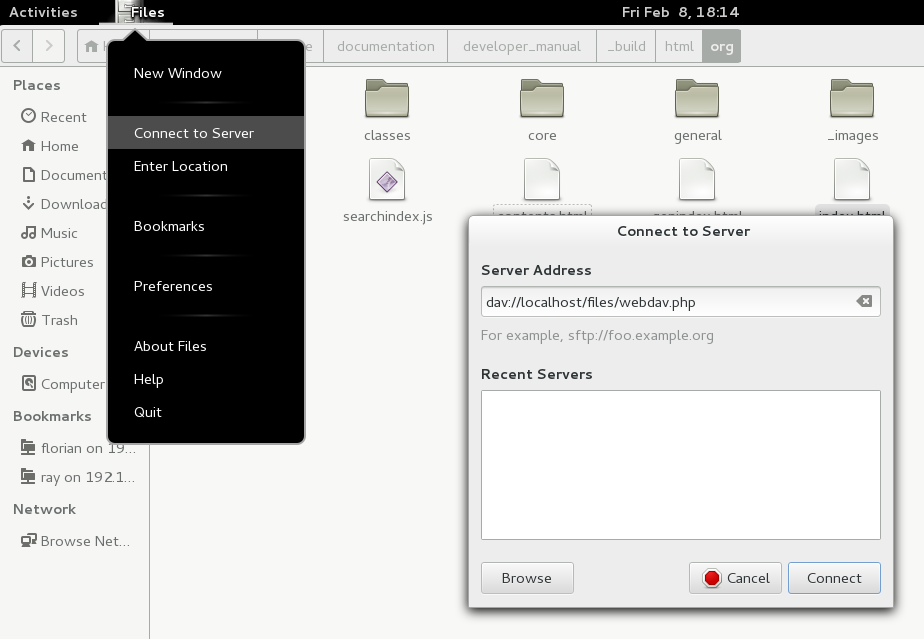
Vous pouvez aussi monter vos fichiers Nextcloud manuellement. Utilisez le protocole davs:// pour connecter le gestionnaire de fichier Nautilus à votre partage Nextcloud:
davs://example.com/nextcloud/remote.php/dav/files/USERNAME/
Note
Si votre connexion serveur n’est pas sécurisée en HTTPS, utilisez dav:// à la place de davs:// :
Note
Cette méthode fonctionne également pour les autres gestionnaires de fichiers qui utilisent GVFS, comme Caja de MATE ou Nemo de Cinnamon.
Accès aux fichiers avec KDE et le gestionnaire de fichiers Dolphin
Accédez à Paramètres système -> Réseau -> Comptes en ligne
Cliquer sur « Ajouter un compte… »
Cliquez sur NextCloud
Saisissez l’adresse de votre serveur
Suivez les instructions à l’écran pour vous connecter
Après vous être connecté, assurez-vous d’activer « Stockage » dans la section « Utiliser ce compte pour »
Vous pouvez désormais accéder à vos fichiers dans Dolphin sous « Réseau » dans la barre latérale
(Facultatif) Pour l’ajouter comme raccourci dans la barre latérale, faites un clic droit sur « Stockage Nextcloud » puis « Ajouter aux Emplacements »
(Facultatif) Pour personnaliser le raccourci, faites un clic droit sur le raccourci dans la barre latérale puis « Modifier… » et personnalisez l’icône et le nom comme vous le souhaitez
Créer un point de montage WebDAV en ligne de commande Linux
Vous pouvez créer un point de montage WebDAV en ligne de commande Linux. Ceci est utile si vous préferrez accéder à Nextcloud de la même manière que n’importe quel autre système de ficher distant. L’exemple suivant montre comment créer un point de montage personnel et activer sa connexion automatiquement à chaque fois que vous vous connectez à votre ordinateur Linux.
Installer le driver WebDAV
davfs2, qui autorise le montage de partages WebDAV comme n’importe quel autre filesystem distant. Utilisez cette commande pour l’installer sur Debian/Ubuntuapt-get install davfs2
Utilisez cette commande pour l’installer sur CentOS, Fedora, and openSUSE
yum install davfs2
Ajoutez vous dans le groupe
davfs2usermod -aG davfs2 <username>
Note
If the davfs2 group doesn’t exist after installing the package, you may need to create it yourself and, possibly, adjust the davfs config file to use the group after you’ve created it.
Puis créer un répertoire
nextclouddans le répertoire racine pour votre point de montage, et.davfs2/pour votre fichier de configuration personnelmkdir ~/nextcloud mkdir ~/.davfs2
Copiez
/etc/davfs2/secretsdans~/.davfs2:cp /etc/davfs2/secrets ~/.davfs2/secrets
Mettez vous owner avec les permissions read-write owner seulement
chown <linux_username>:<linux_username> ~/.davfs2/secrets
chmod 600 ~/.davfs2/secrets
Ajoutez vos information de connexion Nextcloud à la fin du fichier
secrets, en mettant l’URL de votre serveur, l’identifiant et le mot de passe de votre compte Nextcloudhttps://example.com/nextcloud/remote.php/dav/files/USERNAME/ <username> <password> or $PathToMountPoint $USERNAME $PASSWORD for example /home/user/nextcloud john 1234
Ajouter les informations de montage dans
/etc/fstabhttps://example.com/nextcloud/remote.php/dav/files/USERNAME/ /home/<linux_username>/nextcloud davfs user,rw,auto 0 0
Ensuite testez le montage et l’authentification en exécutant la commande suivante. Si votre configuration est correcte, vous n’avez pas besoin de passer en mode root
mount ~/nextcloud
Vous devriez aussi être capable de le démonter
umount ~/nextcloud
Maintenant, chaque fois que vous vous connecterez à votre système Linux, votre partage Nextcloud devrait automatiquement se connecter via WebDAV dans votre répertoire ~/nextcloud . Si vous préférez le monter manuellement, remplacez auto par noauto dans /etc/fstab.
Anomalies connues
Problème
Ressource temporairement inaccessible
Solution
Si vous rencontrez des problèmes lorsque vous créer un fichier dans le répertoire, éditez le fichier /etc/davfs2/davfs2.conf et ajoutez
use_locks 0
Problème
Avertissements sur les certificats
Solution
Si vous utilisez un certificat auto-signé, vous allez obtenir une alerte. Pour retirer l’alerte, vous devez configurer davfs2 pour reconnaître votre certificat. Copiez mycertificate.pem dans /etc/davfs2/certs/. Puis éditez /etc/davfs2/davfs2.conf et retirer le commentaire devant la ligne servercert. Maintenant, ajoutez le chemin de votre certificat comme dans cet exemple
servercert /etc/davfs2/certs/mycertificate.pem
Accéder aux fichiers sous macOS
Note
The macOS Finder suffers from a series of implementation problems and should only be used if the Nextcloud server runs on Apache and mod_php, or Nginx 1.3.8+. Alternative macOS-compatible clients capable of accessing WebDAV shares include open source apps like Cyberduck (see instructions here) and Filezilla. Commercial clients include Mountain Duck, Forklift, Transmit, and Commander One.
Pour accéder aux fichiers avec le Finder de macOS :
Depuis la barre de menu supérieure du Finder, choisissez Aller > Se connecter au serveur…:

Lorsque la fenêtre Connexion au serveur apparaît, saisissez l’adresse WebDAV de votre server Nextcloud dans le champ Adresse du serveur :, par exemple :
https://cloud.YOURDOMAIN.com/remote.php/dav/files/USERNAME/

Cliquez sur Se connecter. Votre serveur WebDAV doit apparaître sur le bureau comme un disque partagé.
Accéder aux fichiers sous Microsoft Windows
Si vous utilisez l’implémentation de WebDAV native de Windows, vous pouvez mapper Nextcloud à un nouveau lecteur grâce à l’explorateur Windows. Mapper à un lecteur vous permet de naviguer dans les fichiers stockés sur un serveur Nextcloud comme si ils étaient stockés sur un répertoire réseau.
Cette fonctionnalité nécessite une connexion réseau. Si vous voulez travailler sur vos fichiers en local, utilisez le « Desktop Sync Client » pour synchroniser vos fichiers depuis votre serveur Nextcloud vers un ou plusieurs répertoires sur votre disque dur local.
Note
Windows 10 autorise maintenant par défaut l’authentification basique si le HTTPS est activé avant de mapper votre lecteur.
Sur les anciennes versions de Windows, vous devez autoriser l’utilisation de l’authentification basique dans le registre Windows :
exécutez
regeditet naviguez versHKEY_LOCAL_MACHINE\SYSTEM\CurrentControlSet\Services\WebClient\Parameters.Créez ou modifiez
BasicAuthLevel(Windows Vista, 7 et 8) ouUseBasicAuth(Windows XP et Windows Server 2003), la valeurDWORDet définissez sa valeur à1pour les connexions SSL. Une valeur à0signifie que l’authentification basique est désactivée et une valeur à2permet les connexions SSL et non-SSL (non recommandé).Puis quittez l’éditeur de registre et redémarrez l’ordinateur.
Connecter un lecteur réseau en ligne de commande
L’exemple suivant montre comment connecter un lecteur réseau en ligne de commande. Pour connecter le lecteur :
Ouvrez une fenêtre d’invite de commandes dans Windows.
Entrez la commande suivante pour connecter Nextcloud au lecteur Z de votre ordinateur
net use Z: https://<drive_path>/remote.php/dav/files/USERNAME/ /user:youruser yourpassword
où <drive_path> est l’URL de votre serveur Nextcloud. Par exemple
net use Z: https://example.com/nextcloud/remote.php/dav/files/USERNAME/ /user:youruser yourpassword
L’ordinateur liste les fichiers de votre compte Nextcloud sur le lecteur Z.
Erreur
Si vous avez l’erreur suivante System error 67 has occurred. The network name cannot be found., ou des déconnexions fréquentes, ouvrez l’application Services et assurez-vous que le service WebClient s’exécute et soit automatiquement lancé au démarrage.
Note
Bien que non recommandé, vous pouvez aussi monter le serveur Nextcloud en utilisant le HTTP, rendant la connexion non chiffrée.
Si vous prévoyez d’utiliser les connexions HTTP sur les appareils utilisés dans un lieu public, nous vous recommandons fortement d’utiliser un tunnel VPN pour assurer une sécurité suffisante.
Une syntaxe alternative de cette commande est :
net use Z: \\example.com@ssl\nextcloud\remote.php\dav /user:youruser
yourpassword
Connecter des lecteurs réseaux avec Windows Explorer
Pour connecter un lecteur réseau avec l’explorateur Microsoft Windows :
Ouvrez Windows Explorer sur votre ordinateur Windows.
Faites un clic-droit sur le dossier Ordinateur et sélectionnez Connectez un lecteur réseau… depuis le menu déroulant.
Choisissez le lecteur de réseau local que vous souhaitez connecter à Nextcloud.
Spécifiez l’adresse de votre instance Nextcloud, suivi de /remote.php/dav/files/USERNAME/.
Par exemple
https://example.com/nextcloud/remote.php/dav/files/USERNAME/
Note
Pour les serveurs protégés par SSL, cochez Se reconnecter lors de la connexion pour s’assurer que le mappage est persistent lors des redémarrages suivants. Si vous voulez vous connecter au serveur Nextcloud avec un autre utilisateur, cochez Se connecter à l’aide d’informations d’identification différentes.

Cliquez sur le bouton
Terminer.
L’explorateur Windows connecte le lecteur de fichiers et rend votre instance Nextcloud disponible.
Accéder aux fichiers avec Cyberduck
Cyberduck est un logiciel open source de transfert de fichiers par FTP, SFTP, WebDAV, OpenStack Swift et Amazon S3 qui fonctionne sous macOS et Windows.
Note
Cet exemple utilise la version 4.2.1 de Cyberduck.
Pour utiliser Cyberduck :
Indiquez un serveur sans autre information sur le protocole.
Par exemple :
exemple.comIndiquez le port approprié.
Le choix du port diffère selon que votre serveur Nextcloud supporte ou non le standard SSL. Cyberduck demande de sélectionner un type de connexion différent pour utiliser SSL.
- Par exemple :
80pour WebDAV non chiffré``443` pour le WebDAV sécurisé (HTTPS/SSL)
Utilisez le menu déroulant « Plus d’options » pour ajouter le reste de votre URL WebDAV dans le champ « Chemin ».
Par exemple :
remote.php/dav/files/USERNAME/
Désormais, Cyberduck permet l’accès aux fichiers du serveur Nextcloud.
Problèmes connus
Problème
Windows ne se connecte pas avec HTTPS.
Solution 1
Le client WebDAV pour Windows ne supporte pas Server Name Indication (SNI) avec les connexions cryptées. Si vous rencontrez une erreur en connectant une instance Nextcloud SSL-encrypted, contactez votre fournisseur pour qu’il vous fournisse une adresse IP dédiée à votre serveur SSL.
Solution 2
Le client Windows WebDAV pourrait ne pas supporter les connections TLSv1.1 / TLSv1.2. Si vous avez restreint la configuration de votre serveur dans le but de fournir uniquement des connections TLSv1.1 et plus, la connexion à votre serveur pourrait échouer. Référez vous à la documentation WinHTTP pour plus d’informations.
Problème
Vous avez obtenu le message d’erreur suivant : Erreur 0x800700DF : La taille du fichier dépasse la limite autorisée ; il ne peut être enregistré.
Solution
Windows limite la taille maximum des fichiers transférés via un partage WebDAV. Vous pouvez augmenter la valeur FileSizeLimitInBytes dans HKEY_LOCAL_MACHINE\\SYSTEM\\CurrentControlSet\\Services\\WebClient\\Parameters en cliquant sur Modifier.
Pour augmenter la limite à la valeur maximal de 4GB, sélectionnez Décimal, entrez la valeur 4294967295, et relancez Windows ou redémarrez le service WebClient.
Problème
L’ajout d’un lecteur WebDAV sous Windows via les étapes décrites ci-dessus n’affiche pas la taille correcte de l’espace disponible dans Nextcloud et affiche à la place la taille du lecteur C: avec son espace disponible.
Réponse
Malheureusement, il s’agit d’une limite de WebDAV lui-même, car il n’offre pas la possibilité pour le client de connaître l’espace libre disponible depuis le serveur. Windows revient automatiquement à l’affichage de la taille du lecteur C: avec son espace disponible. Il n’y a donc malheureusement pas de véritable solution à ce problème.
Problème
Problème d’accès à vos fichiers avec Microsoft Office via WebDAV
Solution
Les problèmes connus et leurs solutions sont documentés dans l’article KB2123563.
Problème
Impossible de mapper Nextcloud en tant que lecteur WebDAV sous Windows à l’aide d’un certificat auto-signé.
Solution
Accédez à votre instance Nextcloud via votre navigateur Web préféré.
Cliquez jusqu’à ce que vous arriviez à l’erreur de certificat dans la ligne d’état du navigateur.
Affichez le certificat, puis dans l’onglet Détails, sélectionnez Copier dans le fichier.
Enregistrez le fichier sur votre bureau avec un nom arbitraire, par exemple
myNextcloud.pem.Accédez au menu Démarrer > Exécuter, tapez MMC et cliquez sur OK pour ouvrir la console de gestion Microsoft.
Accédez à Fichier > Ajouter/Supprimer un composant logiciel enfichable.
Sélectionnez Certificats, cliquez sur Ajouter, choisissez Mon compte utilisateur, puis Terminer et enfin OK.
Creusez jusqu’aux autorités de confiance de certification de la racine, aux certificats.
Cliquez avec le bouton droit sur Certificat, sélectionnez Toutes les tâches et Importer.
Sélectionnez le certificat enregistré sur le bureau.
Sélectionnez Placer tous les certificats dans le magasin suivant et cliquez sur Parcourir.
Cochez la case Afficher les magasins physiques, développez Autorités de certification racines de confiance, sélectionnez Ordinateur local, cliquez sur OK et terminez l’importation.
Vérifiez la liste pour vous assurer que le certificat apparaît. Vous devrez probablement actualiser avant de le voir.
Quitter MMC.
Pour les utilisateurs de Firefox :
Lancez votre navigateur, allez dans le menu Application > Historique > Effacer l’historique récent…
Sélectionnez “Tout” dans le menu déroulant “Période d’effacement”
Cochez la case “Connexions actives”
Cliquez sur le bouton “Effacer maintenant”
Fermez le navigateur, puis rouvrez-le et testez.
Pour les utilisateurs de navigateurs basés sur Chrome (Chrome, Chromium, Microsoft Edge):
Ouvrez le Panneau de configuration de Windows, accédez aux Options Internet
Dans l’onglet Contenu, cliquez sur le bouton Effacer l’état SSL.
Fermez le navigateur, puis rouvrez-le et testez.
Accéder aux fichiers en utilisant cURL
Comme WebDAV est une extension de HTTP, cURL peut être utilisé pour scripter des opérations sur les fichiers.
Note
Paramètres → Administration → Partage → Autoriser les utilisateurs de ce serveur à envoyer des partages à d’autres serveurs. Si cette option est désactivée, l’option --header "X-Requested-With: XMLHttpRequest" doit être transmise à cURL.
Pour créer un dossier avec la date du jour comme nom :
$ curl -u user:pass -X MKCOL "https://example.com/nextcloud/remote.php/dav/files/USERNAME/$(date '+%d-%b-%Y')"
Pour téléverser un fichier error.log dans ce répertoire :
$ curl -u user:pass -T error.log "https://example.com/nextcloud/remote.php/dav/files/USERNAME/$(date '+%d-%b-%Y')/error.log"
Pour déplacer un fichier :
$ curl -u user:pass -X MOVE --header 'Destination: https://example.com/nextcloud/remote.php/dav/files/USERNAME/target.jpg' https://example.com/nextcloud/remote.php/dav/files/USERNAME/source.jpg
Pour obtenir les propriétés des fichiers dans le dossier racine :
    $ curl -X PROPFIND -H "Depth: 1" -u user:pass https://example.com/nextcloud/remote.php/dav/files/USERNAME/ | xml_pp
    <?xml version="1.0" encoding="utf-8"?>
<d:multistatus xmlns:d="DAV:" xmlns:oc="http://nextcloud.org/ns" xmlns:s="http://sabredav.org/ns">
  <d:response>
    <d:href>/nextcloud/remote.php/dav/files/USERNAME/</d:href>
    <d:propstat>
      <d:prop>
        <d:getlastmodified>Tue, 13 Oct 2015 17:07:45 GMT</d:getlastmodified>
        <d:resourcetype>
          <d:collection/>
        </d:resourcetype>
        <d:quota-used-bytes>163</d:quota-used-bytes>
        <d:quota-available-bytes>11802275840</d:quota-available-bytes>
        <d:getetag>"561d3a6139d05"</d:getetag>
      </d:prop>
      <d:status>HTTP/1.1 200 OK</d:status>
    </d:propstat>
  </d:response>
  <d:response>
    <d:href>/nextcloud/remote.php/dav/files/USERNAME/welcome.txt</d:href>
    <d:propstat>
      <d:prop>
        <d:getlastmodified>Tue, 13 Oct 2015 17:07:35 GMT</d:getlastmodified>
        <d:getcontentlength>163</d:getcontentlength>
        <d:resourcetype/>
        <d:getetag>"47465fae667b2d0fee154f5e17d1f0f1"</d:getetag>
        <d:getcontenttype>text/plain</d:getcontenttype>
      </d:prop>
      <d:status>HTTP/1.1 200 OK</d:status>
    </d:propstat>
  </d:response>
</d:multistatus>
Accéder aux fichiers avec WinSCP
WinSCP est un client SFTP, FTP, WebDAV, S3 et SCP gratuit et open source pour Windows. Sa fonction principale est le transfert de fichiers entre un ordinateur local et un ordinateur distant. Au-delà de cela, WinSCP offre des fonctionnalités de script et de gestion de fichiers de base.
Vous pouvez télécharger la version portable de WinSCP et l’exécuter sous Linux grâce à Wine.
Pour exécuter WinSCP sur Linux, téléchargez Wine via le gestionnaire de paquets de votre distribution, puis exécutez-le avec la commande: wine WinSCP.exe.
Pour se connecter à Nextcloud :
Lancer WinSCP
Cliquer sur « Session » dans le menu
Cliquer sur le menu « Nouvelle Session… »
Sélectionner WebDAV dans le menu déroulant « Protocole de fichier »
Définissez le menu déroulant “Encryptage” sur le encryptage implicite TLS/SSL
Remplissez le champ du nom d’hôte:
example.comRemplissez le champ nom d’utilisateur:
NEXTCLOUD USERNAMERemplissez le champ mot de passe:
NEXTCLOUDPASSWORDCliquer sur le bouton « Avancé… »
Naviguer jusqu’à « Environnement > Répertoires » dans l’arborescence à gauche
Remplissez le champ “Répertoire distant” avec les éléments suivants:
/nextcloud/remote.php/dav/files/NEXTCLOUDUSERNAME/Cliquer sur le bouton « OK »
Cliquer sur le bouton « Sauver… »
Choisir les options souhaitées et cliquer sur le bouton « OK »
Cliquer sur le bouton « Connexion » pour accéder à Nextcloud
Note
il est recommandé d’utiliser un mot de passe d’application, pour le mot de passe si vous utilisez TOTP car WinSCP ne comprend pas TOTP avec Nextcloud au moment de la rédaction (2022-11-07).