Toegang tot Nextcloud bestanden met behulp van WebDAV
Nextcloud ondersteunt het WebDAV-protocol volledig en je kunt verbinding maken en synchroniseren met Nextcloud Files via WebDAV. In dit hoofdstuk leer je hoe je Linux, macOS, Windows en mobiele apparaten kunt verbinden met jouw Nextcloud-server.
WebDAV staat voor Distributed Authoring and Versioning. Het is een HTTP-uitbreiding waarmee je eenvoudig bestanden kunt maken, lezen en bewerken die op externe webservers worden gehost. Met een WebDAV-client kan je jouw Nextcloud-bestanden (inclusief shares) op Linux, macOS en Windows op dezelfde manier openen als elke andere externe netwerkshare, en blijven ze gesynchroniseerd.
Voordat we beginnen met het configureren van WebDAV, kijken we eerst even naar de aanbevolen manier om clientapparaten met Nextcloud te verbinden.
Officiële Nextcloud-desktop- en mobiele clients
De aanbevolen manier om een computer met een Nextcloud-server te synchroniseren, is door gebruik te maken van de officiële Nextcloud synchronisatieclients. Je kunt de client zo configureren dat bestanden in elke lokale map worden opgeslagen en je kunt kiezen met welke mappen op de Nextcloud-server je wilt synchroniseren. De client geeft de huidige verbindingsstatus weer en registreert alle activiteiten, zodat je altijd weet welke externe bestanden naar jouw pc zijn gedownload en je kunt controleren of bestanden die op jouw lokale pc zijn gemaakt en bijgewerkt, correct met de server zijn gesynchroniseerd.
De aanbevolen manier om Android- en Apple iOS-apparaten te synchroniseren is door gebruik te maken van de officiële Nextcloud mobiele apps.
Om de officiële Nextcloud-apps te verbinden met een Nextcloud-server, gebruik je dezelfde URL die je gebruikt om Nextcloud te openen vanuit jouw webbrowser, bijvoorbeeld:
https://cloud.example.com
Als Nextcloud is geïnstalleerd in een subdirectory genaamd “nextcloud”:
https://example.com/nextcloud
Derde-partij WebDAV clienten
Als je dat wilt dan kan je jouw computer ook verbinden met de Nextcloud-server door gebruik te maken van een externe ‘client’ die het WebDAV-protocol ondersteunt (inclusief de ‘client’ die mogelijk in jouw besturingssysteem is ingebouwd).
Je kunt ook WebDAV-compatibele apps van derden gebruiken om jouw mobiele apparaat met Nextcloud te verbinden.
Houd er bij het gebruik van ‘clients’ van derden rekening mee dat deze mogelijk niet zijn geoptimaliseerd voor gebruik met Nextcloud of dat ze functies implementeren die je belangrijk vindt voor jouw gebruikssituatie.
Mobiele ‘clients’ die leden van de Nextcloud-community hebben gemeld te gebruiken, zijn onder andere:
De URL die je moet gebruiken als je apps van derden instelt om verbinding te maken met Nextcloud is iets langer dan die voor officiële clients:
https://cloud.example.com/remote.php/dav/files/USERNAME/
Als Nextcloud is geïnstalleerd in een subdirectory genaamd “nextcloud”:
https://example.com/nextcloud/remote.php/dav/files/USERNAME/
Notitie
Wanneer je een WebDAV-client van een derde partij gebruikt (inclusief de ingebouwde client van uw besturingssysteem), moet je een applicatiewachtwoord gebruiken om in te loggen in plaats van jouw normale wachtwoord. Naast verbeterde beveiliging, vergroot dit aanzienlijk de prestaties. Om een applicatiewachtwoord te configureren, log je in op de Nextcloud-webinterface, klik op de avatar rechtsboven en kies Persoonlijke instellingen. Kies vervolgens Beveiliging in de linkerzijbalk en scrol naar beneden. Daar kan je een app-wachtwoord aanmaken (dat je later ook kunt intrekken zonder jouw hoofdgebruikerswachtwoord te wijzigen).
Notitie
In de volgende voorbeelden moet je example.com/nextcloud vervangen door de URL van je Nextcloud-server (laat het directorygedeelte weg als de installatie zich in de root van het domein bevindt) en USERNAME door de gebruikersnaam van de gebruiker die verbinding maakt.
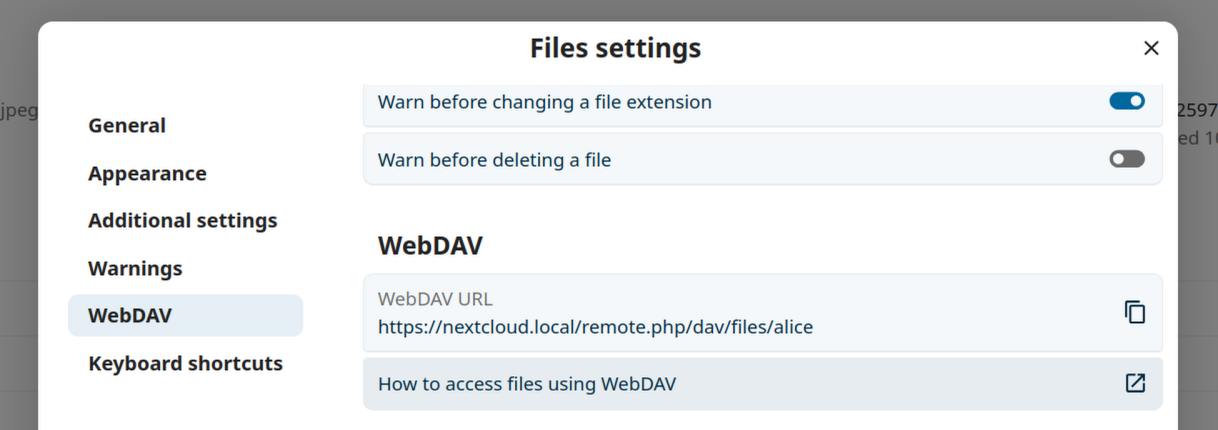
Zie de WebDAV link, te vinden in Bestand Instellingen -> WebDAV in de Bestanden van je Nextcloud account.
Toegang tot bestanden met behulp van Linux
Je kan toegang krijgen tot bestanden in Linux-besturingssystemen met behulp van de volgende methoden.
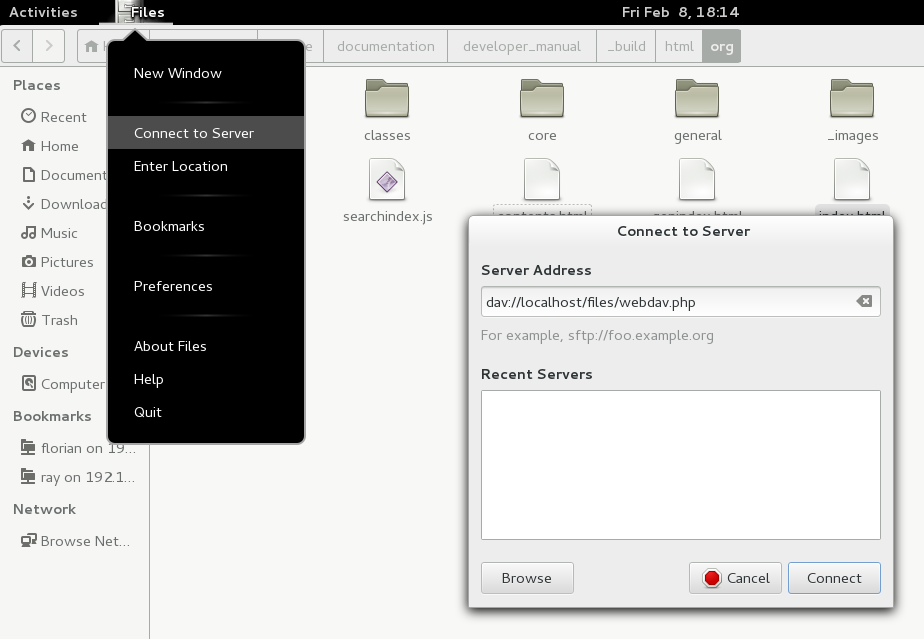
Nautilus bestandsbeheerder
Wanneer je je Nextcloud-account configureert in het GNOME Control Center, dan worden de bestanden automatisch door Nautilus gekoppeld als een WebDAV-share, tenzij je bestandstoegang uitschakelt.
Je kan jouw Nextcloud bestanden ook handmatig koppelen. Gebruik het davs:// protocol om de Nautilus bestandsbeheerder te koppelen met jouw Nextcloud share:
davs://example.com/nextcloud/remote.php/dav/files/USERNAME/
Notitie
Als je serververbinding niet HTTPS-beveiligd is, gebruik dan dav://` in plaats van davs://`:
Notitie
Dezelfde methode werkt ook voor andere bestandsbeheerders die GVFS gebruiken, zoals Caja van MATE en Nemo van Cinnamon.
Toegang tot bestanden met KDE en Dolphin bestandbeheerder
Ga naar Systeeminstellingen -> Netwerk -> Online accounts
Klik “Gebruiker toevoegen…”
Klik Nextcloud
Geef je serveradres in
Volg de instructies op het scherm om in te loggen
Nadat je bent ingelogd, moet je ‘Opslag’ inschakelen in het gedeelte ‘Dit account gebruiken voor’.
Je kunt nu jouw bestanden in Dolphin openen onder “Netwerk” in de zijbalk.
(Optioneel) Om dit als snelkoppeling aan de zijbalk toe te voegen, klik je met de rechtermuisknop op “Nextcloud Opslag” en vervolgens op “Toevoegen aan plaatsen”.
(Optioneel) Om de snelkoppeling aan te passen, klik je met de rechtermuisknop op de snelkoppeling in de zijbalk en vervolgens op “Bewerken…” en pas je het pictogram en het label naar wens aan.
Het maken van WebDAV mounts op de Linux commandoregel
Je kan WebDAV mounts maken vanaf de Linux commandoregel. Dit is handig als je de voorkeur geeft aan Nextcloud op dezelfde manier als elke andere mount voor een bestandssysteem op afstand. Het volgende voorbeeld laat zien hoe je een persoonlijke mount kan maken en deze automatisch kan laten mounten elke keer dat je inlogt op je Linux-computer.
Installeer de
davfs2WebDAV bestandssysteem driver, waarmee je WebDAV shares kan mounten net als elk ander bestandssysteem op afstand. Gebruik dit commando om het te installeren op Debian/Ubuntu:apt-get install davfs2
Gebruik dit commando om het te installeren op CentOS, Fedora en openSUSE:
yum install davfs2
Voeg jezelf toe aan de
davfs2groep:usermod -aG davfs2 <username>
Then create a
nextclouddirectory in your home directory for the mount point, and.davfs2/for your personal configuration file:mkdir ~/nextcloud mkdir ~/.davfs2
Kopieer
/etc/davfs2/secretsnaar~/.davfs2:cp /etc/davfs2/secrets ~/.davfs2/secrets
Stel jezelf in als eigenaar en maak de rechten alleen lees-schrijf-eigenaar:
chown <linux_username>:<linux_username> ~/.davfs2/secrets
chmod 600 ~/.davfs2/secrets
Voeg je Nextcloud logingegevens toe aan het einde van het
secretsbestand, met behulp van jouw Nextcloud server URL en jouw Nextcloud gebruikersnaam en wachtwoord:https://example.com/nextcloud/remote.php/dav/files/USERNAME/ <username> <password> or $PathToMountPoint $USERNAME $PASSWORD for example /home/user/nextcloud john 1234
Voeg de mount informatie toe aan
/etc/fstab:https://example.com/nextcloud/remote.php/dav/files/USERNAME/ /home/<linux_username>/nextcloud davfs user,rw,auto 0 0
Test dan dat het mount en authenticeert door het volgende commando uit te voeren. Als je het correct instelt heb je geen root permissies nodig:
mount ~/nextcloud
Je zou het ook moeten kunnen ontkoppelen:
umount ~/nextcloud
Elke keer dat je inlogt op je Linux systeem zou jouw Nextcloud share automatisch moeten mounten via WebDAV in jouw ~/nextcloud directory. Als je liever handmatig wil mounten, verander dan auto naar noauto in /etc/fstab`.
Bekende problemen
Probleem
Hulpbron tijdelijk niet beschikbaar
Oplossing
Als je problemen ondervindt bij het maken van een bestand in de map, bewerk dan /etc/davfs2/davfs2.conf en voeg toe:
use_locks 0
Probleem
Certificaatwaarschuwingen
Oplossing
Als je een zelf ondertekend certificaat gebruikt, krijg je een waarschuwing. Om dit te veranderen, moet je davfs2` configureren om jouw certificaat te herkennen. Kopieer ``mycertificate.pem naar /etc/davfs2/certs/`. Bewerk vervolgens /etc/davfs2/davfs2.conf en uncommentarieer de regel servercert. Voeg nu het pad van uw certificaat toe zoals in dit voorbeeld:
servercert /etc/davfs2/certs/mycertificate.pem
Toegang tot bestanden met behulp van macOS
Notitie
De macOS Finder kampt met een reeks implementatieproblemen en mag alleen worden gebruikt als de Nextcloud-server draait op Apache en mod_php, of Nginx 1.3.8+. Alternatieve macOS-compatibele ‘clients’ die toegang hebben tot WebDAV-shares zijn onder andere open source-apps zoals Cyberduck (zie instructies hier) en Filezilla. Commerciële clients zijn onder andere Mountain Duck, Forklift, Transmit en Commander One.
Om toegang te krijgen tot bestanden via de macOS Finder:
Kies in de menubalk bovenaan de Finder Ga > Verbinding maken met server…:

Wanneer het venster Verbinden met server… wordt geopend, voer je het WebDAV-adres van jouw Nextcloud-server in het veld Serveradres: in, bijvoorbeeld:
https://cloud.YOURDOMAIN.com/remote.php/dav/files/USERNAME/

Klik op Connect. Jouw WebDAV-server zou op het bureaublad moeten verschijnen als een gedeelde schijf.
Toegang tot bestanden met behulp van Microsoft Windows
Als je de originele Windows-implementatie van WebDAV gebruikt, kan je Nextcloud aan een nieuw station koppelen met Windows Verkenner. Door het koppelen aan een station kan je bestanden die zijn opgeslagen op een Nextcloud-server op dezelfde manier doorbladeren als bestanden die zijn opgeslagen op een gekoppeld netwerkstation.
Voor het gebruik van deze functie is een netwerkverbinding nodig. Als je jouw bestanden offline wilt opslaan, gebruik je de Desktop Client om alle bestanden op jouw Nextcloud te synchroniseren met een of meer mappen van jouw lokale harde schijf.
Notitie
Windows 10 staat nu standaard basisverificatie toe als HTTPS is ingeschakeld voordat de schijf wordt toegewezen.
Op oudere versies van Windows moet je het gebruik van basisverificatie toestaan in het Windows-register:
start
regediten navigeer naarHKEY_LOCAL_MACHINE\SYSTEM\CurrentControlSet\Services\WebClient\Parameters.Maak of bewerk de waarde
BasicAuthLevel(Windows Vista, 7 en 8) ofUseBasicAuth(Windows XP en Windows Server 2003),DWORDen stel de waarde in op1voor SSL-verbindingen. Een waarde van0betekent dat basisverificatie is uitgeschakeld, en een waarde van2staat zowel SSL- als niet-SSL-verbindingen toe (niet aanbevolen).Sluit vervolgens de Register-editor af en start de computer opnieuw op.
Stations toewijzen met de opdrachtregel
Het volgende voorbeeld toont hoe je een netwerkstation toewijst met behulp van de opdrachtregel. Om het station toe te wijzen:
Open een opdrachtregel in Windows.
Voer de volgende lijn in op de opdrachtregel om het station toe te wijzen aan het Z-station van de computer:
net use Z: https://<drive_path>/remote.php/dav/files/USERNAME/ /user:youruser yourpassword
met <drive_path> als de URL naar de Nextcloud server. Bijvoorbeeld:
net use Z: https://example.com/nextcloud/remote.php/dav/files/USERNAME/ /user:youruser yourpassword
De computer wijst de bestanden van jouw Nextcloud-account toe aan de stationsletter Z.
Fout
Als je de volgende foutmelding krijgt: “Systeemfout 67 is opgetreden. De netwerknaam kan niet worden gevonden.”, of als je vaak verbroken verbindingen hebt, open dan de app Services en controleer of de service “WebClient” actief is en automatisch wordt gestart bij het opstarten.
Notitie
Hoewel dit niet wordt aanbevolen, kan je de Nextcloud-server ook via HTTP koppelen, waarbij de verbinding niet versleuteld is.
Als je van plan bent om HTTP-verbindingen te gebruiken op apparaten terwijl je je in een openbare ruimte bevindt, raden we je ten zeerste aan om een VPN-tunnel te gebruiken om de nodige beveiliging te bieden.
Een alternatieve commando syntax is:
net use Z: \\example.com@ssl\nextcloud\remote.php\dav /user:youruser
yourpassword
Stations toewijzen met Windows Verkenner
Een schijf toewijzen met Microsoft Windows Verkenner:
Open Windows Verkenner op de MS Windows-computer.
Klik met de rechtermuisknop op Computer en selecteer Map netwerkstation… in het uitklapmenu.
Kies het lokale netwerkstation waaraan je Nextcloud wil toewijzen.
Geef het adres van jouw Nextcloud instantie op, gevolgd door /remote.php/dav/files/USERNAME/.
Bijvoorbeeld:
https://example.com/nextcloud/remote.php/dav/files/USERNAME/
Notitie
Voor SSL-beveiligde servers vink je Opnieuw verbinden bij aanmelden aan om ervoor te zorgen dat de koppeling bij volgende herstarts behouden blijft. Als je als een andere gebruiker verbinding wilt maken met de Nextcloud-server, vink dan Verbinden met andere inloggegevens aan.

Klik op de knop
Beëindigen.
Windows Verkenner wijst het netwerkstation toet, waardoor jouw Nextcloud instantie beschikbaar wordt.
Toegang tot bestanden met behulp van Cyberduck
Cyberduck is een open source FTP-, SFTP-, WebDAV-, OpenStack Swift- en Amazon S3-browser die is ontworpen voor bestandsoverdracht op macOS en Windows.
Notitie
In dit voorbeeld wordt Cyberduck versie 4.2.1 gebruikt.
Om Cyberduck te gebruiken:
Geef een server op zonder voorafgaande protocolinformatie.
Bijvoorbeeld:
example.comGeef de juiste poort op.
De poort die je kiest, hangt af van het feit of de Nextcloud-server SSL ondersteunt. Cyberduck vereist dat je een ander verbindingstype selecteert als je van plan bent SSL te gebruiken.
- Bijvoorbeeld:
80voor onversleutelde WebDAV443voor veilige WebDAV (HTTPS/SSL)
Gebruik het vervolgkeuzemenu ‘Meer opties’ om de rest van de WebDAV-URL toe te voegen aan het veld ‘Pad’.
Bijvoorbeeld:
remote.php/dav/files/USERNAME/
Nu maakt Cyberduck bestandstoegang tot de Nextcloud-server mogelijk.
Bekende problemen
Probleem
Windows maakt geen verbinding met HTTPS.
Oplossing 1
De Windows WebDAV-client ondersteunt mogelijk geen Server Name Indication (SNI) bij gecodeerde verbindingen. Als je een foutmelding krijgt bij het koppelen van een SSL-gecodeerde Nextcloud instantie, neem dan contact op met je leverancier voor het toewijzen van een dedicated IP-adres voor jouw SSL-gebaseerde server.
Oplossing 2
De Windows WebDAV-client ondersteunt mogelijk geen TLSv1.1- en TLSv1.2-verbindingen. Als de configuratie van je server is beperkt tot het aanbieden van TLSv1.1 en hoger, kan de verbinding met je server mislukken. Raadpleeg de WinHTTP documentatie voor meer informatie.
Probleem
Je ontvangt de volgende foutmelding: Fout 0x800700DF: De bestandsgrootte overschrijdt de toegestane limiet en kan niet worden opgeslagen.
Oplossing
Windows beperkt de maximale grootte van een bestand dat wordt overgedragen van of naar een WebDAV-share. Je kunt de waarde FileSizeLimitInBytes in HKEY_LOCAL_MACHINE\\SYSTEM\\CurrentControlSet\\Services\\WebClient\\Parameters verhogen door op Wijzigen te klikken.
Om de limiet te verhogen tot de maximale waarde van 4 GB, selecteer je Decimaal, voer de waarde 4294967295 in en start Windows opnieuw op of start de WebClient-service opnieuw.
Probleem
Als je via de hierboven beschreven stappen een WebDAV-schijf toevoegt in Windows, wordt de beschikbare ruimte in Nextcloud niet correct weergegeven. In plaats daarvan wordt de grootte van de C:-schijf met de beschikbare ruimte weergegeven.
Antwoord
Helaas is dit een beperking van WebDAV zelf, omdat het de ‘client’ geen manier biedt om de beschikbare vrije ruimte van de server op te vragen. Windows valt automatisch terug op het weergeven van de grootte van de C:-schijf met de beschikbare ruimte. Er is dus helaas geen echte oplossing voor dit probleem.
Probleem
Toegang tot je bestanden vanuit Microsoft Office via WebDAV mislukt.
Oplossing
Bekende problemen en hun oplossingen zijn gedocumenteerd in het KB2123563 artikel.
Probleem
Nextcloud kan niet als WebDAV-station in Windows worden toegewezen met een zelfondertekend certificaat.
Oplossing
Toegang tot de Nextcloud-instantie via jouw favoriete webbrowser.
Klik door tot je bij de certificaatfout in de statusregel van de browser komt.
Bekijk het certificaat en selecteer vervolgens op het tabblad Details de optie ‘Kopiëren naar bestand’.
Sla het bestand op het bureaublad op onder een willekeurige naam, bijvoorbeeld
myNextcloud.pem.Ga naar het menu Start > Uitvoeren, typ MMC en klik op ‘OK’ om Microsoft Management Console te openen.
Ga naar Bestand > Snap-in toevoegen/verwijderen.
Selecteer Certificaten, klik op ‘Toevoegen’, kies ‘Mijn gebruikersaccount’, vervolgens ‘Voltooien’ en ten slotte ‘OK’.
Ga naar Trust Root Certification Authorities, Certificaten.
Klik met de rechtermuisknop op het certificaat, selecteer Alle taken en vervolgens Importeren.
Selecteer het opgeslagen certificaat op het bureaublad.
Selecteer Alle certificaten in de volgende opslagplaats plaatsen en klik op Bladeren.
Vink het vakje ‘Fysieke winkels weergeven’ aan, vouw ‘Vertrouwde basiscertificeringsinstanties’ uit, selecteer daar ‘Lokale computer’, klik op ‘OK’ en voltooi het importeren.
Controleer de lijst om te zien of het certificaat wordt weergegeven. Waarschijnlijk moet je eerst op Vernieuwen klikken voordat je het kunt zien.
Verlaat MMC.
Voor Firefox gebruikers:
Start de browser, ga naar het menu Toepassingen > Geschiedenis > Recente geschiedenis wissen…
Selecteer ‘Alles’ in het vervolgkeuzemenu ‘Te wissen tijdsbereik’.
Schakel het selectievakje ‘Actieve aanmeldingen’ in.
Klik op de knop ‘Nu wissen’.
Sluit de browser, open deze vervolgens opnieuw en test.
Voor gebruikers van Chrome-gebaseerde browsers (Chrome, Chromium, Microsoft Edge):
Open het Configuratiescherm van Windows en ga naar Internetopties.
Klik in de ‘Inhoud’ tabblad op de knop SSL-status wissen.
Sluit de browser, open deze vervolgens opnieuw en test.
Toegang tot bestanden met behulp van cURL
Aangezien WebDAV een uitbreiding is van HTTP, kan cURL worden gebruikt om bestandsbewerkingen te scripten.
Notitie
Instellingen → Beheer → Delen → Gebruikers op deze server toestaan om bestanden te delen met andere servers. Als deze optie is uitgeschakeld, moet de optie --header “X-Requested-With: XMLHttpRequest” worden doorgegeven aan cURL.
Om een map aan te maken met de huidige datum als naam:
$ curl -u user:pass -X MKCOL "https://example.com/nextcloud/remote.php/dav/files/USERNAME/$(date '+%d-%b-%Y')"
Om een bestand error.log te uploaden naar die map:
$ curl -u user:pass -T error.log "https://example.com/nextcloud/remote.php/dav/files/USERNAME/$(date '+%d-%b-%Y')/error.log"
Om een bestand te verplaatsen:
$ curl -u user:pass -X MOVE --header 'Destination: https://example.com/nextcloud/remote.php/dav/files/USERNAME/target.jpg' https://example.com/nextcloud/remote.php/dav/files/USERNAME/source.jpg
Om de eigenschappen van bestanden in de hoofdmap te krijgen:
    $ curl -X PROPFIND -H "Depth: 1" -u user:pass https://example.com/nextcloud/remote.php/dav/files/USERNAME/ | xml_pp
    <?xml version="1.0" encoding="utf-8"?>
<d:multistatus xmlns:d="DAV:" xmlns:oc="http://nextcloud.org/ns" xmlns:s="http://sabredav.org/ns">
  <d:response>
    <d:href>/nextcloud/remote.php/dav/files/USERNAME/</d:href>
    <d:propstat>
      <d:prop>
        <d:getlastmodified>Tue, 13 Oct 2015 17:07:45 GMT</d:getlastmodified>
        <d:resourcetype>
          <d:collection/>
        </d:resourcetype>
        <d:quota-used-bytes>163</d:quota-used-bytes>
        <d:quota-available-bytes>11802275840</d:quota-available-bytes>
        <d:getetag>"561d3a6139d05"</d:getetag>
      </d:prop>
      <d:status>HTTP/1.1 200 OK</d:status>
    </d:propstat>
  </d:response>
  <d:response>
    <d:href>/nextcloud/remote.php/dav/files/USERNAME/welcome.txt</d:href>
    <d:propstat>
      <d:prop>
        <d:getlastmodified>Tue, 13 Oct 2015 17:07:35 GMT</d:getlastmodified>
        <d:getcontentlength>163</d:getcontentlength>
        <d:resourcetype/>
        <d:getetag>"47465fae667b2d0fee154f5e17d1f0f1"</d:getetag>
        <d:getcontenttype>text/plain</d:getcontenttype>
      </d:prop>
      <d:status>HTTP/1.1 200 OK</d:status>
    </d:propstat>
  </d:response>
</d:multistatus>
Toegang tot bestanden met WinSCP
WinSCP is een open source gratis SFTP-, FTP-, WebDAV-, S3- en SCP-client voor Windows. De belangrijkste functie is het overzetten van bestanden tussen een lokale en een externe computer. Daarnaast biedt WinSCP scripting en basisfuncties voor bestandsbeheer.
Je kunt de portable versie van WinSCP downloaden en deze op Linux uitvoeren via Wine.
Om WinSCP op Linux te draaien, download je Wine via de pakketbeheerder van je distributie en voer het vervolgens uit met het commando: wine WinSCP.exe.
Om met Nextcloud te verbinden:
Starten WINSCP
Klik op ‘Sessie’ in het menu
Klik op de ‘Nieuwe Sessie’ menuoptie
Stel de ‘File protocol’ dropdown in op WebDAV
Stel de vervolgkeuzelijst ‘Versleuteling’ in op TLS/SSL Impliciete versleuteling
Vul het veld voor de hostnaam in.:
example.comVul het veld voor de gebruikersnaam in.:
NEXTCLOUDUSERNAMEVul het wachtwoordveld in:
NEXTCLOUDPASSWORDDruk op de knop ‘Geavanceerd…’
Ga naar ‘Omgeving’, ‘Mappen’ aan de linkerkant.
Vul het veld ‘Externe directory’ in met het volgende:
/nextcloud/remote.php/dav/files/NEXTCLOUDUSERNAME/Druk op de knop ‘OK’.
Druk op de knop ‘Bewaar’.
Selecteer de gewenste opties en druk op de knop ‘OK’.
Druk op de knop ‘Inloggen’ om verbinding te maken met Nextcloud.
Notitie
Het wordt aanbevolen om een app-wachtwoord te gebruiken voor het wachtwoord als je TOTP gebruikt, aangezien WinSCP op het moment van schrijven (07-11-2022) TOTP met Nextcloud niet ondersteunt.