E-posta uygulamasını kullanmak
Not
E-posta uygulaması, varsayılan olarak Nextcloud Hub ile kurulmuş olarak gelir, ancak kullanımdan kaldırılabilir. Lütfen bunu yöneticinize sorun.

E-posta hesabınızı yönetmek
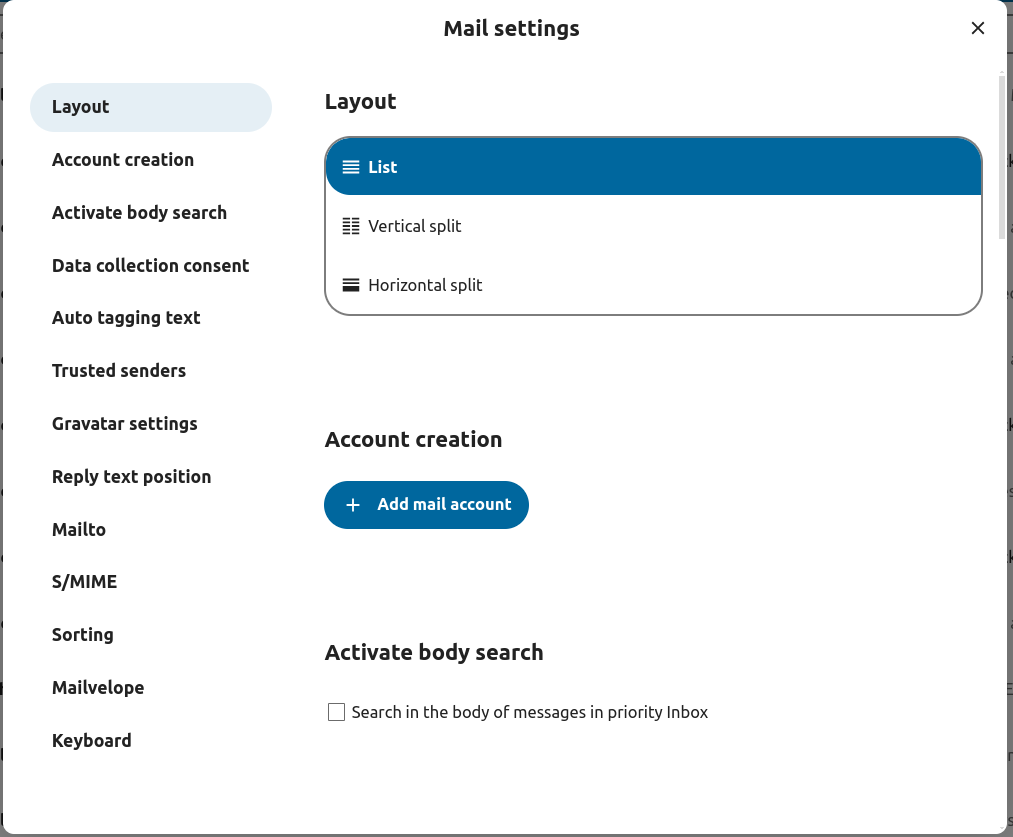
Yerleşimi değiştirmek
Added in version 3.6.
E-posta ayarlarını değiştirmek
Liste, Dikey bölünmüş ya da Yatay bölünmüş olarak seçin
Use Compact Mode
Added in version 5.7.0.
Compact mode offers a cleaner and more efficient way to view your messages. Avatars are hidden, selection checkboxes are always visible, and the preview of messages is removed. It saves space allowing you to see more emails at once.
Visit the mail settings
Go to Appearance
Toggle the Compact Mode

İleti görünümü / Çalışma kipi
Added in version 5.2.
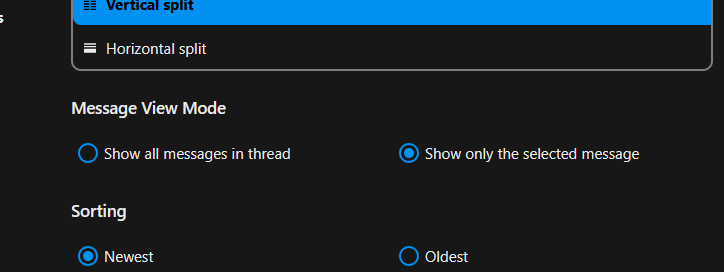
E-posta, iki farklı ileti görünümü ve çalışma kipi arasında geçiş yapabilir: Yazışma ve Tekil.
Yazışma görünümde, iletiler görüşmeye göre gruplandırılır. E-posta kutusu ileti listesinde, ilgili iletiler bir araya toplanır. Böylece yalnızca son ileti görüntülenir. Yazışma iletisi seçildiğinde, tüm ilgili iletiler ileti görüntüleme panosunda görüntülenir. Böylece, yazışmaları izlemek ve yanıtların bağlamını anlamak kolaylaşır. Bu görünümde, taşıma ve silme gibi ileti işlemleri tüm gruba uygulanır. Yani bir yazışmayı taşıdığınızda ya da sildiğinizde, o yazışmadaki tüm iletiler etkilenir.
Tekil görünümünde, iletiler hem e-posta kutusu ileti listesinde hem de ileti görüntüleme panosunda ayrı ayrı görüntülenir. Taşıma ve silme gibi işlemler yalnızca seçilmiş iletiye uygulanır. Bu görünüm, tüm yazışmayı etkilemeden iletileri ayrı ayrı yönetmek için kullanışlıdır.
E-posta ayarlarını değiştirmek
Yazışma ya da Tekil olarak seçin
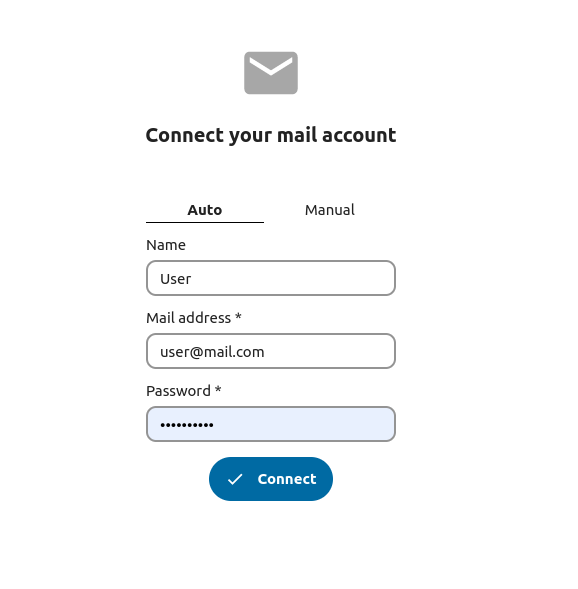
Yeni bir e-posta hesabı ekleyin
Uygulamalardan e-posta uygulamasını kullanıma alın
Başlıktaki e-posta simgesine tıklayın
Oturum açma formunu doldurun (otomatik ya da el ile)
Sıralamayı değiştirmek
Added in version 3.5.
E-posta ayarlarını değiştirmek
Sıralama bölümüne gidin
Eskiden yeniye ya da Yeniden eskiye olarak seçin
Not
Bu değişiklik tüm hesaplarınıza ve e-posta kutularınıza uygulanır
Sort favorites up
Added in version 5.7: Nextcloud 31 or newer
This setting allows you to show messages set as favorite in a separate section on top of the message list.
E-posta ayarlarını değiştirmek
Go to Appearance
Enable sorting favorites up
İletileri zamanlamak
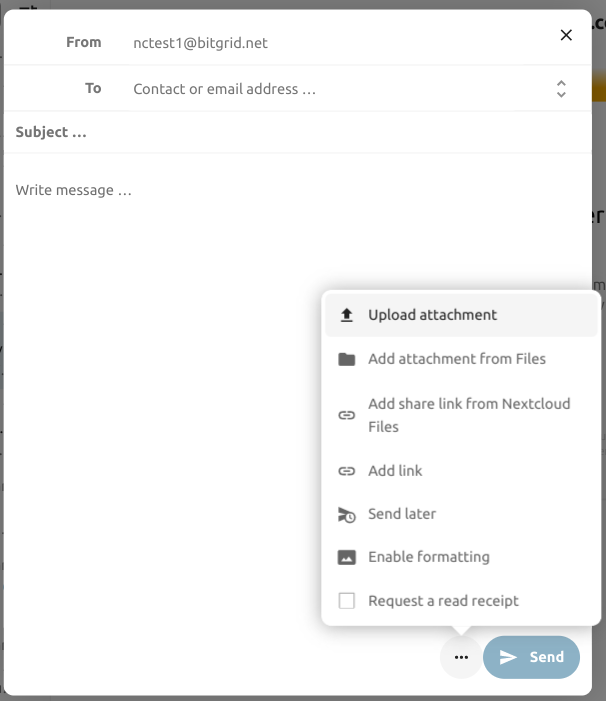
Ekranın sol üstündeki yeni ileti düğmesine tıklayın
Açılan düzenleyiciden (…) işlem menüsüne tıklayın
Daha sonra gönder üzerine tıklayın
Öncelikli gelen kutusu
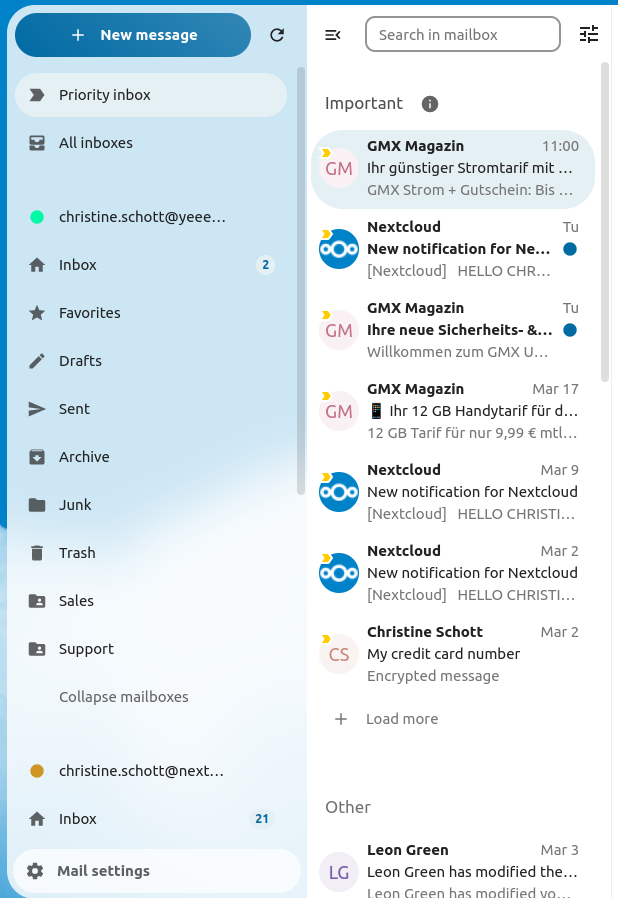
Öncelikli gelen kutusunda, Önemli ve Diğer olmak üzere 2 bölüm bulunur. İletiler, yazıştığınız kişi ve konulara veya önemli olarak işaretlediğiniz iletilere göre kendiliğinden önemli olarak işaretlenir. Başlangıçta, sisteme öğretmek için önem düzeyini el ile seçmeniz gerekebilir. Bu davranış zamanla gelişir.
The automatic classification is optional. You can opt-out when setting up an account. The classification can also be turned on and off in the account settings at any time.
Tüm gelen kutuları
Oturum açmış olduğunuz tüm hesaplardan gelen tüm iletiler burada zamana göre görüntülenir.
Hesap ayarları
Hesap ayarlarınız şu şekildedir:
Takma adlar
İmza
Varsayılan klasörler
Otomatik yanıtlayıcı
Güvenilen göndericiler
…ve diğer
Bir e-posta hesabının işlemler menüsünde bulunabilir. Gerek duyduğunuz ayarları düzenleyebilir, ekleyebilir ya da kaldırabilirsiniz.
İletileri gereksiz klasörüne taşımak
Added in version 3.4.
Posta uygulaması, gereksiz olarak işaretlendiğinde bir iletiyi farklı bir klasöre taşıyabilir.
Hesap ayarlarına gidin
Varsayılan klasörlere gidin
Gereksiz iletiler için bir klasör seçildiğinden emin olun
Gereksiz ayarlarına gidin
İletiler gereksiz klasörüne taşınsın üzerine tıklayın

Refresh mailbox
You can manually trigger a sync of your mailbox by clicking the refresh button located at the top of the mailbox list.
Starting from version 5.7 triggering the sync will also refresh the list of folders for the selected account.
E-posta kutusunda arama yapmak
Added in version 2.1.
Herhangi bir e-posta yerleşimindeki zarf listesinin en üstünde, e-posta konularını aramak için bir arama alanı kısayolu bulunur. 3.7 sürümü ile başlayarak, bu kısayol varsayılan olarak konuya, alıcıya (kime) veya göndericiye (kimden) göre arama yapmanızı sağlar.
E-posta kutusunda gelişmiş arama yapmak
Added in version 3.4.
Gelişmiş arama özelliğine arama kısayolunun sonundaki bir üste açılan pencereden erişebilirsiniz.
E-posta içeriğinde arama yapmak
Added in version 3.5.
Artık e-posta gövdelerinde arama yapılabiliyor. Bu özellik olası başarım sorunları nedeniyle isteğe bağlı olarak kullanıma alınır.
Kullanıma almak için:
Hesap ayarlarına gidin
E-posta kutusu arama bölümüne gidin
E-posta içeriğinde arama yapmak
Uyarı
Birleşik e-posta kutuları için de kullanıma almak isterseniz, bu işlemi E-posta ayarlarından yapmanız gerekir
Kullanıma alındığında asıl arama kutusu artık eüpostaların hem konularında hem deiçeriklerinde arama yapar ve gelişmiş aramada ayrı bir İçerik seçeneği görüntülenir.
Hesap yetkilendirmesi
Uygulamada, bir kullanıcının diğerinin adresinden e-posta gönderebilmesi için hesap yetkilendirmesi yapılabilir.
Yetkilendirme, e-posta sunucusunda bir yönetici tarafından yapılandırılmalıdır.
Diğer e-posta adresini kendi e-posta hesabınıza takma ad olarak ekleyin
Bir e-posta gönderirken, gönderici olarak takma adı seçin
Uyarı
Kişisel Gönderilmiş kutunuzda tutuluyorsa, gönderilen e-posta özgün hesap tarafından görülemeyebilir.
Otomatik çöp boşaltma
Added in version 3.4.
Posta uygulaması, belirli sayıda gün sonra çöp kutusundaki iletileri otomatik olarak silebilir.
Hesap ayarlarına gidin
Otomatik çöp boşaltmaya git
İletilerin kaç gün sonra silineceğini yazın
Alanı boş bırakarak ya da 0 yazarak çöp tutmayı kapatabilirsiniz.
Not
Yalnızca çöpleri tutma seçeneğini açtıktan sonra silinen e-postalar işlenir.

İleti oluşturmak
Ekranın sol üstündeki yeni ileti üzerine tıklayın
İletinizi yazmaya başlayın
Oluşturucu penceresini küçültme
Added in version 3.2.
Oluşturucu kipi, yeni bir ileti yazarken, var olan bir taslağı veya giden kutusundaki bir iletiyi düzenlerken küçültülebilir. Penceresinin sağ üstündeki simge durumuna küçült düğmesine ya da pencerenin dışında herhangi bir yere tıklamanız yeterlidir.

Küçültülmüş iletinizi, ekranınızın sağ alt bölümündeki göstergenin herhangi bir yerine tıklayarak kaldığınız yerden sürdürebilirsiniz.

Bir iletiyi düzenlemeyi durdurmak için penceredeki kapat düğmesine ya da sağ alt köşedeki göstergeye tıklayın. E-posta kutunuza otomatik olarak bir taslak kaydedilir.
Oluşturucuda alıcı bilgilerini görüntülemek
Added in version 4.2.
İlk alıcınızı veya kişinizi “Kime” alanına eklediğinizde, o kişinin kaydedilmiş profil bilgilerinin görüntüleneceği bir sağ pano açılır. İkinci bir kişi eklemek, listeyi daraltarak, bilgilerini görüntülemek için eklediğiniz herhangi bir kişiyi seçmenizi ve genişletmenizi sağlar. Yalnızca oluşturucuda yazmaya odaklanmak isterseniz, sağ üst köşedeki genişlet simgesine tıklayarak sağ panoyu gizleyebilirsiniz. Sağ panonun yeniden görüntülenmesi için aynı konumdaki simgeye tıklamanız yeterlidir.
Kişileri anmak
Added in version 4.2.
@ yazarak ve ardından listeden kişiyi seçerek iletinizde kişileri anabilirsiniz. Bunu yaptığınızda kişi otomatik olarak alıcılar arasına eklenir.
Not
Yalnız geçerli bir e-posta adresi bulunan kişiler öneri olarak görüntülenir.
Yazı blokları
Added in version 5.2.
Yazı blokları, e-postanıza eklenebilecek önceden tanımlanmış yazı parçalarıdır. E-posta uygulamasının ayarlarından oluşturulabilir ve yönetilebilirler. Oluşturucuda ! yazarak ve ardından listeden veya oluşturucu işlemlerinden bloğu seçerek eklenebilirler. Yazı blokları kullanıcılar ve kullanıcı gruplarıyla paylaşılabilir.
Giden kutusu
Bir ileti oluşturulduğunda ve “Gönder” düğmesine tıklandığında, ileti sol kenar çubuğunun sol alt köşesinde bulunan giden kutusuna eklenir.
Ayrıca, gönderme işleminin tarihini ve saatini gelecekte bir zamana ayarlayabilirsiniz (ayrıntılı bilgi almak için Zamanlanmış iletiler). İleti belirlediğiniz tarih ve saat gelene kadar giden kutusunda tutulur, ve zamanı geldiğinde otomatik olarak gönderilir.
Giden kutusu yalnızca giden kutusunda işlenmeyi bekleyen bir ileti bulunduğunda görüntülenir.
“Gönder” işlemi tetiklenmeden önce istediğiniz bir zamanda giden kutusundaki bir ileti için oluşturucuyu yeniden açabilirsiniz.
Not
Gönderim sırasında bir sorun oluştuğunda üç hata iletisinden biri görüntülenir:
- “Gönderilmiş” kutusuna kopyalanamadı
E-posta gönderilmiştir ancak “Gönderilmiş” kutusuna kopyalanamamıştır. Bu hata giden kutusu tarafından işlenir ve kopyalama işlemi yeniden denenir.
- E-posta sunucusu sorunu
Gönderim yapılamamıştır ama yeniden denenebilir (SMTP sunucusuna ulaşılamamıştır gibi). Giden kutusu iletiyi yeniden göndermeyi dener.
- İleti gönderilemedi
İleti gönderilmiş ya da gönderilememiş olabilir. E-posta sunucusu bize iletinin durumunu söyleyemez. E-posta uygulamasının iletinin durumunu (gönderilmiş veya gönderilmemiş) durumunu belirlemenin bir yolu olmadığından, ileti giden kutusunda kalır ve hesap kullanıcısının nasıl ilerleyeceğine karar vermesi gerekir.
E-posta kutusu işlemleri
E-posta kutusu eklemek
Bir hesabın işlem menüsünü açın
E-posta kutusu ekle üzerine tıklayın
Bir alt e-posta kutusu eklemek
Bir e-posta kutusunun işlem menüsünü açın
Alt e-posta kutusu ekle üzerine tıklayın
Zarf işlemleri
Bir etkinlik oluşturmak
Doğrudan e-posta uygulamasından belirli bir ileti ya da yazışma için bir etkinlik oluşturun
Bir zarfın işlem menüsünü açın
Diğer işlemler üzerine tıklayın
Etkinlik ekle üzerine tıklayın
Not
Yönetici etkinleştirdiyse, sizin için etkinlik başlığı ve gündem oluşturulur.
Bir görev oluşturmak
Added in version 3.2.
Doğrudan e-posta uygulamasından belirli bir ileti ya da yazışma için bir görev oluşturun
Bir zarfın işlem menüsünü açın
Diğer işlemler üzerine tıklayın
Görev ekle üzerine tıklayın
Not
Görevler, desteklenen takvimlere kaydedilir. Uyumlu bir takvim yoksa calendar app ile yeni bir takvim oluşturabilirsiniz.
Yapay zeka ile özet çıkarmak
Added in version 4.2.
E-posta kutunuza baktığınızda, e-postalarınızın yapay zeka tarafından oluşturulmuş kısa bir özetini ön izleme olarak görürsünüz.
Not
Bu özelliğin yönetici tarafından açılmış olması gerektiğini lütfen unutmayın
Quick actions
Added in version 5.5: (Nextcloud 30)
Allows you to group action steps that you would normally perform on envelopes such as tagging, moving, marking as read … into quick actions that can be executed with a single click. Quick actions are scoped to one mail account and can be created and managed in the mail settings under “Quick actions” or directly from the envelope action menu.
Not
Some action steps such as Mark as spam, Move thread and Delete thread are mutually exclusive and cannot be part of the same quick action, they also can’t be re-ordered and will always be executed last.
Not
Please note that quick actions will be performed on all messages in a thread when executed on one.
İleti işlemleri
Bir e-posta listesi aboneliğinden ayrılmak
Added in version 3.1.
Bazı e-posta listeleri ve haber bültenleri kolayca abonelikten çıkmanıza izin verir. E-posta uygulaması iletinin böyle bir göndericiden geldiğini algılarsa, gönderen bilgilerinin yanında bir Abonelikten ayrıl düğmesi görüntülenir. Listeden ayrılmak için üzerine tıklayıp onaylayın.
Ertele
Added in version 3.4.
Bir iletiyi ya da yazışmayı ertelemek, seçilmiş erteleme tarihine ulaşılana ve ileti ya da yazışma özgün e-posta kutusuna geri taşınana kadar onu özel bir e-posta kutusuna taşır.
Bir zarfın ya da yazışmanın işlem menüsünü açın
Ertele üzerine tıklayın
İleti ya da yazışmanın ne kadar süreyle erteleneceğini seçin
Akıllı yanıtlar
Added in version 3.6.
E-posta uygulamasında bir ileti açtığınızda, yapay zeka tarafından oluşturulan yanıtlar önerilir. Yalnızca önerilen bir yanıta tıkladığınızda, oluşturucu bu yanıtı önceden doldurarak açılır.
Not
Bu özelliğin yönetici tarafından açılmış olması gerektiğini lütfen unutmayın
Not
Desteklenen diller kullanılan büyük dil modeline bağlıdır
E-postaları çevirmek
Added in version 4.2.
İletileri Konuş uygulamasına benzer şekilde yapılandırılmış dillerinize çevirebilirsiniz.
Not
Çeviri özelliklerinin sunucu üzerinde açılmış olması gerektiğini lütfen unutmayın
Not
5.3 sürümünden başlayarak, büyük dil modeli yönetici tarafından açıldığında çeviriler önerilir
Yazışmaları özetlemek
E-posta uygulaması, 3 veya daha fazla ileti bulunan yazışmaları özetleyebilir.
Added in version 3.4.
Not
Bu özelliğin yönetici tarafından açılmış olması gerektiğini lütfen unutmayın
Not
Lütfen bu özelliğin yalnızca integration_openai ile iyi çalıştığını unutmayın. Yerel büyük dil modellerinin yanıt vermesi çok uzun sürer ve özet isteği zaman aşımına uğrayabilir ve önemli bir sistem yükü oluşturabilir.
Süzmek ve otomatik yanıtları kullanmak
E-posta uygulamasında, Sieve betikleri için bir düzenleyici, otomatik yanıtlayıcıları yapılandırmak için bir arayüz ve süzgeçleri yapılandırmak için bir arayüz bulunur. Sieve, hesap ayarları içinden açılmış olmalıdır.
Otomatik yanıtlayıcılar
Added in version 3.5: Otomatik yanıtlayıcı sistem ayarlarını kullanabilir.
Otomatik yanıtlayıcı varsayılan olarak kapalıdır. El ile ayarlanabilir veya sistem ayarlarını kullanabilir. Şu sistem ayarları, Bulunmama ayarları bölümüne yazılan uzun bulunmama iletisinin otomatik olarak uygulandığı anlamına gelir.
Süzgeç
Added in version 4.1.
E-posta 4.1, uygulamasında süzgeç kurallarını yapılandırmak için basit bir düzenleyici bulunur.
Not
Var olan süzgeçler içe aktarılmaz. Ancak, var olan tüm süzgeçler etkin ve değişmeden kalır. Önlem olarak var olan betik dosyanızı Sieve betik düzenleyicisi ile yedeklemenizi öneririz.
Yeni bir süzgeç eklemek
Hesap ayarlarınızı açın.
Hesabınızda Sieve özelliğinin açık olduğundan emin olun (Sieve sunucu ayarlarına bakın).
Süzgeçler üzerine tıklayın.
Yeni bir kural oluşturmak için Yeni süzgeç üzerine tıklayın.
Bir süzgeci silmek
Hesap ayarlarınızı açın.
Hesabınızda Sieve özelliğinin açık olduğundan emin olun (Sieve sunucu ayarlarına bakın).
Süzgeçler üzerine tıklayın.
Silmek istediğiniz süzgecin üzerinde gelin ve çöp kutusu simgesine tıklayın.
Koşullar
Koşullar, Konu, Gönderici ve Alıcı gibi alanları kullanarak e-posta sunucunuzdaki gelen e-postalara uygulanır. Bu alanların koşullarını tanımlamak için aşağıdaki seçenekleri kullanabilirsiniz:
tam olarak şu olan: Tam eşleşme. Alan belirtilen değer ile aynı olmalıdır.
şunu içeren: Alt dizge eşleşmesi. Alanın içinde belirtilen değer geçiyorsa eşleşir. Örnek: “por” ifadesi “rapor” dizgesi ile eşleşir.
şuna uyan: Genel arama karakterleri kullanan bir model. “*” simgesi herhangi bir sayıda karakteri ifade eder (boşluk ile), “?” simgesi tek bir krarakteri ifade eder. Örnek: “rapor” ifadesi “Kurumsal rapor 2024” dizgesi ile eşleşir.
İşlemler
Belirtilen koşullar gerçekleştiğinde işlemler tetiklenir. Şu işlemler kullanılabilir:
fileinto: İletiyi belirtilen klasöre taşır.
addflag: İletiye bir işaret ekler.
stop: Süzgeç betiğinin işlenmesini durdurur. Bu işlemden sonraki süzgeçler işlenmez.
Bir iletiden bir süzgeç oluşturmak
Added in version 5.2.
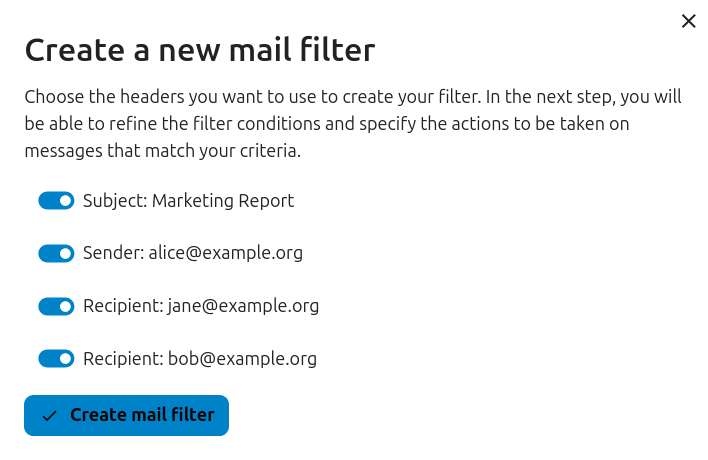
Belirli bir iletiden bir süzgeç oluşturmak için iletiyi açın ve ardından üç noktaya tıklayarak menüyü açın. “Diğer işlemler” üzerinde ve ardından “E-posta süzgeci oluştur” üzerine tıklayın.
Pencerede, lütfen gelen iletilerle eşleşecek koşulları seçin ve “E-posta süzgeci oluştur” üzerine tıklayarak ilerleyin.
Takip anımsatıcıları
Added in version 4.0.
E-posta uygulaması, giden bir e-postanın yanıt almadığını size otomatik olarak anımsatır. Gönderilen her e-posta, bir yanıt beklenip beklenmediğini denetlemek için bir yapay zeka tarafından incelenir. Dört gün sonra ilgili tüm e-postalar öncelikli gelen kutunuzda görüntülenir.
Böyle bir e-postaya tıkladığınızda, tüm alıcıları hızlı bir şekilde takip edebileceğiniz bir düğme görüntülenir. Gönderilen bir e-posta için takip anımsatıcıları kapatılabilir de.
Not
Bu özelliğin yönetici tarafından açılmış olması gerektiğini lütfen unutmayın.
Güvenlik
Kimlik avı algılama
Added in version 4.0.
E-posta uygulaması olası kimlik avı girişimlerini denetler ve kullanıcıya bir uyarı görüntüler.
Denetimler şunlardır:
Adres defterine kaydedilen gönderici adresi, e-posta hesabındaki adres ile aynı değil
Gönderici, gönderici adresiyle eşleşmeyen özel bir e-posta adresi kullanıyor
Gönderildiği tarih geleceğe ayarlanmış
İleti içeriğindeki bağlantılar görüntülenen yazıdaki yere gitmiyor
Yanıt adresi gönderici adresiyle aynı değil
Not
Uyarının iletinin bir kimlik avı girişimi olduğu anlamına gelmediğini lütfen unutmayın. Bu yalnızca E-posta uygulamasının olası bir kimlik avı girişimi algıladığı anlamına gelir.
İç adresler
Added in version 4.0.
E-posta uygulaması, iç adreslerin ve etki alanlarının eklenmesine izin verir. Adres listede yoksa, bir ileti gönderirken ve alırken kullanıcıyı uyarır.
Bir iç adres eklemek için:
E-posta uygulamasının ayarlarını açın
Gizlilik ve güvenlik bölümüne gidin
İşaret kutusuna tıklayarak iç adreslerin kullanılmasını açın
İç adres ekle düğmesine tıklayın
Adresi ya da etki alanını yazıp Ekle üzerine tıklayın
Pano bütünleştirmesi
Added in version 1.8.
E-posta uygulaması, Nextcloud panosuyla bütünleşik kullanılabilen iki pano bileşeni sunar:
Okunmamış e-postalar: Bu pano bileşeni okunmamış iletileri görüntüler.
Önemli e-postalar: Bu pano bileşeni önemli olarak işaretlenmiş e-postaları görüntüler.
Bu pano bileşenleri, hesabınız için ayarlanmış e-posta hesaplarından gelen e-postaları kullanır.
Calendar integration
The Mail app integrates with the Calendar app to help you manage meeting invitations and keep your calendar up to date.
Meeting invitations
When you receive a message containing a meeting invitation, the Mail app automatically detects the attached calendar file and displays a formatted action section to help you respond.
You can:
Accept the invitation
Decline the invitation
Tentatively accept the invitation
Your response is sent directly from the Mail app, and the event is added to your primary calendar accordingly.
You can also manually add a meeting invitation to a specific calendar:
Open the message with the meeting invitation
Scroll to the bottom of the message to the attachments section
Select the calendar file (usually with a .ics extension), then click the three dots menu.
Click “Import in to calendar” and choose the desired calendar.
Meeting invitation automation
When a meeting organizer sends updates to an existing event (such as time changes or location updates), the Mail app processes these automatically and updates the corresponding event in your calendar.
Added in version 5.7: (Nextcloud 32 or newer)
You can also configure Mail to automatically add all new meeting invitations to your calendar without requiring manual acceptance. The invitations will be added to the calendar as tentative.
To enable this feature:
Visit account settings of a specific mail account
Navigate to Calendar settings section
Enable Automatically create tentative appointments in calendar
Not
With this setting enabled, invitations will still appear in your mail list, but they will be automatically added to your calendar.
Keyboard shortcuts
The Mail app implements several keyboard shortcuts to speed up your experience.
For a full list of the supported shortcuts, check out the Mail settings in your instance.

