Synchroniser avec Thunderbird
Thunderbird est un client de messagerie riche en fonctionnalités et mature qui peut être transformé en un gestionnaire d’informations personnelles (PIM) à part entière. Depuis la version 102, il prend en charge la synchronisation du carnet d’adresses via CardDAV et la découverte automatique des calendriers et carnets d’adresses disponibles sur le serveur.
Méthode recommandée
Depuis Thunderbird 102, les protocoles CardDAV & CalDAV sont nativement supportés.
Contacts
Dans la vue Carnet d’adresse, cliquer sur la flèche vers le bas à côté de Nouveau Carnet d’Adresse et choisir Ajouter un Carnet d’Adresse CardDAV.
Dans la fenêtre suivante, saisissez votre Nom d’utilisateur ainsi que l”emplacement (URL du serveur).
La fenêtre suivante vous demandera votre nom d’utilisateur et votre mot de passe pour ce compte.
La fenêtre précédente sera rafraîchie et vous demandera quel·s carnet·s d’adresse·s vous souhaitez synchroniser.
Choisissez et cliquez sur Continuer.
Si vous souhaitez ultérieurement ajouter un nouveau carnet d’adresses, vous pouvez refaire toutes ces étapes et seuls les carnets non déjà synchronisés vous seront proposés.
Note
Si votre compte utilise l’authentification à double facteurs, vous avez besoin d’une application de mot de passe dédié pour se connecter plutôt que votre mot de passe normal.
Agendas
Accédez à la vue du calendrier dans Thunderbird et sélectionnez le bouton Nouveau Calendrier… en bas du panneau de gauche.
Choisissez Sur le réseau :
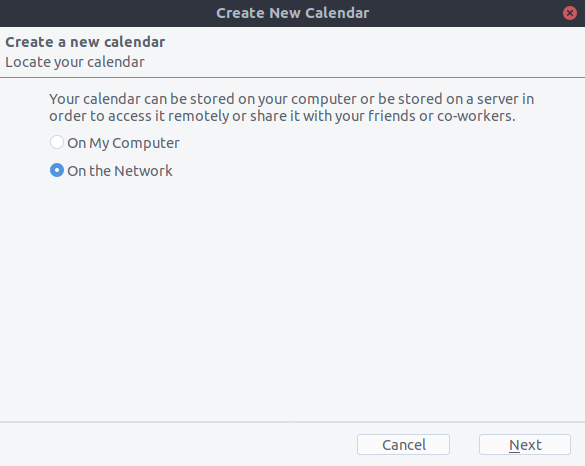
Tapez votre Nom d’utilisateur et l”Emplacement (l’URL du serveur), puis cliquez sur Trouver les agendas.
Choisissez quels agendas vous souhaitez ajouter et cliquez sur S’abonner.
Même chose ici, si vous souhaitez plus tard ajouter d’autres calendriers, il suffit de refaire la procédure.
Alternative: utiliser l’extension CardBook (Contacts seulement)
CardBook est une alternative avancée au carnet d’adresses inclus dans Thunderbird, qui prend en charge CardDAV.
Cliquer sur l’icône Cardbook dans le coin supérieur droit dans Thunderbird :

Dans Cardbook :
Allez dans Carnet d’adresses > Nouveau carnet d’adresses Remote > Suivant
Sélectionner CardDAV, renseigner l’adresse de votre serveur Nextcloud, votre nom d’utilisateur et mot de passe

Cliquer sur « Valider », cliquer sur Suivant, puis choisir le nom du carnet d’adresses et cliquer une nouvelle fois sur Suivant :

Une fois terminé, CardBook synchronise vos carnets d’adresses. Vous pouvez toujours déclencher une synchronisation manuellement en cliquant sur « Synchroniser » dans le coin supérieur gauche de CardBook :
