Usar a aplicación Correo
Nota
A aplicación Correo vén instalada con Nextcloud Hub de xeito predeterminado, mais pódese desactivar. Pídallo á administración da súa instancia.

Xestionar a súa conta de correo
Cambiar o deseño
Added in version 3.6.
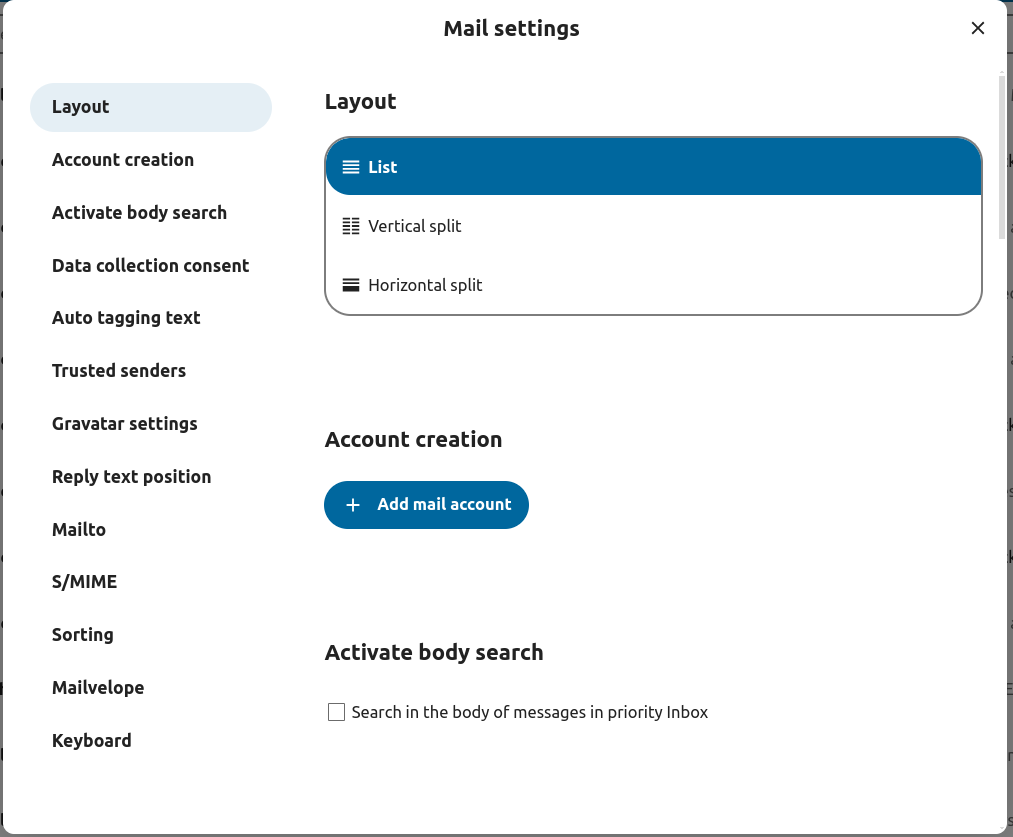
Vaia aos axustes de correo
Escolla entre Lista, División vertical e División horizontal
Use Compact Mode
Added in version 5.7.0.
Compact mode offers a cleaner and more efficient way to view your messages. Avatars are hidden, selection checkboxes are always visible, and the preview of messages is removed. It saves space allowing you to see more emails at once.
Visit the mail settings
Go to Appearance
Toggle the Compact Mode

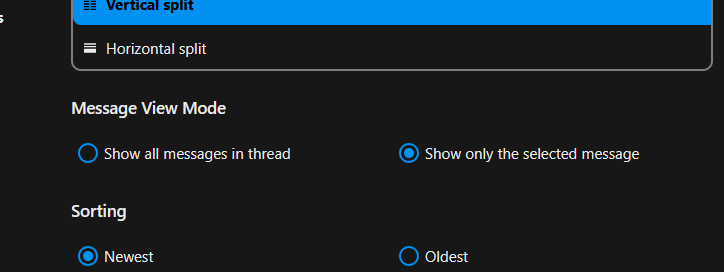
Modo de Vista de mensaxes / de operativa
Added in version 5.2.
Correo ten a capacidade de cambiar entre dous modos de vista e operativa de mensaxes diferentes: Fío e Individual.
No modo Fío, as mensaxes están agrupadas por conversa. Na lista de mensaxes da caixa de correo, as mensaxes relacionadas están amoreadas de xeito que só se amosa a mensaxe máis recente, e todas as mensaxes relacionadas amósanse no panel de vista de mensaxes após seleccionar a mensaxe amoreada. Isto é útil para seguir os debates e comprender o contexto das respostas. Neste modo, a operación de mensaxes como mover e eliminar aplícase a todo o fío, o que significa que cando move ou elimina un fío, todas as mensaxes dentro dese fío están afectadas.
No modo Individual, as mensaxes amósanse individualmente, tanto na lista de mensaxes da caixa de correo como no panel de vista de mensaxes, e operacións como mover e eliminar aplícanse só á mensaxe seleccionada. Este modo é útil cando se quere xestionar as mensaxes por separado sen afectar a toda a conversa.
Vaia aos axustes de correo
Escolla entre Fío, Individual
Engadir unha nova conta de correo
Active a aplicación de correo desde as aplicacións
Prema na icona de correo na cabeceira
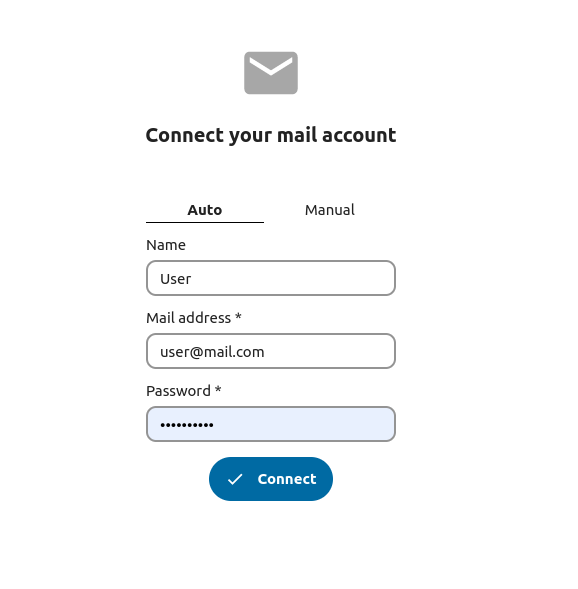
Encha o formulario de acceso (automático ou manual)
Cambiar o criterio de ordenación
Added in version 3.5.
Vaia aos axustes de correo
Vaia a Ordenación
Pode escoller, primeiro o correo Máis vello ou o Máis recente
Nota
Este cambio aplicarase en todas as súas contas e caixas de correo
Sort favorites up
Added in version 5.7: Nextcloud 31 or newer
This setting allows you to show messages set as favorite in a separate section on top of the message list.
Vaia aos axustes de correo
Go to Appearance
Enable sorting favorites up
Mensaxes programadas
Prema no botón Nova mensaxe na parte superior esquerda da pantalla
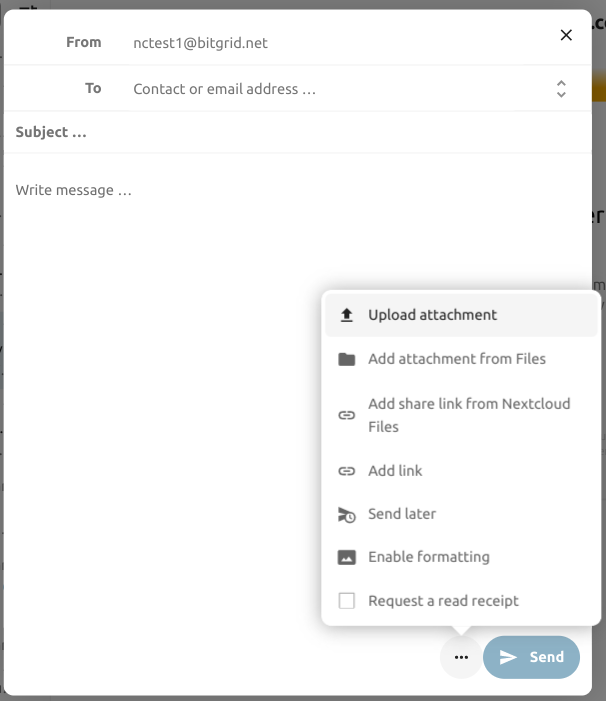
Prema no menú de accións (…) na xanela modal de redacción
Prema en Enviar máis tarde
Caixa de entrada prioritaria
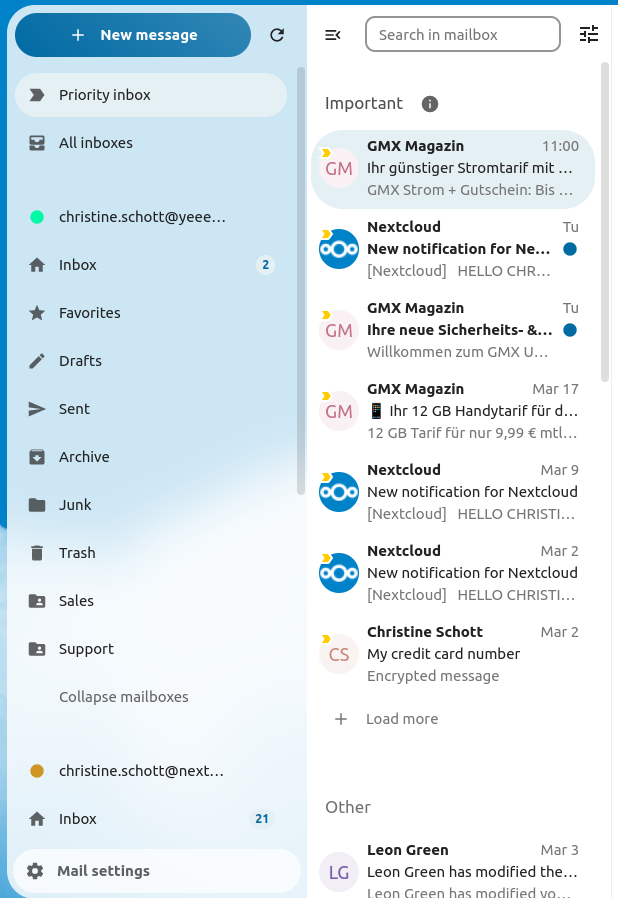
A caixa de entrada prioritaria ten 2 seccións Importante e Outro. As mensaxes marcaranse automaticamente como importantes en función das mensaxes coas que teña interactuado ou marcado como importantes. Ao principio quizais teñas que cambiar manualmente a importancia para aprenderllo ao sistema, mais mellorará co paso do tempo.
The automatic classification is optional. You can opt-out when setting up an account. The classification can also be turned on and off in the account settings at any time.
Todas as caixas de entrada
Todas as mensaxes de todas as contas ás que accedeu amosaranse aquí cronoloxicamente.
Axustes da conta
Axustes da súa conta, como:
Alias
Sinatura
Cartafoles predeterminados
Resposta automática
Remitentes de confianza
…e máis
Pódese atopar no menú de accións dunha conta de correo. Alí pode editar, engadir ou retirar axustes segundo a súa necesidade.
Mover as mensaxes ao cartafol de non desexado
Added in version 3.4.
Correo pode mover unha mensaxe a un cartafol diferente cando se marca como non desexado.
Vaia a Axustes da conta
Vaia a Cartafoles predeterminados
Comprobe que foi seleccionado un cartafol para as mensaxes non desexadas
Vaia a Axustes de «non desexado»
Prema en Mover as mensaxes ao cartafol de non desexado

Refresh mailbox
You can manually trigger a sync of your mailbox by clicking the refresh button located at the top of the mailbox list.
Starting from version 5.7 triggering the sync will also refresh the list of folders for the selected account.
Buscar na caixa de correo
Added in version 2.1.
Na parte superior da lista de sobres en calquera esquema de correo, hai un atallo de campo de busca para buscar asuntos de correo. A partir da versión 3.7, este atallo permite buscar por asunto, destinatario (a) ou remitente (de) de xeito predeterminado.
Busca avanzada na caixa de correo
Added in version 3.4.
Pode acceder á función de busca avanzada a través dunha xanela modal situada ao final do atallo de busca.
Activar a busca no corpo do correo
Added in version 3.5.
Agora pode buscarse no corpo dos correos, esta funcionalidade é opt-in (confirmación única) por mor dos posíbeis problemas de rendemento.
Para activalo:
Vaia a Axustes da conta
Vaia á Busca na caixa de correo
Activar a busca no corpo do correo
Advertencia
Se tamén quere activalo para as caixas de correo unificadas, ten que facelo nos axustes de Correo
Ao activalo, a caixa de busca principal buscará agora tanto nos asuntos como nos corpos dos correos, e aparecerá unha opción separada Corpo na busca avanzada.
Delegación de contas
A aplicación permite a delegación de contas para que un usuario poida enviar correos desde o enderezo doutro.
A delegación ten que ser configurada no servidor de correo pola administración do mesmo
Engada o outro enderezo de correo como alias para a súa propia conta de correo
Cando envíe un correo, seleccione o alias como remitente
Advertencia
É posíbel que o correo electrónico enviado non sexa visíbel para a conta orixinal se está almacenado na súa caixa de correo persoal Enviado.
Eliminación automática do lixo
Added in version 3.4.
A aplicación de correo pode eliminar automaticamente mensaxes do cartafol do lixo após un determinado número de días.
Vaia a Axustes da conta
Ir é eliminación automática do lixo
Introduza o número de días após os que se debe eliminar as mensaxes
Desactivar a retención de lixo deixando o campo baleiro ou axustándoo a 0.
Nota
Só se procesarán os correos eliminados após activar a retención do lixo.

Redactar mensaxes
Prema en Nova mensaxe na parte superior esquerda da pantalla
Comece a escribir a súa mensaxe
Minimizar a xanela modal de redacción
Added in version 3.2.
A xanela modal de redacción (a caixa na que se redacta a mensaxe) pódese minimizar mentres se escribe unha mensaxe nova, se edita un borrador existente ou unha mensaxe desde a caixa de saída. Simplemente prema no botón de minimizar na parte superior dereita da xanela modal ou prema en calquera lugar fóra da xanela modal.

Pode retomar a súa mensaxe minimizada premendo en calquera lugar do indicador na parte inferior dereita da pantalla.

Prema no botón de pechar na xanela modal ou no indicador do canto inferior dereito para deixar de editar unha mensaxe. Gardarase automaticamente un borrador na súa caixa de borradores.
Información do destinatario na xanela de redacción
Added in version 4.2.
Cando engade o seu primeiro destinatario ou contacto no campo «Para», aparecerá un panel á dereita amosando os detalles do perfil gardados dese contacto. Engadir un segundo contacto contraerá a lista, permitíndolle seleccionar e estender calquera contacto que engada para ver os seus detalles. Se prefire centrarse só en escribir na xanela de redacción, pode agochar o panel dereito premendo na icona estender no canto superior dereito. Para amosar de novo o panel correcto, simplemente prema na icona de minimizar na mesma localización.
Mencionar contactos
Added in version 4.2.
Pode mencionar contactos na súa mensaxe escribindo @ e de seguido seleccionando o contacto da lista. Ao facelo, o contacto engadirase automaticamente como destinatario.
Nota
Só se suxerirán contactos cun enderezo de correo válido.
Bloques de texto
Added in version 5.2.
Os bloques de texto son fragmentos de texto predefinidos que se poden inserir no correo-e. Pódense crear e xestionar nos axustes do correo. Pódense inserir no compositor escribindo “”!”” e logo seleccionando o bloque da lista ou das accións do compositor. Os bloques de texto pódense compartir con usuarios e grupos de usuarios.
Caixa de saída
Unha vez redactada unha mensaxe e premido o botón «Enviar», esta mensaxe é engadida á caixa de saída que se pode atopar no canto inferior esquerdo da barra lateral esquerda.
Tamén pode definir a data e a hora para a operación de envío a un punto no futuro (consulte Mensaxes programadas)- a mensaxe permanecerá na caixa de saída ata que chegue a data e hora escollida, entón enviarase automaticamente.
A caixa de saída só é visíbel cando hai unha mensaxe que agarda ser xestionada pola caixa de saída.
Pode volver abrir a xanela de redacción para unha mensaxe na caixa de saída en calquera momento antes de que se active a operación de «enviar».
Nota
Cando se produce un erro durante o envío, hai tres posíbeis mensaxes de erro:
- Non foi posíbel copialo na caixa de correo «Enviado».
O correo foi enviado, mais non foi posíbel copialo na caixa de correo «Enviado». Este erro será xestionado pola caixa de saída e tentarase de novo a operación de copia.
- Produciuse un erro no servidor de correo
O envío non foi satisfactorio cun estado do que se pode recuperar (ex: non foi posíbel acadar o servidor SMTP). A caixa de saída tentará de novo o envío da mensaxe.
- Non foi posíbel enviar a mensaxe
O envío puido ou non fallar. O servidor de correo non nos pode dicir o estado da mensaxe. Dado que a aplicación de correo non ten xeito de determinar o estado da mensaxe (enviado ou non enviado), a mensaxe permanecerá na caixa de saída e o usuario da conta ten que decidir como proceder.
Accións na caixa de correo
Engadir unha caixa de correo
Abra o menú de accións dunha conta
Prema en Engadir unha caixa de correo
Engadir unha caixa de correo secundaria
Abra o menú de accións dunha caixa de correo
Prema en Engadir unha caixa de correo secundaria
Accións de sobre
Crear un evento
Crear un evento para unha determinada mensaxe/fío directamente a través da aplicación de correo
Abra o menú de accións dun sobre
Prema en Máis accións
Prema en Crear evento
Nota
Crearase para Vde. o título do evento e unha axenda, se a administración o activou.
Crear unha tarefa
Added in version 3.2.
Crear unha tarefa para unha determinada mensaxe/fío directamente a través da aplicación de correo
Abra o menú de accións dun sobre
Prema en Máis accións
Prema en Crear tarefa
Nota
As tarefas almacénanse en calendarios compatíbeis. Se non hai un calendario compatíbel, pode crear un novo coa aplicación de calendario.
Resumo por IA
Added in version 4.2.
Ao mirar na súa caixa de correo verá un breve resumo xerado por IA dos seus correos como unha vista previa.
Nota
Teña en conta que a funcionalidade ten que estar activada pola administración
Quick actions
Added in version 5.5: (Nextcloud 30)
Allows you to group action steps that you would normally perform on envelopes such as tagging, moving, marking as read … into quick actions that can be executed with a single click. Quick actions are scoped to one mail account and can be created and managed in the mail settings under «Quick actions» or directly from the envelope action menu.
Nota
Some action steps such as Mark as spam, Move thread and Delete thread are mutually exclusive and cannot be part of the same quick action, they also can’t be re-ordered and will always be executed last.
Nota
Please note that quick actions will be performed on all messages in a thread when executed on one.
Accións de mensaxes
Cancelar a subscrición dunha lista de correo
Added in version 3.1.
Algunhas listas de correo e boletíns permiten cancelar a subscrición doadamente. Se a aplicación Correo detecta mensaxes deste remitente, amosará un botón Cancelar a subscrición xunto á información do remitente. Prema e confirme para cancelar a subscrición a esa lista.
Adiamento
Added in version 3.4.
Ao adiar unha mensaxe ou fío móvese a unha caixa de correo específica ata que se acade a data de adiamento seleccionada e a mensaxe ou fío movese de novo á caixa de correo orixinal.
Abra o menú de accións dun sobre ou fío
Prema en Adiar
Seleccione canto tempo debe adiarse a mensaxe ou o fío
Respostas intelixentes
Added in version 3.6.
Cando abre unha mensaxe na aplicación Correo, este propón respostas xeradas por AI. Simplemente ao premer nunha resposta suxerida, a xanela de redacción ábrese coa resposta precuberta.
Nota
Teña en conta que a funcionalidade ten que estar activada pola administración
Nota
Os idiomas admitidos dependen do gran modelo de linguaxe empregado
Tradución do correo
Added in version 4.2.
Vde. é quen de traducir mensaxes aos seus idiomas configurados de xeito semellante a como o fai Parladoiro.
Nota
Teña en conta que as funcionalidades de tradución deben estar activadas no servidor
Nota
Desde a versión 5.3, se LLM está activado pola administración, suxeriranse traducións
Resumo do fío
A aplicación de correo permite resumir fíos de mensaxes que conteñen 3 ou máis mensaxes.
Added in version 3.4.
Nota
Teña en conta que a funcionalidade ten que estar activada pola administración
Nota
Teña en conta que esta funcionalidade só traballa ben con integration_openai. Os GML (LLM) locais tardan demasiado tempo en responder e é probábel que se esgote o tempo de espera da solicitude de resumo e, aínda así, xere unha carga significativa do sistema.
Filtrado e resposta automática
A aplicación Correo ten un editor para scripts Sieve, unha interface para configurar respostas automáticas e unha interface para configurar filtros. Sieve ten que estar activado nos axustes da conta.
Respostas autromáticas
Added in version 3.5: A resposta automática pode seguir os axustes do sistema.
A resposta automática está desactivada de xeito predeterminado. Pódese definir manualmente ou seguir a configuración do sistema. Seguindo os axustes do sistema significa que a mensaxe de ausencia longa introducida na Sección de axustes de ausencias aplícase automaticamente.
Filtro
Added in version 4.1.
Correo 4.1 inclúe un editor sinxelo para configurar as regras do filtro.
Nota
Non está admitida a importación de filtros existentes. Porén, todos os filtros existentes permanecerán activos e sen cambios. Recomendamos facer unha copia de seguranza do seu script actual a través do editor de scripts de Sieve como precaución.
Como engadir un novo filtro
Abra os axustes da súa conta
Comprobe que Sieve está activado para súa conta (consulte os axustes do servidor de Sieve).
Prema en Filtros
Seleccione Novo filtro para crear a nova regra.
Como eliminar un filtro
Abra os axustes da súa conta
Asegúrese de que Sieve está activado para súa conta (consulte os axustes do servidor de Sieve).
Prema en Filtros
Pase o rato por riba do filtro que quere eliminar e. de seguido, prema na icona do cesto do lixo.
Condicións
As condicións aplícanse aos correos entrantes no servidor de correo, dirixidos a campos como Asunto, Remitente e Destinatario. Pode usar os seguintes operadores para definir as condicións para estes campos:
é exactamente: unha coincidencia exacta. O campo debe ser idéntico ao valor indicado.
contén: unha coincidencia de subcadea. O campo coincide se o valor indicado está contido dentro del. Por exemplo, «conforme» coincide con «forme».
coincide: unha coincidencia de patróns empregando comodíns. O símbolo «*» representa calquera número de caracteres (incluído ningún), mentres que «?» representa exactamente un carácter. Por exemplo, «informe» coincidiría con «Actualizar o informe de 2024».
Accións
As accións son activadas cando as probas especificadas son verdadeiras. Están dispoñíbeis as seguintes accións:
fileinto: move a mensaxe a un cartafol especificado.
addflag: engade un indicador á mensaxe.
stop: detén a execución do script de filtro. Non se procesarán máis filtros após sta acción.
Crear un filtro a partir dunha mensaxe
Added in version 5.2.
Para crear un filtro a partir dunha mensaxe determinada, abra a mensaxe e logo abra o menú premendo nos tres puntos. A continuación, prema en «Máis accións» seguido de «Crear filtro de correo».
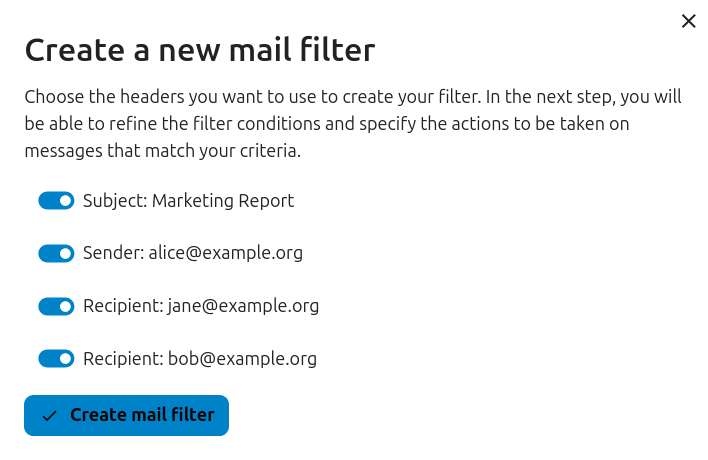
No diálogo, seleccione as condicións para coincidir coas mensaxes entrantes e continúe premendo en «Crear filtro de correo».
Lembretes de seguimento
Added in version 4.0.
A aplicación Correo lembraralle automaticamente cando un correo saínte non recibise unha resposta. Cada correo enviado será analizado por unha IA para comprobar se se agarda unha resposta. Após catro días, todos os correos relevantes amosaranse na súa caixa de entrada prioritaria.
Ao premer nesa mensaxe amosarase un botón para facer un seguimento rápido con todos os destinatarios. Tamén é posíbel desactivar os lembretes de seguimento dun correo enviado.
Nota
Teña en conta que a funcionalidade ten que estar activada pola administración.
Seguridade
Detección de ciberestafa (pishing)
Added in version 4.0.
A aplicación Correo comprobará os posíbeis intentos de ciberestafa (phishing) e amosará unha advertencia ao usuario.
As comprobacións son as seguintes:
O enderezo do remitente gardado no caderno de enderezos non é o mesmo que o da conta de correo
O remitente está a usar un enderezo de correo personalizado que non coincide co enderezo do remitente
A data de envío está definida no futuro
As ligazóns do corpo da mensaxe non apuntan ao texto amosado
O enderezo de resposta non é o mesmo que o enderezo do remitente
Nota
Teña en conta que a advertencia non significa que a mensaxe sexa un intento de ciberestafa (phishing). Só significa que a aplicación de correo detectou un potencial intento de ciberestafa (phishing).
Enderezos internos
Added in version 4.0.
A aplicación de correo permite engadir enderezos e dominios internos e advertirá ao usuario se o enderezo non está na lista, ao enviar e recibir unha mensaxe.
Para engadir un enderezo interno:
Abra os axustes de correo
Desprácese ata a sección de Privacidade e seguridade
Active os enderezos internos de premendo na caixa de selección
Prema no botón Engadir enderezo interno
Introduza o enderezo ou o dominio e prema en Engadir
Integración co Taboleiro
Added in version 1.8.
A aplicación de correo ofrece dous trebellos deseñados para a integración co Taboleiro de Nextcloud:
Correos sen ler: este trebello amosa os correos pendentes de ler.
Correos importantes: este trebello amosa os correos que foron marcados como importantes.
Estes trebellos empregan os correos das contas de correo-e que están definidas para a súa conta.
Calendar integration
The Mail app integrates with the Calendar app to help you manage meeting invitations and keep your calendar up to date.
Meeting invitations
When you receive a message containing a meeting invitation, the Mail app automatically detects the attached calendar file and displays a formatted action section to help you respond.
You can:
Accept the invitation
Decline the invitation
Tentatively accept the invitation
Your response is sent directly from the Mail app, and the event is added to your primary calendar accordingly.
You can also manually add a meeting invitation to a specific calendar:
Open the message with the meeting invitation
Scroll to the bottom of the message to the attachments section
Select the calendar file (usually with a .ics extension), then click the three dots menu.
Click «Import in to calendar» and choose the desired calendar.
Meeting invitation automation
When a meeting organizer sends updates to an existing event (such as time changes or location updates), the Mail app processes these automatically and updates the corresponding event in your calendar.
Added in version 5.7: (Nextcloud 32 or newer)
You can also configure Mail to automatically add all new meeting invitations to your calendar without requiring manual acceptance. The invitations will be added to the calendar as tentative.
To enable this feature:
Visit account settings of a specific mail account
Navigate to Calendar settings section
Enable Automatically create tentative appointments in calendar
Nota
With this setting enabled, invitations will still appear in your mail list, but they will be automatically added to your calendar.
Keyboard shortcuts
The Mail app implements several keyboard shortcuts to speed up your experience.
For a full list of the supported shortcuts, check out the Mail settings in your instance.

