Utilizzo dell’app Mail
Nota
L’app Mail è installata di default con Nextcloud Hub, ma può essere disabilitata. Chiedi al tuo amministratore.

Gestire il tuo account di posta
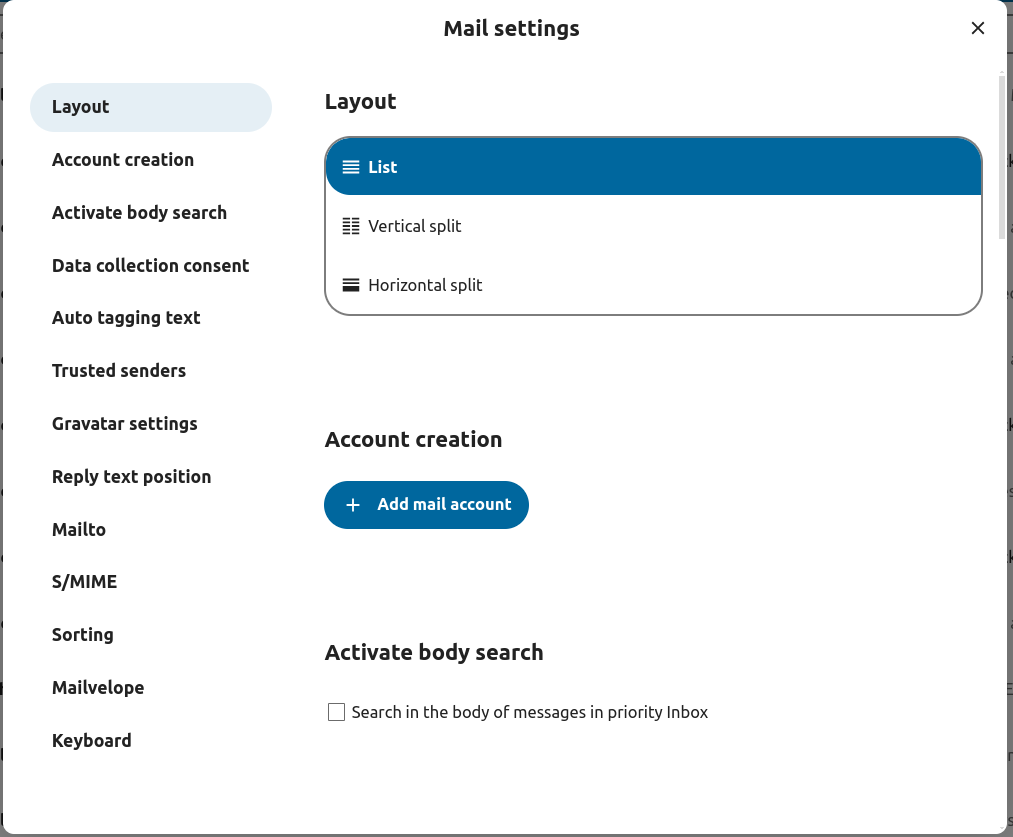
Cambiare layout
Added in version 3.6.
Visita le impostazioni di posta
Scegli tra Elenco, Divisione verticale e Divisione orizzontale
Use Compact Mode
Added in version 5.7.0.
Compact mode offers a cleaner and more efficient way to view your messages. Avatars are hidden, selection checkboxes are always visible, and the preview of messages is removed. It saves space allowing you to see more emails at once.
Visit the mail settings
Go to Appearance
Toggle the Compact Mode

Visualizzazione dei messaggi / Modalità operativa
Added in version 5.2.
Mail consente di passare da una modalità di visualizzazione dei messaggi all’altra: Threaded e Singleton.
In modalità Threaded, i messaggi sono raggruppati per conversazione. Nell’elenco dei messaggi della casella di posta, i messaggi correlati vengono raggruppati in modo da visualizzare solo il messaggio più recente, mentre tutti i messaggi correlati vengono visualizzati nel pannello di visualizzazione dei messaggi dopo aver selezionato il messaggio raggruppato. Questa funzionalità è utile per seguire le discussioni e comprendere il contesto delle risposte. In questa modalità, le operazioni sui messaggi come lo spostamento e l’eliminazione si applicano all’intero thread, il che significa che quando si sposta o si elimina un thread, tutti i messaggi al suo interno vengono modificati.
In modalità Singleton, i messaggi vengono visualizzati singolarmente, sia nell’elenco dei messaggi della casella di posta che nel pannello di visualizzazione dei messaggi, e operazioni come sposta ed elimina si applicano solo al messaggio selezionato. Questa modalità è utile quando si desidera gestire i messaggi separatamente senza influire sull’intera conversazione.
Visita le impostazioni di posta
Scegli tra Threaded, Singleton
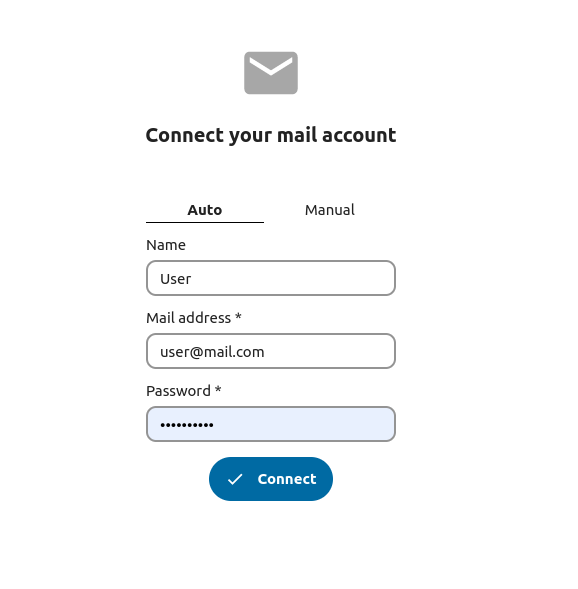
Aggiungi un nuovo account di posta
Abilita l’app di posta dalle app
Fare clic sull’icona della posta nell’intestazione
Compila il modulo di login (automatico o manuale)
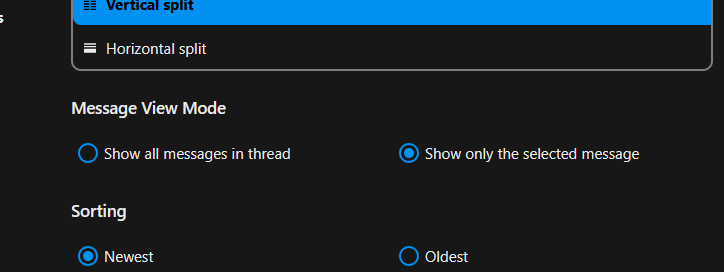
Cambia l’ordine di ordinamento
Added in version 3.5.
Visita le impostazioni di posta
Vai a Ordinamento
Puoi scegliere prima la posta Più vecchia o Più nuova
Nota
Questa modifica verrà applicata a tutti i tuoi account e caselle di posta
Sort favorites up
Added in version 5.7: Nextcloud 31 or newer
This setting allows you to show messages set as favorite in a separate section on top of the message list.
Visita le impostazioni di posta
Go to Appearance
Enable sorting favorites up
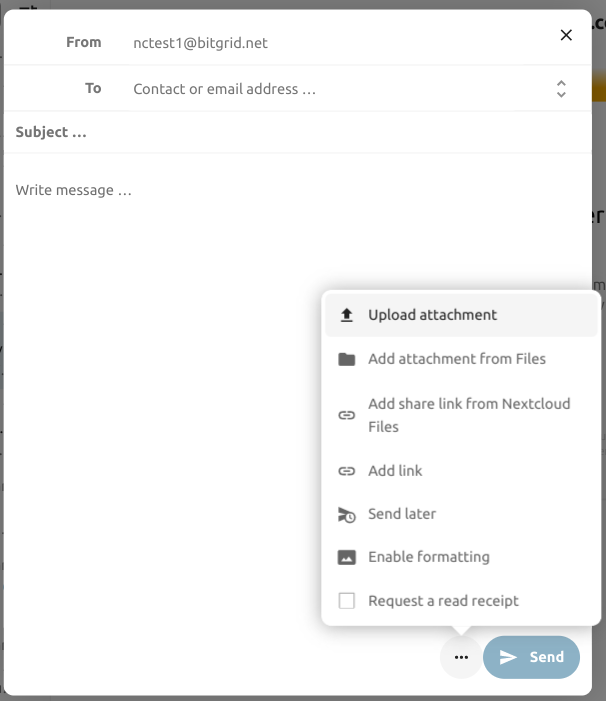
Messaggi programmati
Fai clic sul pulsante Nuovo messaggio in alto a sinistra dello schermo
Fare clic sul menu azione (…) nel compositore modale
Fai clic su Invia più tardi
Posta prioritaria in arrivo
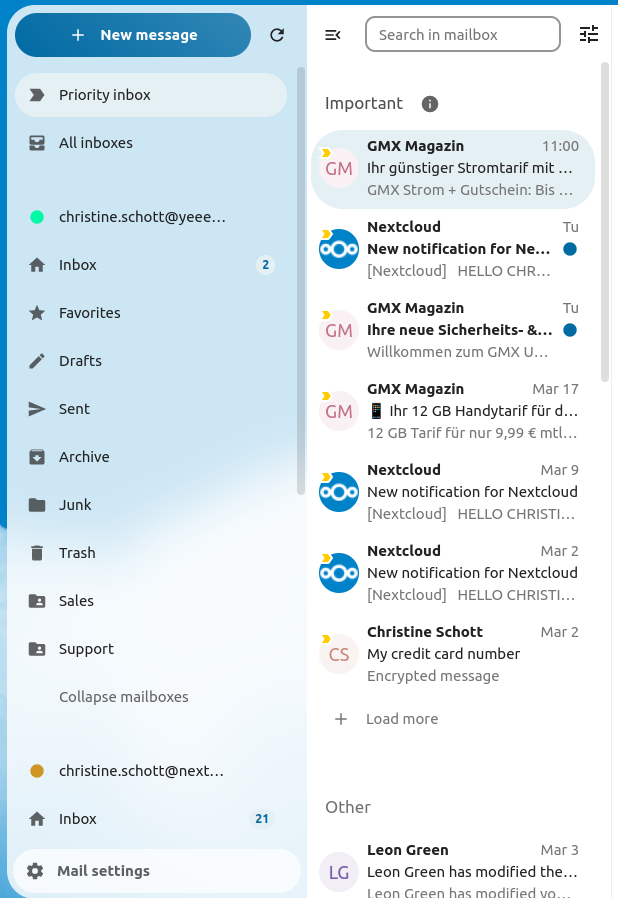
La posta in arrivo prioritaria ha 2 sezioni Importante e Altro. I messaggi verranno automaticamente contrassegnati come importanti in base ai messaggi con cui hai interagito o contrassegnati come importanti. All’inizio potresti dover modificare manualmente l’importanza per insegnare al sistema, ma migliorerà nel tempo.
The automatic classification is optional. You can opt-out when setting up an account. The classification can also be turned on and off in the account settings at any time.
Tutte le caselle di posta
Qui verranno visualizzati in ordine cronologico tutti i messaggi provenienti da tutti gli account con cui hai effettuato l’accesso.
Impostazioni dell’account
Le impostazioni del tuo account, ad esempio:
Alias
Firma
Cartelle predefinite
Risponditore automatico
Mittenti attendibili
..e altro ancora
Si trova nel menu azioni di un account di posta. Lì puoi modificare, aggiungere o rimuovere impostazioni a seconda delle tue esigenze.
Sposta i messaggi nella cartella Posta indesiderata
Added in version 3.4.
Mail può spostare un messaggio in una cartella diversa quando è contrassegnato come posta indesiderata.
Visita Impostazioni account
Vai alle cartelle predefinite
Controllare che sia selezionata una cartella per i messaggi indesiderati
Vai alle impostazioni della posta indesiderata
Fai clic su Sposta i messaggi nella cartella Posta indesiderata

Refresh mailbox
You can manually trigger a sync of your mailbox by clicking the refresh button located at the top of the mailbox list.
Starting from version 5.7 triggering the sync will also refresh the list of folders for the selected account.
Cerca nella casella di posta
Added in version 2.1.
In cima all’elenco delle buste in qualsiasi layout di posta, è presente un collegamento al campo di ricerca per cercare gli oggetti delle email. A partire dalla versione 3.7, questo collegamento consente di cercare per oggetto, destinatario (a) o mittente (da) per impostazione predefinita.
Ricerca avanzata nella casella di posta
Added in version 3.4.
Puoi accedere alla nostra funzione di ricerca avanzata tramite una finestra modale situata alla fine del collegamento di ricerca.
Abilita la ricerca nel corpo della posta
Added in version 3.5.
Ora è possibile effettuare ricerche nei corpi dei messaggi di posta elettronica; questa funzionalità è opzionale a causa di potenziali problemi di prestazioni.
Per abilitarlo:
Visita Impostazioni account
Vai alla ricerca nella casella di posta
Abilita la ricerca nel corpo della posta
Avvertimento
Se vuoi abilitarlo anche per le caselle di posta unificate devi farlo nelle impostazioni di posta
Abilitandola, la casella di ricerca principale cercherà sia nell’oggetto che nel corpo del messaggio e nella ricerca avanzata apparirà un’opzione separata Corpo.
Delega dell’account
L’app consente la delega dell’account, in modo che un utente possa inviare e-mail dall’indirizzo di un altro utente.
La delega deve essere configurata sul server di posta da un amministratore
Aggiungi l’altro indirizzo email come alias per il tuo account email
Quando si invia un’e-mail, selezionare l’alias come mittente
Avvertimento
L’email inviata potrebbe non essere visibile all’account originale se è archiviata nella casella di posta personale Inviata.
Cancellazione automatica del cestino
Added in version 3.4.
L’app Mail può eliminare automaticamente i messaggi nella cartella Cestino dopo un certo numero di giorni.
Visita Impostazioni account
Vai a Eliminazione automatica cestino
Inserisci il numero di giorni dopo i quali i messaggi devono essere eliminati
Disattiva la conservazione del cestino lasciando il campo vuoto o impostandolo su 0.
Nota
Verranno elaborate solo le email eliminate dopo aver abilitato la conservazione nel cestino.

Comporre messaggi
Fai clic su nuovo messaggio in alto a sinistra dello schermo
Inizia a scrivere il tuo messaggio
Minimizzare la modale del compositore
Added in version 3.2.
La finestra di composizione può essere ridotta a icona durante la scrittura di un nuovo messaggio, la modifica di una bozza esistente o la creazione di un messaggio dalla posta in uscita. Basta cliccare sul pulsante di riduzione a icona in alto a destra della finestra o cliccare in qualsiasi punto al di fuori della finestra.

Puoi riprendere la lettura del messaggio ridotto a icona cliccando in un punto qualsiasi dell’indicatore in basso a destra dello schermo.

Per interrompere la modifica di un messaggio, premi il pulsante Chiudi nella finestra modale o l’indicatore nell’angolo in basso a destra. Una bozza verrà salvata automaticamente nella casella di posta delle bozze.
Informazioni sul compositore del destinatario
Added in version 4.2.
Quando aggiungi il tuo primo destinatario o contatto nel campo «A», apparirà un riquadro a destra che mostra i dettagli del profilo salvato di quel contatto. Aggiungendo un secondo contatto, l’elenco si ridurrà, consentendoti di selezionare ed espandere qualsiasi contatto aggiunto per visualizzarne i dettagli. Se preferisci concentrarti esclusivamente sulla scrittura nel compositore, puoi nascondere il riquadro a destra cliccando sull’icona di espansione nell’angolo in alto a destra. Per visualizzare nuovamente il riquadro a destra, è sufficiente cliccare sull’icona di riduzione a icona nella stessa posizione.
Menzionare i contatti
Added in version 4.2.
Puoi menzionare i contatti nel tuo messaggio digitando @ e selezionando il contatto dall’elenco. In questo modo, il contatto verrà automaticamente aggiunto come destinatario.
Nota
Verranno suggeriti solo i contatti con un indirizzo email valido.
Blocchi di testo
Added in version 5.2.
I blocchi di testo sono frammenti di testo predefiniti che possono essere inseriti nelle tue email. Possono essere creati e gestiti nelle impostazioni di posta. Possono essere inseriti nel compositore digitando ! e selezionando il blocco dall’elenco o dalle azioni del compositore. I blocchi di testo possono essere condivisi con utenti e gruppi di utenti.
Posta in uscita
Una volta composto un messaggio e cliccato sul pulsante «Invia», il messaggio viene aggiunto alla posta in uscita, che si trova nell’angolo in basso a sinistra della barra laterale sinistra.
È anche possibile impostare la data e l’ora per l’operazione di invio in un punto futuro (vedere Messaggi pianificati)- il messaggio verrà conservato nella posta in uscita fino alla data e all’ora da te scelte, dopodiché verrà inviato automaticamente.
La posta in uscita è visibile solo quando c’è un messaggio in attesa di essere gestito dalla posta in uscita.
È possibile riaprire il compositore per un messaggio nella posta in uscita in qualsiasi momento prima che venga attivata l’operazione di «invio».
Nota
Quando si verifica un errore durante l’invio, sono possibili tre messaggi di errore:
- Impossibile copiare nella casella di posta «Inviati»
Il messaggio è stato inviato ma non è stato possibile copiarlo nella casella di posta «Inviati». Questo errore verrà gestito dalla posta in uscita e l’operazione di copia verrà ripetuta.
- Errore del server di posta
L’invio non è riuscito e lo stato non consente di ripetere l’operazione (ad esempio: il server SMTP non è raggiungibile). La posta in uscita riproverà a inviare il messaggio.
- Il messaggio non può essere inviato
L’invio potrebbe non essere riuscito. Il server di posta non può comunicarci lo stato del messaggio. Poiché l’app Mail non ha modo di determinarne lo stato (inviato o non inviato), il messaggio rimarrà nella posta in uscita e l’utente dell’account dovrà decidere come procedere.
Azioni della casella di posta
Aggiungi una casella di posta
Aprire il menu azioni di un account
Fare clic su aggiungi casella di posta
Aggiungere una sottocasella di posta
Aprire il menu azioni di una casella di posta
Fare clic su aggiungi sottocasella di posta
Azioni di posta
Crea un evento
Crea un evento per un determinato messaggio/thread direttamente tramite l’app di posta
Apri il menu delle azioni di una posta
Fai clic su Altre azioni
Fai clic su Crea evento
Nota
Se l’amministratore ha abilitato questa funzione, vengono creati per te il titolo dell’evento e un’agenda.
Creare un attività
Added in version 3.2.
Crea un’attività per un determinato messaggio/thread direttamente tramite l’app di posta
Apri il menu delle azioni di una posta
Fai clic su altre azioni
Fai clic su crea attività
Nota
Le attività sono archiviate in calendari supportati. Se non c’è un calendario compatibile, puoi crearne uno nuovo con l’app :rif:`calendar<calendar-app>`.
Riepilogo dell’IA
Added in version 4.2.
Quando controlli la tua casella di posta, vedrai un breve riepilogo delle tue email generato dall’intelligenza artificiale come anteprima.
Nota
Si prega di notare che la funzione deve essere abilitata dall’amministratore
Quick actions
Added in version 5.5: (Nextcloud 30)
Allows you to group action steps that you would normally perform on envelopes such as tagging, moving, marking as read … into quick actions that can be executed with a single click. Quick actions are scoped to one mail account and can be created and managed in the mail settings under «Quick actions» or directly from the envelope action menu.
Nota
Some action steps such as Mark as spam, Move thread and Delete thread are mutually exclusive and cannot be part of the same quick action, they also can’t be re-ordered and will always be executed last.
Nota
Please note that quick actions will be performed on all messages in a thread when executed on one.
Azioni del messaggio
Annullare l’iscrizione a una mailing list
Added in version 3.1.
Alcune mailing list e newsletter consentono di annullare facilmente l’iscrizione. Se l’app Mail rileva messaggi da un mittente del genere, mostrerà un pulsante Annulla iscrizione accanto alle informazioni del mittente. Fai clic e conferma per annullare l’iscrizione alla lista.
Posticipare
Added in version 3.4.
Quando si posticipa un messaggio o una discussione, questa viene spostata in una casella di posta dedicata finché non viene raggiunta la data di posticipo selezionata, dopodiché il messaggio o la discussione viene spostata nuovamente nella casella di posta originale.
Apri il menu delle azioni di una posta o di un thread
Fai clic su Posponi
Seleziona per quanto tempo il messaggio o il thread devono essere posticipati
Risposte intelligenti
Added in version 3.6.
Quando apri un messaggio nell’app Mail, vengono proposte risposte generate dall’intelligenza artificiale. Basta cliccare su una risposta suggerita e il compositore apre il messaggio con la risposta precompilata.
Nota
Si prega di notare che la funzione deve essere abilitata dall’amministratore
Nota
Le lingue supportate dipendono dal modello linguistico di grandi dimensioni utilizzato
Traduzione della posta
Added in version 4.2.
Puoi tradurre i messaggi nelle lingue da te configurate in modo simile a Talk.
Nota
Si prega di notare che le funzionalità di traduzione devono essere abilitate sul server
Nota
Dalla versione 5.3, se LLM è abilitato dall’amministratore, verranno suggerite le traduzioni
Riepilogo del thread
L’app di posta supporta il riepilogo di thread di messaggi contenenti 3 o più messaggi.
Added in version 3.4.
Nota
Si prega di notare che la funzione deve essere abilitata dall’amministratore
Nota
Si prega di notare che questa funzionalità funziona bene solo con integration_openai. Gli LLM locali impiegano troppo tempo per rispondere e la richiesta di riepilogo rischia di scadere, creando comunque un carico di sistema significativo.
Filtraggio e risposta automatica
L’app Mail ha un editor per gli script Sieve, un’interfaccia per configurare i risponditori automatici e un’interfaccia per configurare i filtri. Sieve deve essere abilitato nelle impostazioni dell’account..
Risponditori automatici
Added in version 3.5: Il risponditore automatico può seguire le impostazioni di sistema.
Il risponditore automatico è disattivato per impostazione predefinita. Può essere impostato manualmente o seguendo le impostazioni di sistema. Seguire le impostazioni di sistema significa che il messaggio di assenza prolungata inserito nella sezione :ref:`Impostazioni assenza <groupware-absence>`viene applicato automaticamente.
FIltro
Added in version 4.1.
Mail 4.1 include un semplice editor per configurare le regole di filtro.
Nota
L’importazione di filtri esistenti non è supportata. Tuttavia, tutti i filtri esistenti rimarranno attivi e invariati. Per precauzione, consigliamo di eseguire il backup dello script corrente tramite l’editor di script Sieve.
Come aggiungere un nuovo filtro
Apri le impostazioni del tuo account.
Verifica che Sieve sia abilitato per il tuo account (vedi Impostazioni del server Sieve).
Fare clic su filtri.
Selezionare nuovo filtro per creare una nuova regola.
Come eliminare un filtro
Apri le impostazioni del tuo account.
Assicurati che Sieve sia abilitato per il tuo account (vedi Impostazioni del server Sieve).
Fare clic su filtri.
Passa il mouse sul filtro che desideri eliminare, quindi fai clic sull’icona del cestino.
Condizioni
Le condizioni vengono applicate alle email in arrivo sul tuo server di posta, prendendo di mira campi come Oggetto, Mittente e Destinatario. Puoi utilizzare i seguenti operatori per definire le condizioni per questi campi:
è esattamente: una corrispondenza esatta. Il campo deve essere identico al valore fornito.
contiene: una corrispondenza di sottostringa. Il campo corrisponde se il valore fornito è contenuto al suo interno. Ad esempio, «report» corrisponde a «port».
corrispondenze: una corrispondenza di tipo utilizzando i caratteri jolly. Il simbolo «*» rappresenta un numero qualsiasi di caratteri (anche nessuno), mentre «?» rappresenta esattamente un carattere. Ad esempio, «report» corrisponderebbe a «Business report 2024».
Azioni
Le azioni vengono attivate quando i test specificati sono veri. Sono disponibili le seguenti azioni:
fileinto: sposta il messaggio in una cartella specificata.
addflag: Aggiunge un flag al messaggio.
stop: Interrompe l’esecuzione dello script di filtro. Dopo questa azione, non verranno elaborati altri filtri.
Crea un filtro da un messaggio
Added in version 5.2.
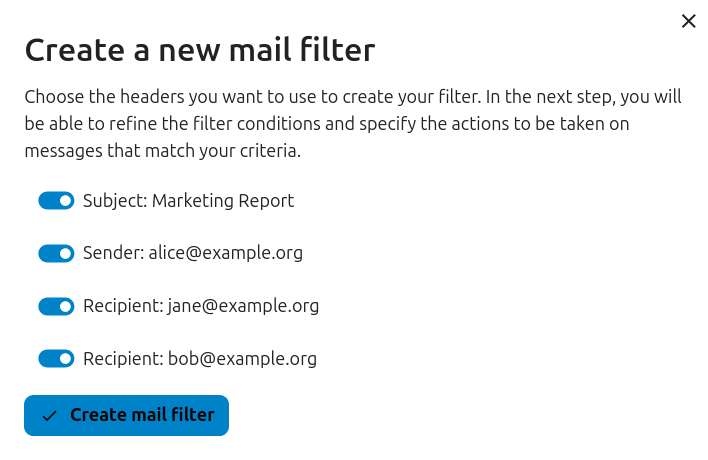
Per creare un filtro da un determinato messaggio, apri il messaggio e apri il menu cliccando sui tre puntini. Quindi, clicca su «Altre azioni» e poi su «Crea filtro email».
Nella finestra di dialogo, seleziona le condizioni per far corrispondere i messaggi in arrivo e continua cliccando su «Crea filtro posta».
Promemoria di follow-up
Added in version 4.0.
L’app Mail ti ricorderà automaticamente quando un’email in uscita non ha ricevuto risposta. Ogni email inviata verrà analizzata da un’intelligenza artificiale per verificare se è prevista una risposta. Dopo quattro giorni, tutte le email pertinenti verranno visualizzate nella tua casella di posta prioritaria.
Cliccando su un’email di questo tipo, verrà visualizzato un pulsante per contattare rapidamente tutti i destinatari. È anche possibile disattivare i promemoria di follow-up per un’email inviata.
Nota
Si prega di notare che la funzionalità deve essere abilitata dall’amministratore.
Sicurezza
Rilevamento del phishing
Added in version 4.0.
L’app Mail verificherà la presenza di potenziali tentativi di phishing e visualizzerà un avviso all’utente.
I controlli sono i seguenti:
L’indirizzo del mittente salvato nella rubrica non è lo stesso di quello presente nell’account di posta
Il mittente utilizza un indirizzo email personalizzato che non corrisponde all’indirizzo del mittente
La data di invio è impostata nel futuro
I link nel corpo del messaggio non puntano al testo visualizzato
L’indirizzo di risposta non è lo stesso dell’indirizzo del mittente
Nota
Tieni presente che l’avviso non significa che il messaggio sia un tentativo di phishing. Significa solo che l’app Mail ha rilevato un potenziale tentativo di phishing.
Indirizzi interni
Added in version 4.0.
L’app Mail consente di aggiungere indirizzi e domini interni e avvisa l’utente se l’indirizzo non è presente nell’elenco, al momento dell’invio e della ricezione di un messaggio.
Per aggiungere un indirizzo interno:
Apri le impostazioni della posta
Vai alla sezione Privacy e sicurezza
Abilita gli indirizzi interni cliccando sulla casella di controllo
Fare clic sul pulsante Aggiungi indirizzo interno
Inserisci l’indirizzo o il dominio e fai clic su Aggiungi
Integrazione della dashboard
Added in version 1.8.
L’app di posta offre due widget progettati per l’integrazione con la dashboard di Nextcloud:
Email non lette: questo widget mostra le email non lette.
Email importanti: questo widget mostra le email contrassegnate come importanti.
Questi widget utilizzano le email degli account email configurati per il tuo account.
Calendar integration
The Mail app integrates with the Calendar app to help you manage meeting invitations and keep your calendar up to date.
Meeting invitations
When you receive a message containing a meeting invitation, the Mail app automatically detects the attached calendar file and displays a formatted action section to help you respond.
You can:
Accept the invitation
Decline the invitation
Tentatively accept the invitation
Your response is sent directly from the Mail app, and the event is added to your primary calendar accordingly.
You can also manually add a meeting invitation to a specific calendar:
Open the message with the meeting invitation
Scroll to the bottom of the message to the attachments section
Select the calendar file (usually with a .ics extension), then click the three dots menu.
Click «Import in to calendar» and choose the desired calendar.
Meeting invitation automation
When a meeting organizer sends updates to an existing event (such as time changes or location updates), the Mail app processes these automatically and updates the corresponding event in your calendar.
Added in version 5.7: (Nextcloud 32 or newer)
You can also configure Mail to automatically add all new meeting invitations to your calendar without requiring manual acceptance. The invitations will be added to the calendar as tentative.
To enable this feature:
Visit account settings of a specific mail account
Navigate to Calendar settings section
Enable Automatically create tentative appointments in calendar
Nota
With this setting enabled, invitations will still appear in your mail list, but they will be automatically added to your calendar.
Keyboard shortcuts
The Mail app implements several keyboard shortcuts to speed up your experience.
For a full list of the supported shortcuts, check out the Mail settings in your instance.

