Používání aplikace E-mail
Poznámka
Aplikace E-mail je nainstalovaná jako součást Nextcloud Hub už ve výchozím stavu, ale může být vypnutá. Požádejte o ní případně správce vámi využívané instance.

Správa vašeho e-mailového účtu
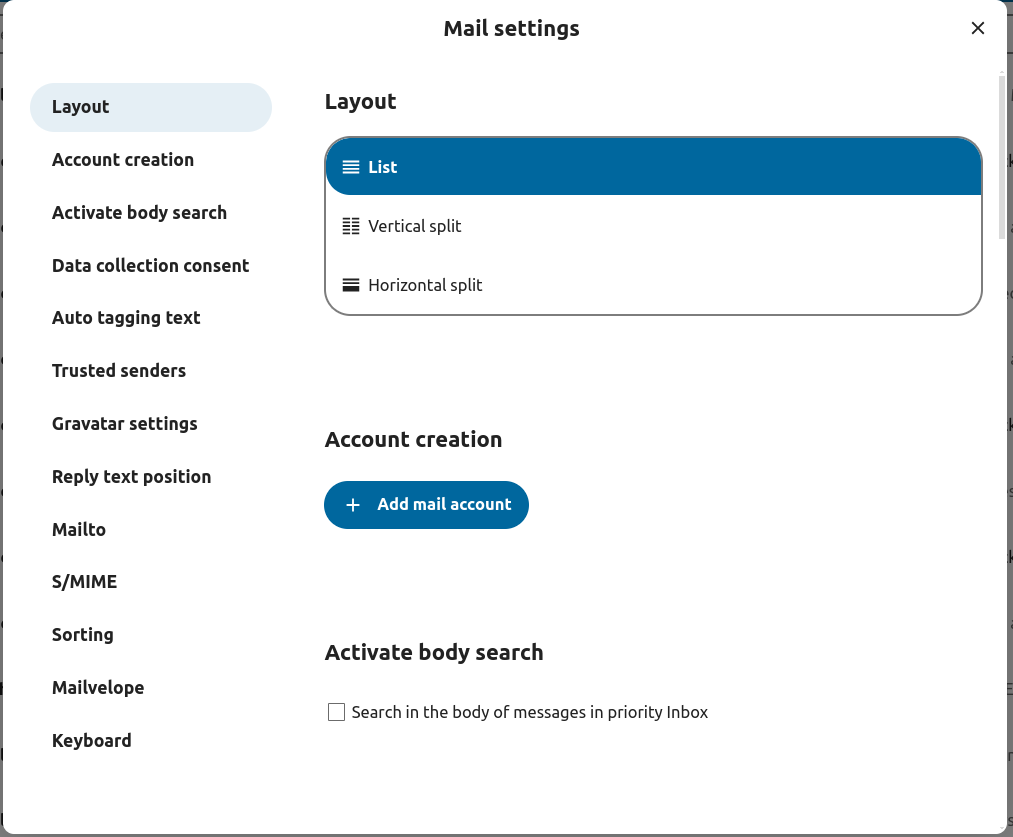
Přepnout rozvržení
Added in version 3.6.
Přejděte do nastavení e-mailu
Zvolte mezi Seznam, Svislé rozdělení a Vodorovné rozdělení
Režim zobrazení / operací se zprávami
Added in version 5.2.
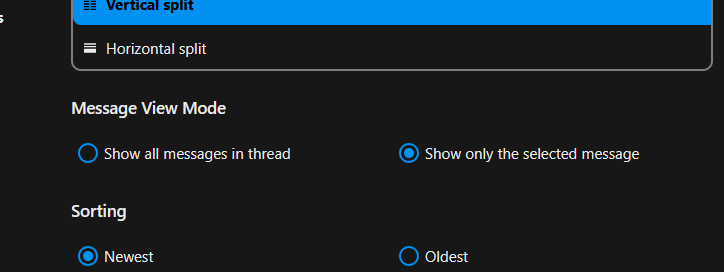
Aplikace E-mail má schopnost přepínat mezi dvěma různými režimy zobrazování a operací se zprávami: Ve vláknech a Samostatně.
V režimu Ve vláknech jsou zprávy seskupovány podle konverzací. V seznamu zpráv ve schránce jsou související zprávy naskládány na sebe tak, že jsou zobrazeny pouze ty nejnovější a veškeré související zprávy jsou zobrazovány v panelu zobrazení zprávy (po vybrání naskládané zprávy). To se hodí pro následování diskuzí a porozumění kontextu odpovědí. V tomto režimu jsou operace se zprávou (jako je přesunutí a smazání) uplatňovány na celé vlákno, což znamená, že když přesunete nebo smažete vlákno, bude se to týkat všech zpráv v rámci vlákna.
V režimu Samostatně jsou zprávy zobrazovány jednotlivě, jak v seznamu zpráv ve schránce a panelu zobrazení zprávy a operace jako přesunutí či smazání se budou týkat pouze označené zprávy. Tento režim je užitečný pokud chcete spravovat zprávy odděleně bez toho, aby to postihlo celou konverzaci.
Přejděte do nastavení e-mailu
Zvolte mezi Ve vláknech a Samostatné
Přidání nového e-mailového účtu
Povolte aplikaci E-mail v Aplikacích
Klikněte na ikonu e-mailu v záhlaví
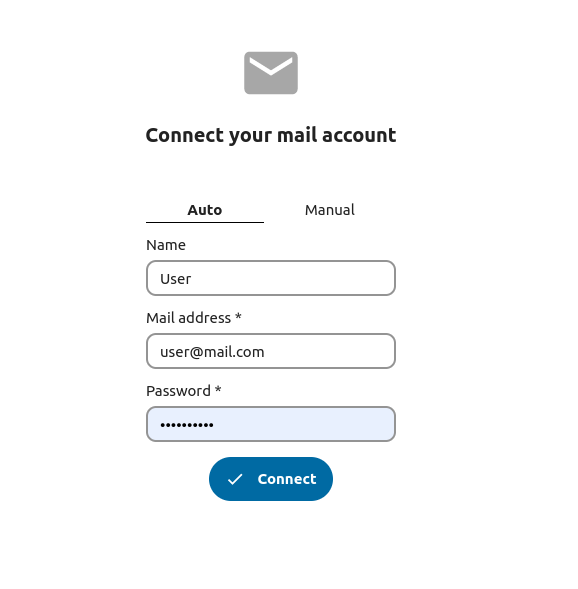
Vyplňte přihlašovací formulář (automaticky nebo ručně)
Změna pořadí řazení
Added in version 3.5.
Přejděte do nastavení e-mailu
Jděte do Řazení
Je možné zvolit od Nejstarších nebo Nejnovějších
Poznámka
Tato změna bude uplatněna napříč vašimi účty a schránkami
Sort favorites up
Added in version 5.7: Nextcloud 31 or newer
This setting allows you to show messages set as favorite in a separate section on top of the message list.
Přejděte do nastavení e-mailu
Go to Appearance
Enable sorting favorites up
Naplánované zprávy
Klikněte na tlačítko nové zprávy v levé horní části obrazovky
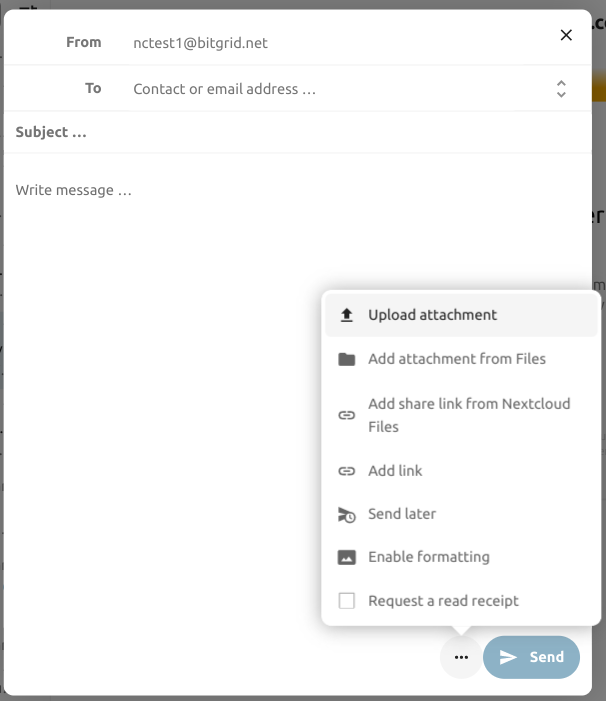
Klikněte na nabídku akcí (…) v dialogu editoru zprávy
Klikněte na odeslat později
Schránka pro přednostní zprávy
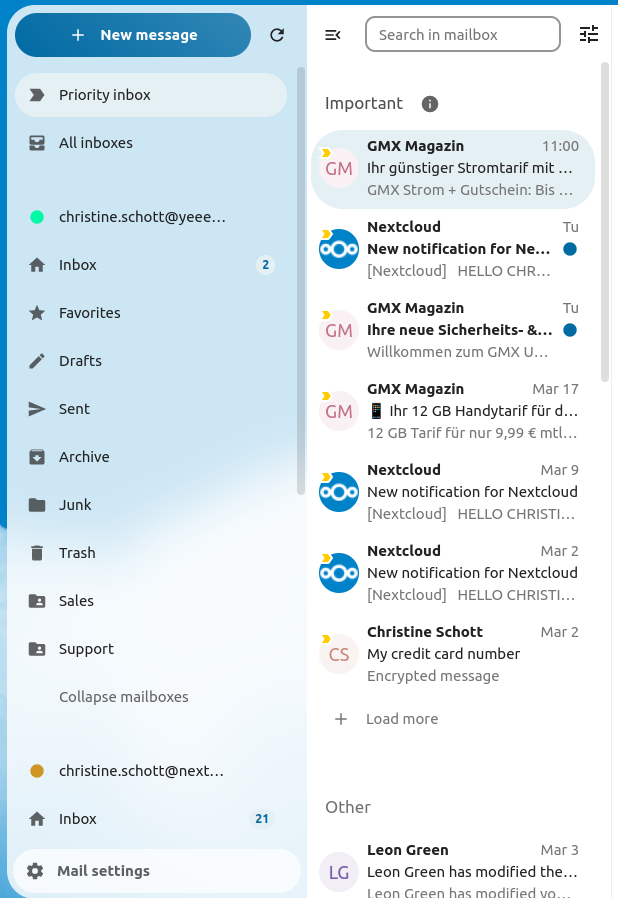
Přednostní schránka má dvě sekce: Důležité a Ostatní. Zprávy budou automaticky označovány jako důležité na základě toho, s jakými zprávami jste pracovali nebo je označili jako důležité. Zpočátku může být třeba důležitost měnit ručně a systém tak naučit, ale časem se tím vylepší.
The automatic classification is optional. You can opt-out when setting up an account. The classification can also be turned on and off in the account settings at any time.
Všechny schránky
Veškeré zprávy ze všech účtů, ke kterým jste přihlášení, zde budou chronologicky zobrazeny
Nastavení účtu
Nastavení vašeho účtu, jako:
Alternativní názvy
Podpis
Výchozí složky
Automatické odpovědi
Důvěryhodní odesilatelé
…a další
Je k dispozici v nabídce akcí u e-mailového účtu. Zde je možné upravovat, přidávat nebo odebírat nastavení, v závislosti na vašich potřebách.
Přesunutí zpráv do složky Nevyžádané
Added in version 3.4.
Když je označená jako nevyžádaná, aplikace E-mail jí umí přesunout do jiné složky.
Navštivte nastavení účtu
Jděte na Výchozí složky
Zkontrolujte že je vybrána složka pro nevyžádané zprávy
Jděte do nastavení pro nevyžádané
Klikněte na Přesunout zprávy do složky Nevyžádané

Refresh mailbox
You can manually trigger a sync of your mailbox by clicking the refresh button located at the top of the mailbox list.
Starting from version 5.7 triggering the sync will also refresh the list of folders for the selected account.
Hledat ve e-mailové schránce
Added in version 2.1.
Na začátku seznamu obálek v libovolném rozvržení e-mailu, se zkratka na kolonku pro vyhledávání v předmětech e-mailů. Od verze 3.7 tento zástupce umožňuje vyhledávat v předmětu, příjemci či odesilateli a to ve výchozím stavu.
Pokročilé vyhledávání ve schránce
Added in version 3.4.
K funkci pokročilého vyhledávání se dostanete prostřednictvím dialogu nacházejícího se na konci zástupce pro vyhledávání.
Zapněte hledání v těle e-mailu
Added in version 3.5.
Nyní je možné vyhledávat i v tělech e-mailů, ale tuto funkci je třeba si výslovně zapnout, protože může způsobovat problémy s výkonem.
Pro zapnutí:
Navštivte nastavení účtu
Přejděte do hledání ve schránce
Zapněte hledání v těle e-mailu
Varování
Pokud to chcete zapnout také pro sjednocené schránky, je třeba tak učinit v nastaveních E-mailu
Zapnutím bude hlavní vyhledávací kolonka nyní hledat jak v předmětech, tak v tělech e-mailů a v pokročilém vyhledávání se zobrazí zvlášť volba Tělo.
Delegování účtu
Tato aplikace umožňuje delegování účtů, takže uživatel může posílat e-maily z adresy jiného.
Je třeba, aby delegování bylo nastavené správcem na e-mailovém serveru
Přidejte jinou e-mailovou adresu jako alternativní název pro váš vlastní e-mailový účet
Při odesílání e-mailu vyberte alternativní název coby odesilatele
Varování
Pokud je uložen ve ve složce Odeslané vaší osobní schránky, může se stát, že odeslaný e-mail nebude vidět v původním účtu.
Automatické mazání koše
Added in version 3.4.
Aplikace E-mail může automaticky mazat zprávy ve složce Koš po uplynutí určitého počtu dnů.
Navštivte nastavení účtu
Jděte do Automatického mazání Koše
Zadejte počet dnů po jejichž uplynutí mají být zprávy smazány
Lhůtu ponechávání v Koši je možné vypnout nevyplněním kolonky nebo jejím nastavením na hodnotu 0 (nula).
Poznámka
Takto zpracovány budou pouze e-maily smazané až po zapnutí lhůty ponechávání v Koši.

Napsání zprávy
Klikněte na novou zprávu v levé horní části obrazovky
Začněte psát svou zprávu
Minimalizace dialogu editoru zprávy
Added in version 3.2.
Dialogové okno s editorem zpráv je možné minimalizovat v průběhu psaní nové zprávy, upravování existujícího konceptu nebo upravování zprávy z odeslaných. Stačí kliknout na tlačítko minimalizace vpravo nahoře dialogu nebo kliknout kamkoli mimo dialog.

K minimalizované z právě se vrátíte kliknutím kamkoli na indikátor ve spodní části obrazovky.

Kliknutím na tlačítko zavřít v dialogu nebo na indikátoru v pravém dolním rohu ukončí upravování zprávy. Koncept bude automaticky uložen do schránky s koncepty.
Informace o příjemci na editoru
Added in version 4.2.
Při přidávání prvního příjemce nebo kontaktu do kolonky „Pro“, zobrazí se vpravo podokno zobrazující podrobnosti o uloženém profilu takového kontaktu. Přidání druhého kontaktu tento seznam sbalí, a umožňuje vybrat a rozbalit jakýkoli kontakt, který jste přidali a zobrazit tak podrobnosti o něm. Pokud upřednostňujete zaměřit se čistě na psaní e-mailu, je možné podokno vpravo skrýt kliknutím na ikonu rozbalování v pravém horním rohu. Pro jeho opětovné zobrazení stačí kliknout na ikonu minimalizace ve stejném umístění.
Zmínění kontaktů
Added in version 4.2.
Ve zprávě je možné zmiňovat kontakty a to zadáním @ (zavináč) a poté výběrem kontaktu ze seznamu. Tím bude kontakt automaticky přidán coby příjemce.
Poznámka
Navrhovány budou pouze ty kontakty, které mají uvedenou platnou e-mailovou adresu.
Textové bloky
Added in version 5.2.
Textové bloky jsou předpřipravené úryvky textu, které můžete vložit do svého e-mailu. Je možné je vytvářet a spravovat v nastavení e-mailů. Do editoru je možné je vkládat napsáním ! a poté vybráním bloku ze seznamu nebo z akcí editoru. Textové bloky je možné sdílet s uživateli a skupinami uživatelů.
Odchozí pošta
Pokud byla zpráva napsána a kliknuto na tlačítko „Odeslat“, bude zpráva přidána do složky Odeslané, která se nachází v levém dolním rohu postranního panelu vlevo.
Je také možné nastavit datum a čas pro operaci odeslání na okamžik v budoucnosti (viz Naplánované zprávy) – zpráva bude ponechána v poště k odeslání až do okamžiku vámi zvoleného data a času, poté bude automaticky odeslána.
Složka „K odeslání“ se zobrazí je tehdy, pokud existuje nějaká zpráva, jejíž odeslání ještě nebylo dokončeno.
Dokud není spuštěna operace „odeslat“, je možné kdykoli znovu otevřít editor zprávy ve složce „K odeslání“.
Poznámka
Pokud se při odesílání vyskytne chyba, objeví se jedno ze tří možných chybových hlášení:
- Nebylo možné zkopírovat do schránky „Odeslané“
E-mail byl odeslán ale nebylo možné ho zkopírovat do složky „Odeslané“. Tato chyba bude obsloužena složkou pro odchozí poštu a bude proveden opětovný pokus o zkopírování.
- Chyba e-mailového serveru
Odesílání nebylo úspěšné, přičemž skončilo ve stavu, kdy není možný opakovat pokus (např. SMTP server není dosažitelný). Složka odchozí pošty se pokusí zprávu znovu odeslat později.
- Zprávu nebylo možné odeslat
Odesílání se mohlo (ale také nemuselo) nezdařit. E-mailový server nesdělil stav zprávy. Protože aplikace E-mail nemá žádný způsob, jak zjistit stav zprávy (odeslané nebo neodeslané), zpráva zůstane ve složce k odeslání a uživatel účtu rozhodne, jak pokračovat.
Akce ohledně e-mailové schránky
Přidání schránky
Otevřete nabídku akcí ohledně účtu
Klikněte na přidání schránky
Přidání dílčí schránky
Otevřete nabídku akcí ohledně schránky
Klikněte na dílčí schránku
Akce ohledně obálky
Vytvoření události
Vytvořte událost pro určitou zprávu/vlákno přímo prostřednictvím aplikace E-mail
Otevřete nabídku akcí ohledně obálky
Klikněte na Další akce
Klikněte na Vytvořit událost
Poznámka
Pokud tuto funkci správce zapnul, bude vytvořen název události a její program.
Vytvoření úkolu
Added in version 3.2.
Vytvořte úkol pro určitou zprávu/vlákno přímo prostřednictvím aplikace E-mail
Otevřete nabídku akcí ohledně obálky
Klikněte na další akce
Klikněte na vytvořit úkol
Poznámka
Úkoly jsou ukládány v podporovaných kalendářích. Pokud takový není k dispozici, je možné si takový vytvořit v aplikaci Kalendář.
AI shrnutí
Added in version 4.2.
Při prohlížení své schránky uvidíte coby náhled krátké shrnutí (vytvoření AI) svých e-mailů.
Poznámka
Mějte na paměti, že je třeba, aby funkci zapnul správce
Quick actions
Added in version 5.5: (Nextcloud 30)
Allows you to group action steps that you would normally perform on envelopes such as tagging, moving, marking as read … into quick actions that can be executed with a single click. Quick actions are scoped to one mail account and can be created and managed in the mail settings under „Quick actions“ or directly from the envelope action menu.
Poznámka
Some action steps such as Mark as spam, Move thread and Delete thread are mutually exclusive and cannot be part of the same quick action, they also can’t be re-ordered and will always be executed last.
Poznámka
Please note that quick actions will be performed on all messages in a thread when executed on one.
Akce ohledně zprávy
Odhlášení se z odběru e-mailové konference
Added in version 3.1.
Některé e-mailové konference a zpravodaje umožňují snadné zrušení odběru. Pokud aplikace E-mail zjistí zprávy od takového odesilatele, zobrazí tlačítko Zrušit odebírání vedle údaje o odesilateli. Pokud chcete přestat odebírat, klikněte a potvrďte.
Odložit
Added in version 3.4.
Odkládání zprávy či vlákna ho přesune do k tomu určené složky po dobu délky odkladu a zpráva nebo vlákno pak po jejím uplynutí bude přesunuta do původní složky.
Otevřete nabídku akcí obálky nebo vlákna
Klikněte na Odložit
Vyberte na jak dlouho má být zpráva nebo vlákno odloženo
Chytré odpovědi
Added in version 3.6.
Při otevření zprávy v aplikaci E-mail, tato navrhuje odpovědi, vytvořené AI. Stačí kliknout na navrhovanou odpověď a otevře se editor, ve které je předvyplněná.
Poznámka
Mějte na paměti, že je třeba, aby funkci zapnul správce
Poznámka
Jaké jazyky jsou podporovány závisí na použitém LLM modelu
Překládání e-mailů
Added in version 4.2.
Máte možnost nechat si překládat zprávy do vámi nastaveného jazyka podobně, jako v Talk.
Poznámka
Mějte na paměti, že je třeba, aby funkce pro překládání byly zapnuté na serveru
Poznámka
Od verze 5.3, pokud je LLM zapnuté správcem, budou navrhovány aktualizace
Shrnutí vlákna
Aplikace E-mail podporuje vytváření shrnutí vláken zpráv, které obsahují tři a více zpráv.
Added in version 3.4.
Poznámka
Mějte na paměti, že je třeba, aby funkci zapnul správce
Poznámka
Mějte na paměti, že tato funkce pracuje dobře pouze s integration_openai. Místně provozovaným LLM typicky trvá odpověď příliš dlouho a pro požadavek na shrnutí nejspíš bude překročen časový limit, přičemž i tak vytvoří významnou zátěž pro systém.
Filtrování a automatické odpovídání
Aplikace E-mail má editor pro Sieve skripty – rozhraní pro nastavování automatického odpovídání a filtrů. Sieve je třeba zapnout v nastavení účtu.
Automatické odpovědi
Added in version 3.5: Automatické odpovědi se mohou řídit nastaveními systému.
Ve výchozím stavu je automatické odpovídání vypnuté. Je možné ho ručně zapnout, nebo se řídit nastaveními systému. Následující nastavení systému znamenají, že zpráva o dlouhodobé nepřítomnosti zadaná do Sekce nastavení nepřítomnosti je uplatněna automaticky.
Filtr
Added in version 4.1.
E-mail 4.1 obsahuje jednoduchý editor pro nastavování pravidel filtru.
Poznámka
Import existujících filtrů není podporován. Nicméně, veškeré existující filtry zůstanou aktivní a nezměněné. Pro jistotu doporučujeme zazálohovat si své stávající skripty zazálohovat pomocí editoru Sieve skriptů.
Jak přidat nový filtr
Otevřete nastavení svého účtu.
Ověřte, že je pro váš účet Sieve zapnuté (viz nastavení pro Sieve server).
Klikněte na Filtry.
Nové pravidlo vytvoříte vybráním Nový filtr.
Jak smazat filtr
Otevřete nastavení svého účtu.
Ověřte, že je pro váš účet Sieve zapnuté (viz nastavení pro Sieve server).
Klikněte na Filtry.
Najeďte ukazatelem na filtr, který si přejete smazat, poté klikněte na ikonu koše.
Podmínky
Podmínky jsou uplatňovány na příchozí e-maily na vámi využívaném e-mailovém serveru, cílící na kolonky jako např. Předmět, Odesilatel a Příjemce. Podmínky pro tyto kolonky je možné definovat následujícími operátory:
je přesně. Přesná shoda. Je třeba, aby kolonka byla identická se zadanou hodnotou.
obsahuje: Shoda s částí řetězce. Kolonka odpovídá pokud je v ní zadaná hodnota obsažená. Například, „výkaznictví“ by odpovídalo „kazn“.
shoduje se: Shoda se vzorem pomocí zástupných znaků. Symbol „*“ představuje libovolný počet znaků (včetně žádného), zatímco „?“ představuje právě jeden znak. Například „vykaz“ by odpovídal „Vykazy_podnikani_2024“.
Akce
Akce jsou spouštěny když pozitivně vyjdou určené testy. K dispozici jsou následující akce:
fileinto:Přesune zprávu do určené složky.
addflag: Přidá zprávě příznak.
stop. Zastaví vykonávání filtrovacího skriptu. Po této sekci nebudou zpracovávány žádné další filtry.
Vytvoření filtru ze zprávy
Added in version 5.2.
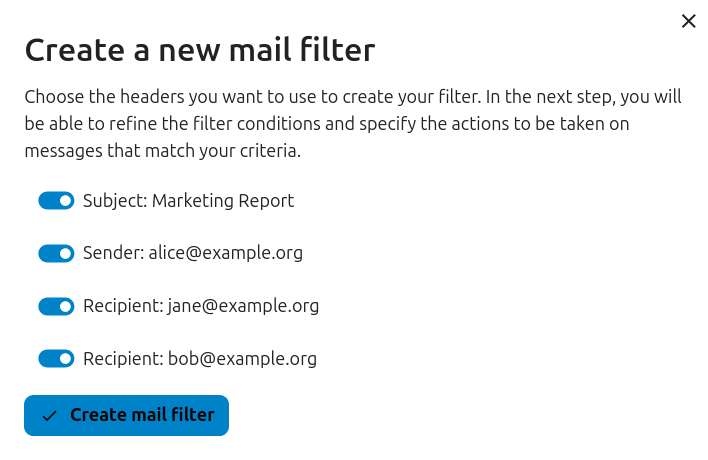
Pokud chcete z dané zprávy vytvořit filtr, otevřete ji a poté otevřete nabídku kliknutím na tři tečky. Dále klikněte na „Další akce“ a poté „Vytvořit filtr e-mailů“.
V dialogu vyberte podmínky pro hledání shody s příchozími zprávami a pokračujte kliknutím na „Vytvořit filtr e-mailů“.
Připomínky následných kroků
Added in version 4.0.
Aplikace E-mail vám automaticky připomene, když na odchozí e-mail nepřijde žádná odpověď. Každý odeslaný e-mail bude zanalyzován AI a zjištěno tak tak zda je očekávána odpověď. Po čtyřech dnech se všechny relevantní e-maily zobrazí v prioritní schránce.
Při kliknutí na takový e-mail se zobrazí tlačítko pro rychlé návazné kroky se všemi příjemci. Je také možné vypnout připomínky návazných kroků pro odeslaný e-mail.
Poznámka
Mějte na paměti, že je třeba, aby funkci zapnul správce.
Zabezpečení
Detekce rhybaření
Added in version 4.0.
Aplikace E-mail zkontroluje případné pokusy oklamat vás podvodnými e-maily a zobrazí uživateli varování.
Kontroly jsou následující:
Adresa odesilatele uložená v adresáři kontaktů se neshoduje s tou v e-mailovém účtu
Odesilatel používá vlastní e-mailovou adresu, která neodpovídá adrese „Od“
Datum, kdy mělo být odesláno, je nastaveno do budoucnosti
Odkazy v těle zprávy neodkazují na zobrazený text
Adresa „komu odpovědět“ není stejná jako adresa odesilatele
Poznámka
Mějte na paměti, že varování neznamená, že je zpráva pokusem o podvod. Pouze znamená, že aplikace E-mail zjistila potenciální pokus o něj.
Interní adresy
Added in version 4.0.
Aplikace E-mail umožňuje přidávat interní adresy a domény a při odesílání a příjmu zprávy varuje uživatele, pokud se adresa nenachází na seznamu.
Pro přidání interní adresy:
Otevřete nastavení e-mailu
Přejděte do sekce Soukromí a zabezpečení
Zapněte interní adresy kliknutím na zašktrtávátko
Klikněte na tlačítko Přidat interní adresu
Zadejte adresu nebo doménu a klikněte na Přidat
Napojení na nástěnku
Added in version 1.8.
Aplikace e-mail nabízí dva ovládací prvky navržené pro napojení na Nextcloud nástěnku:
Nepřečtené e-maily: Ovládací prvek zobrazující nepřečtené e-maily.
Důležité e-maily: Tento ovládací prvek zobrazuje e-maily které byly označené jako důležité.
Tyto ovládací prvky využívají e-maily z e-mailových účtů, které jsou nastavené pro váš účet.
Calendar integration
The Mail app integrates with the Calendar app to help you manage meeting invitations and keep your calendar up to date.
Meeting invitations
When you receive a message containing a meeting invitation, the Mail app automatically detects the attached calendar file and displays a formatted action section to help you respond.
You can:
Accept the invitation
Decline the invitation
Tentatively accept the invitation
Your response is sent directly from the Mail app, and the event is added to your primary calendar accordingly.
You can also manually add a meeting invitation to a specific calendar:
Open the message with the meeting invitation
Scroll to the bottom of the message to the attachments section
Select the calendar file (usually with a .ics extension), then click the three dots menu.
Click „Import in to calendar“ and choose the desired calendar.
Meeting invitation automation
When a meeting organizer sends updates to an existing event (such as time changes or location updates), the Mail app processes these automatically and updates the corresponding event in your calendar.
Added in version 5.7: (Nextcloud 32 or newer)
You can also configure Mail to automatically add all new meeting invitations to your calendar without requiring manual acceptance. The invitations will be added to the calendar as tentative.
To enable this feature:
Visit account settings of a specific mail account
Navigate to Calendar settings section
Enable Automatically create tentative appointments in calendar
Poznámka
With this setting enabled, invitations will still appear in your mail list, but they will be automatically added to your calendar.
Keyboard shortcuts
The Mail app implements several keyboard shortcuts to speed up your experience.
For a full list of the supported shortcuts, check out the Mail settings in your instance.

